
 3. Once you have selected the “style” a new screen will pop up. This is where you will type your journaling and select your font and font size. I’ve used the default font and font size.
 4. Click OK and the journaling will be placed in your document and looks like this:
 5. In the WordArt Styles section there is an “A” with a drop down box on the right. Click on the down arrow and you will get a selection of styles to chose from. Click on the circle and then grab a corner of the box and drag out your circle. (You may have to play with this part in order to get a true circle) It helps if you have your rulers turned on so that you can see the size of the circle as you stretch out the circle.
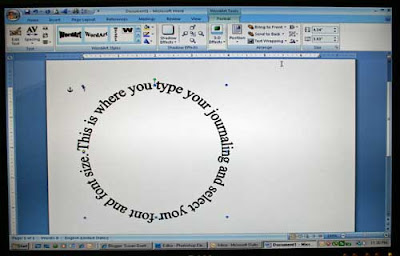
 6. This is what it will look like when you've selected the circle: Then grab the lower right corner box of the journaling frame and drag it out into a circle.

 7. This is your completed “circle journaling” :
 8. On this same Word Art format screen, click on: text wrapping - behind text. You’ll notice the little “anchor” on the upper left.

 9. Once you have selected the “behind text” and have the little anchor in the upper left corner, those of you who are a little more industrious can add a second circle of journaling inside or outside this one. Here’s all you do.
10. Go back to step 2 and begin again. You will follow all of the same steps. Once you select behind text again, you can move the new circle inside/or outside the first circle.
9. Once you have selected the “behind text” and have the little anchor in the upper left corner, those of you who are a little more industrious can add a second circle of journaling inside or outside this one. Here’s all you do.
10. Go back to step 2 and begin again. You will follow all of the same steps. Once you select behind text again, you can move the new circle inside/or outside the first circle.

 11. To change the font color, you must select one circle at a time. There are two drop down selections in the WordArt Styles box. One has a pencil on it and the other a paint bucket. Set both to the same color and your journaling will be all one color. The pencil is the “outline” of the letter, and the bucket is the color of the letter.


 So, I hope these are easy to follow. My apologies for the quality of my screen photos. I know they aren't the best, but I couldn't get a screen print of each step in my blog entry for some reason, so I resorted to taking a photo of each screen.
 After you do it a time or two, it's really not that many steps. I was just trying to take photos of each thing that I did so that it would be (hopefully) a little easier to follow. If you have question, please let me know and I'll help any way I can. I've also saved this as a word document if you would like me to email it to you. Just let me know.
Be sure to let me know if you try it. I'd love to see your layout!
Hugs!
Susan

