Thursday, October 28, 2010

Anything Goes But Buttons and Bows

The Flourishes Timeless Tuesday challenge this week was to design a card (with Flourishes stamps if you have them) but to use NO buttons or bows.  Sounds easy, right?  I thought to myself, sure, I can do this...until I tried it! LOL!  I kept wanting to add a little ribbon bow on both these cards!


For this first card I stamped the beautiful poinsettia and leaves from the Poinsettia and Boxwood Collection.  I colored the poinsettia and leaves with Copics .  The snowflake background is a Cuttlebug embossing folder.  I pop-dotted the embossed layer, added a few randomly placed bling on the snowflakes, and then pop-dotted the poinsettia on top.  The sentiment is also a Flourishes stamp from the Christmas Music Collection. To add a little extra sparkle, I added a thin line with a gold leafing pen around the outside edges of the card.


For the second card, I used the Wreath Collection.  I colored the wreath with Copics and then cut it out.  I stamped "joy" in the center of the wreath with a stamp from PTI.  I added a little stickles on the wreath on the red berries and I added white 3D paint for the little sprigs of white. Once again I used the embossing folder from Cuttlebug for the background.  Background is on pop dots as is the wreath.  On this card, I also added sparkle by adding a thin line with a gold leafing pen around the outside edges of the card.

Note:  I found that the wreath look more finished when I used the Copics brush to go around the outside edges so that the white card stock doesn't show.

Thanks so much for stopping by!  I appreciate your comments....Until next time...

Hugs!


Pin It!

Wednesday, October 27, 2010

OLW25 - Black and White and Red All Over

It's time once again for the One Layer Wednesday challenge.  This week the challenge is hosted by Jennifer Styles at Styles Ink .  Our challenge this week was to design a card that is black, white, and red.  Sounds easy, huh?...NOT!  Anyone want to guess how many times I had to do this to get it right?  LOL!


For my card, I chose to use a red card base.  I stamped the image from Inkadinkado in black Memento ink. The sentiment was stamped with a SU stamp with embossing ink and then embossed with white EP.  (Okay...now guess how many times I had to try before I got the embossing right!).  Can I just say that when I embossed it on scrap paper before putting it on my card, the embossing was impeccable!  How can that be?

That's it for this challenge...on to the next challenge. Thanks so much for stopping by!  Until next time.....

Hugs!


Pin It!

Tuesday, October 26, 2010

Day 2 - Meet the Designers

It's day 2 of the Meet the Designers at Bella Blvd.  Today the post is layouts each of us made using a sketch provided by Bella Blvd.  I used the Hello Beautiful Collection for my layout.


The photos are of my grandson, Adam, and were taken at Pensacola Beach last summer.  He just looked so cool with his sunglasses on!  I cut 3 inch squares and rounded the corners. The tabs of yellow were cut with a Spellbinder die and cut in half.  The title work was cut on the Silhouette.  The journaling block was a Bella Blvd Stamp.  That big scalloped border across the bottom is punched with a Martha Stewart deep edge punch.  The strip "Baby it's hot outside" was cut from the patterned paper.

I think this is a great sketch...and I might just use it again!  Thanks so much for stopping by!  Until next time.....

Hugs!


Pin It!

Monday, October 25, 2010

Bella Blvd - October Designers

A few months ago I was selected as a Bella Artista for Bella Blvd. I was so excited! Within just a short period of time, I received a box full of Bella goodies to play with. Today, I'm one of the featured Artistas on the Bella Blog. Hop on over and check out the other Artista's work!


Here's a layout that I created for Bella using the Man of the House Collection. These papers are perfect for "guy" layouts. I scrapped some photos of my cute little grandson, Adam. I love these photos of Adam. He's taken off his shirt and is working so hard to show me how he can move that big log! What a Guy! Even the labels worked perfectly with these photos!


More to come at Bella Blvd in the days ahead. Thanks for stopping by...Until next time...

Hugs!


Pin It!

Wednesday, October 20, 2010

OLW25 - Birds and the Bees (and Flowers and Trees)

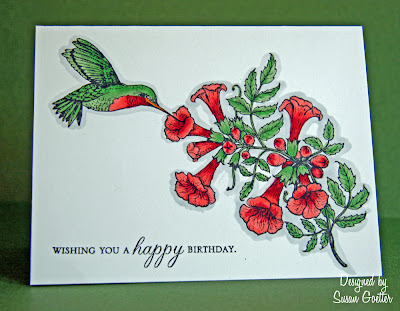
It's time again for the One Layer Wednesday Challenge. This week the challenge is once again hosted by Jennifer Styles at Styles Ink. Our challenge this week is to create a card of any theme and to incorporate two of the four things mentioned in the title of this blog. We're also to include a sentiment. I chose to include the bird and the flowers. Here's my take:

I used Flourishes stamps Humming Along for my card. I colored the flowers and the humming bird with Copics, then added a little shadow around the images with the Copic (c-1). The sentiment is Papertrey Ink's Through the Trees.

I'd love to tell you that I got it right the first time...but I'd be lying. However...it only took me 3 tries to get it right. Actually, I finished a card and thought I was finished, then decided to add a little Twinkling H2O...and guess what?! I totally messed the card up! Grrrr..... Hate when I do that! Anyway, this is the finished product, and I'm definitely going to leave it alone now.

Thanks so much for stopping by! Until next time...

Hugs!


Pin It!

Tuesday, October 19, 2010

A Fit for Two - Challenges that is...

Here's a card that I made today that actually fits two different challenges. YAY me!! I love it when I can combine two challenges. The design of the card is based on a sketch at the Card Patterns blog. It's really a great sketch and fit perfect for the challenge over at Flourishes - Timeless Tuesday Challenge which was to make the sentiment the focal point of the design.

For this card, I used a red cardstock base. The three panels are done with some red textured paper from my scrap bin - each section mounted on gold cardstock (slick finish). The sentiment is from the Flourishes Christmas Wreath set and was stamped on white cardstock from Flourishes . I cut the oval panel with a petite oval Spellbinder die, and then used the companion scalloped petite oval from Spellbinder for the backing. I punched a couple of snowflakes with a Martha Stewart punch and added a little sparkle with stickles. The poinsetta and leaf are Prima blooms. The gold ribbon is a metallic ribbon and added just the right amount of elegance. It's difficult to see on here, but I also sponged some Galaxy gold ink on the oval cut with the Spellbinder and then added a thin line around the outside edges with a gold pen. I even finished the inside of the card.

Now...adding it to my stack of Christmas cards that I've finished. Maybe this year I won't be rushing to finish cards two weeks before Christmas!

Thanks so much for stopping by. Love your comments and appreciate you taking the time to leave a little luv. Until next time....

Hugs!


Pin It!

Sunday, October 17, 2010

OLW - The FUN Continues!

First of all...when I read that Susan at Simplicity needed to take a break from the OLW...(you know how life interferes with our fun sometimes)...I was so sad. This challenge has a way of keeping me challenged...and at the same time, I get to make so many beautiful cards...which in turn feeds my paper/stamping addiction! Susan was planning to be back in a couple of weeks, then we were going to have challenges every 2 weeks. THEN....Jennifer Styles at Styles Ink stepped up to the plate and offered to help out with the challenges....and Wa-La! We'll continue our weekly challenges.

The requirements this week (at Styles Ink) was to create a holiday card using NO white, NO cream, NO red, and NO green. Geesh! This is a difficult one for me...mostly because I think holidays are red and green! Therefore, I'm a little late with my OLW challenge because I have had a very difficult time making a card that fit the challenge requirements! Anywho...here's what I came up with:

This card is NOT cream...it's actually a soft yellow. Couldn't get the camera to give me a true image. Of course, it's probably not the camera...I'm sure it's a USER problem! LOL!

I can't remember who makes the lamp post stamp. I took it out of the package and now I don't have a clue who makes it! It's a beautiful stamp though, as are all in the package. The Sentiment is from PTI stamps. I love PTI stamps! I stamped the image in Memento Cocoa, then I inked my stamp up with Galaxy Gold pigment ink and stamped again over the brown. I couldn't get it to show up, but there is a fine gold look to the brown ink now. It's really pretty, so I wish you could see it! Drat! I did the same thing with the sentiment stamp.

The "brick" path was drawn with a gold marker. At first, I just drew a line to ground the lamp...then I started doodling with it and messed it up, so I had to make bricks. I think I kinda like it now....

That's it for this time. Maybe next week will not be such a difficult challenge for me! LOL! Thanks so much for stopping by! Until next time....

Hugs!


Pin It!

Monday, October 11, 2010

Creative Scrappers - Sketch 125

Here's my take on sketch 125 for Creative Scrappers. I used Basic Grey papers. The photo is of my grandson, Adam.

Here's the sketch...be inspired...give it a try, then link it to the Creative Scrappers post for super prizes!

Thanks so much for stopping by! Until next time...

Hugs!


Pin It!

Saturday, October 9, 2010

Flourishes - Details are Sketchy challenge

I decided to play along with the challenge at Flourishes this week. This week is a sketch challenge, and here's what I made with the sketch.

I used a white card base. All papers I used were from my scrap pile. The blueberry stamp is from Flourishes Berry Sweet collection. I stamped the blueberries on Flourishes white cardstock (it's a very thick cardstock and I LOVE it!). I colored the berries with Copic markers, then cut the berries out so that I could pop dot them on the white oval cut with the petite oval die from Spellbinders. The scallops behind the white oval was cut with the petite oval scallop die from Spellbinders. Added a little faux stitching to the blue mat.

That's it for today....Until next time...

Hugs!


Pin It!

Friday, October 8, 2010

One Layer Wednesday 23 - Heavy Metal

The challenge this week at Simplicity was to make a card using something metallic on the card. Well, naturally, I couldn't make up my mind what I wanted to do, so I ended up making five different cards. Some I used the same stamp on, but kept trying different things. I think I ending up liking this first card best.

(You can click on the images to see them bigger)

I used Flourishes white cardstock for the base. The ornament is a Hero Arts stamp that I colored with my Copic pens. The metal on this card is the ornament top that I colored with a gold leafing pen and the line I drew across the base of the ornament to ground it. The sentiment is from PTIs Christmas sentiments.

The leaf card is just very simple. I added two metallic leaves from my stash, and then three red bling for berries. The sentiment is from the PTI Christmas sentiments. The next card is my least favorite of all the cards I made. I don't really like the border drawn in red. I think it distracts from the stamped image. The Santa face is a Delta stamp that I picked up at Michaels last year. The metal on this is the gold leafing I used for his glasses, and I added silver sparkles to the snowflakes and his beard.

These last two cards are also using the Santa stamp. I colored the face of Santa with copic pens and tried to make him have rosy cheeks. The glasses are highlighted with the gold leafing pen, and then I added Glossy Accents to make the glasses lens. For the first one, I cut a rectangle from the front of the card, then stamped the image on the inside of the card. Then edged the outside frame with a gold leafing pen. The sentiment is an old, old stamp...don't know who makes it. The last card was prepared the same...stamp wise...but then I added a gold border with the gold leafing pen. The sentiment is a Stampin Up stamp, I believe.

As you can see, I'm really getting a head start on my Christmas cards this year. If I can keep up the pace, I'll be finished before Thanksgiving! YAY!

Thanks for stopping by...I appreciate your comments. Which one of these cards do you like the best? I'd love to get your feedback! Until next time....

Hugs!


Pin It!

Saturday, October 2, 2010

Two Card Challenges - World Cardmaking Day

Today is World Cardmaking day, and I have two cards to share. The first card is for Susan's OLW challenge at Simplicity. The focus this week at Simplicity, was to make a card to a mom and express our gratitude. I made this for my mama. She's 85 now and still lives alone...and that's her choice. I truly appreciate the things she did for me and the sacrifices she made for me during my growing up years. Unfortunately, most people don't realize how difficult it is being a mom until you are grown and have children of your own. ~raising hand here~

I used a single piece of white cardstock and stamped the PTI leaves Memento Bamboo Leaves ink. The sentiment is also a PTI stamp. I added a little inking around the edges...and that was all. Simple, yet effective.

The second card I want to share is a birthday card. This is for the challenge at Flourishes blogspot. The challenge was to make a card that was not the standard 4.25 x 5.5 (I believe that's an A2), to use ribbon, and to use pink.

I cut the pink base with a Spellbinder die, then cut a smaller piece of folded cardstock to fit behind the solid part of the pink circle for my card. The finished size is about a 4.25" diameter circle. The flowers are a Flourishes stamp (cherry blossoms), that I colored lightly with Copic markers, then cut them out with an oval Spellbinder die. I added a double mounted scalloped edge across the bottom half of the circle, added a ribbon and bow, then stamped the sentiment (Happy Birthday) with a PTI stamp. The oval with the flowers is also pop-dotted. I think it turned out to be a really cute card, and I'm thinking I might make a few of these.

Thanks so much for stopping by! Until next time...

Hugs!


Pin It!

LinkWithin

Related Posts with Thumbnails