Thursday, June 30, 2011

OLW60 - Ink on Ink

Our challenge this week from Susan at Simplicity was to create a card layering ink over ink...no masking or sponging of inks....so this is what I came up with. Super simple card.  I used my new stamps from Papertrey Ink for this card. The dandelions are stamped with SU Crumb Cake, stems with Pear Pizzazz, and the sentiment was stamped with Memento cocoa.


I really do love how this one came out...no bling, no masking, no sponging...just a three stamps and about 10 minutes! Gotta love that!

Thanks so much for stopping by! Thanks for the fabulous comments you leave for me...it's greatly appreciated! Until next time....

Hugs!


Pin It!

Saturday, June 25, 2011

LIM 21 - A Sketch and Zentangle

After last week's challenge to create a card using a monogram, our taskmasters fearless leaders, Chrissie and Mandi at Less is More have decided to give us an easy week this week and have provided this sketch for us! Here's the sketch...

Now...how easy is that!  I love this sketch, in fact, I love it so much, I finished off three cards this morning.  I think I love all three cards this week...Thanks for the cool challenge this week, Chrissie and Mandi!  This first card was just fun to create.


I have my kitchen decorated with chickens and roosters and when I saw this stamp set, I just had to have it! (having no idea what I'd do with it).  The chicken wire stamp that came with the set just didn't look right to me, so I drew my own chicken wire with a pencil and then smudged the lines a bit for a faded look.  The rooster was stamped on white card stock and colored with Copics, then punched out with a 1.5 inch circle punch. The red mat was punch with a 1.75 circle punch.  Roosters were then pop dotted over the chicken wire.  The sentiment is from the same stamp set from Clear Art Stamps.


Last week when I was making the rounds visiting all of your beautiful cards, I came across this card at Carzo's Crafty Corner that she had made using something called Zentangle.  Well, that was a new one for me, so I did a little research and discovered that Zentangle is basically just doodling...in a structured way.  I was captivated!  Needless to say, I've been doodling my heart out all week.  For this card, I did some Zentangle drawing on white card stock, then punched out 1.5 in circles and matted with black. I added a piece of embossed white card stock also matted with black behind the circles. Circles are pop-dotted on the embossed piece.  


Still looking for something different, I decided to make this card.  I cut a piece of white card stock slightly smaller than my card front. I used some score tape on the back where I would be winding my jute string around the card.  I wound about 15 rows of string around the card and adhered it to the score tape in the back. I then matted the string layer on a piece of dark brown (it looks black here, but it's brown).  The sea shells are SU stamps that I've had forever....stamped on white card stock and colored with Copics. I cut the shell out and mounted with pop dots.  The sentiment "Praying for You" is also a SU sentiment.

Now...you know I said earlier that I've been doodling like crazy...this is the layout I made this week with my new-found interest. The layout was created with a piece of white card stock, several black pens, a photo, and some chipboard and foam letters.  


I didn't do any shading on this, and I might go back and do that since the shading give it a little more dimension.  Some of you might be wondering how long this took to doodle...well, it took me about 3.5 hours.  The hardest part was deciding what my doodle pattern would be! Anyway...totally love this layout! 

Thanks so much for stopping by and visiting.  Thank you SO much for all the wonderful and sweet comment you leave for me! Until next time...

Hugs!


Pin It!

Thursday, June 23, 2011

OLW59 - Inspiration Challenge and a Layout


I'm running a little behind on my entry for the OLW challenge which is hosted this week by Susan at Simplicity.  This week Susan has given us a photo to inspire us...yeah, right!  I have the worse time with inspiration challenges....don't know why, but I do!  Anyway, here's our inspiration photo:


Cute little yellow flowers in a jar...nothing!  My poor brain finally hit on an idea and then I couldn't get it to work out like I wanted it to.  This is the 4th and final effort (well, of course it's the final effort....I'm not still making the same card! LOL!).  I used Asian Fusion stamps from Papertrey Ink.  I tried the vase in blue, red, black...and finally yellow before I liked what I saw.  The flowers are individual blooms that I stamped several times over the top of the vase, then I added the greenery with a Memento pen. [Just so you know, there's a fine line between getting too much greenery and not enough greenery].  


I scored a couple of lines.  One under the vase and one on the bottom edge of the vase.  The sentiment is also a PTI stamp from one of the birthday sets.

I'm also sharing a layout with you today. I made this a few weeks ago and just forgot to post it.


This is my daughter, Kimberly, when she was about 15 months old in 1978. Background is white card stock with a red border. The large loopy border was cut with a die from Lifestyles...and it goes perfectly with the MS loopy punch! The word priceless is a rub on I've had forever. The banner was cut with a die that's also from Lifestyles. The die set includes the strip for the flags, and three different sizes and two styles...it also includes a flag with a different shape. The title work is some old sticker letters from my stash. I added some red doodled lines around the outside border and some white and black doodling on the punched edges. Papers are just some old papers from my stash.  Journaling is tucked behind the photo and the top edge was punched with a MS edge punch. Letters on flags are rub on letters.  Journaling reads:

It happened every day. You climbed on everything and I would have to rescue you and put you back down on the floor. There wasn’t a table, a chair, a shelf, or a bed that you didn’t climb on. I guess you started early reaching for new heights and no matter how often I warned you that you were going to get hurt…you still climbed with abandon…absolutely NO FEAR! Now that you are grown with children of your own, I thoroughly enjoy watching you chase after your little girl - who loves to climb just as much as you did at that age! Kimberly – 15 months old."

Thanks so much for stopping by! Thank you for all the fabulous comments you leave for me! Until next time.....

Hugs!


Pin It!

Wednesday, June 22, 2011

Long Distance Scrapping with Friends

My friends Julie and Delaina, are scrapbooking friends that I met through Scrapbook.com a few years ago.  At the time, we all lived close enough to each other to get together occasionally to have a girl's weekend (with a little scrapbooking thrown in sometimes!)  Now that Julie has moved faaaaaaaaaaaaaaaaaar away, it looks like out get togethers will be few and far between.  (And, just for the record, Julie...I would drive up to Delaina's for the weekend! Pffft!)

Since we haven't been able to get together for over a year, we decided to have a long distance challenge  by using this sketch that Julie found at the Sketch Support blog.  If you haven't checked out their sketches, you should pop over and do that!  So every few weeks, we're doing a challenge where each of us creates a layout in our own personal style, using the exact same sketch.

This sketch was actually designed for a card, but we decided it would work for a layout too.  I think it might have been best on a 11 x 8.5 layout, but since I scrap on 12 x 12, I just made it work for mine. I decided to do a "heritage" layout featuring my hubby and his brothers.


Now, since this photo was taken before I was born, I'm not exactly sure when it was made, but probably sometime in the late 1940s. I used Bo Bunny's Timepiece collection.  I cut the pocket watches from the patterned paper and mounted them to the layout with pop dots.  The title letters were cut with QK dies.  For the brown strip across the striped piece, I made a belt buckle by punching a circle then cutting two slots down the middle of it.  I put it on another piece of the brown and then added glossy accents to the buckle.  I added faux stitching around each of the pieces across the middle by piercing around the edges and then connecting the piercings with a line drawn with a brown pen.  There's a journaling piece behind the photo that reads:

The three Goetter boys…Butch, Bill, and Tom….all dressed up. I don’t know for sure when this photo was taken, but I’m guessing it was in the late 1940s because Tom looks like he is about 2 years old, which would have made Butch about 11 years old.Bill is right between the two of them and he would have been about 7 years old. It looks like they’re all dressed up for Easter, but I don’t know for sure.They were all such cute little guys.Now they’re all grown, and they still have a strong sense of being “brothers.”They’re friends now, and that’s just how it should be.

Thanks so much for stopping by! Take a moment to check out Julie's and Delaina's blogs to see what they created with this sketch.  Until next time....

Hugs!


Pin It!

Saturday, June 18, 2011

LIM20 - Monogram It!

It's time again for the Less is More weekly challenge. This week, Mandi and Chrissie have giving us a theme challenge.  We will be making cards with a Monogram.  I can't say that I've ever done a card with a monogram on it, but what the heck...I'll give it a try!

I do like to have a meaning and purpose for the cards that I make...you know, someone to send it to.  Thinking about all that's going on in our lives, I realized that since my son and daughter-in-law are expecting a baby in October, that they could probably use a few thank you cards. Now that I have an idea...I'm off and running.  


My cards are 4.25 x 4.25 squares.  I rarely do a square card, but this design seemed to work better on a square card.  I printed the letter "B" (for their last name) using Brush Script font and a text box in Word.  I wanted my circle to be a 2 inch circle, so I played around with it and printed it out a few times before I got it the size I wanted it (I set the font size to150).  Then I copied the text box and pasted it 11 times so that I filled a page with the letter.  I punched the Monogram out with my 2 inch circle punch.  I wanted a thin black mat on the monogram, but all my punches were too big, so I cut my circles out using the Silhouette and that way I was able to get the to a size that would only make a thin matted edge on the monogram.  I stamped the flourishes about 1/2 inch in from each side at the middle, then added the matted monogram on pop dots.  I must say, I am delighted with my cards this week.


In fact, I like them so much that I decided to make up about 10 cards to give to my daughter-in-law.  Now I just needed something to put them in....hmmm. You guessed it! I decided to make a box that would hold the cards and envelopes.


I made quite a few of these boxes a year or so ago to give cards at Christmas, so I decided to tweak my box pattern so that it would be deeper and I could put 10 cards and envelopes in it. There's a tutorial on my blog for how I make these boxes that you can see here.  I used a 12 x 12 sheet of black card stock to make my box, instead of the 8.5 x 11 in my pattern.  I made it about 1.5 inches deep so that it would hold all the cards and envelopes, because the smaller box will only hold about 5 cards.  I used a Martha Stewart deep edge punch for the top panel, mostly because the 12 x 12 sheet of card stock isn't quite big enough to get a full front flap.  I added a strip of black across the front with punched edges, and then a white satin ribbon over the punched piece.  The monogram circle was added with pop dots.  I also used some small Basic Grey magnetic snaps under the top flap and on the box so that it would stay closed.  

Sharing another layout I did last week. This is a photo of my maternal grandparents that was probably taken sometime in the mid 1940s. 


I used TPC Studio papers (Grandma's Attic collection).The swirls are stamped on transparencies and cut out. The blooms are a combination of Prima and blooms I punched, inked and doodled on. All flowers have pearl centers. Some of the centers I colored with Copics to match my flowers better. The Bible is a photo that I printed on card stock and cut out, then pop dotted it on the layout. Lots of doodling around the edges of each layer...and the double stitched look was done with a stamp. The green scalloped circle was made by stamping an image on the green, punching with a circle punch and then punching a brown scalloped backing with a scalloped circle punch. The other two tags were made by stamping an image and then cutting it out. The rectangle Bible verse was stamped and then cut out with a Spellbinder die. Title letters (Granddaddy)were cut with the Silhouette and "was a Preacher-Man" was created in Word. 
  
Journaling is tucked behind the photo on the right side with the scalloped green edge as the pull and reads:

My Granddaddy (William Wesley Pace) was a Baptist minister. He was married to Ola Catherine Susan McDowell Pace and they had 10 children. My mama (Grandma Perdue) is the baby of her family. My grandparents both died in the early 1950s. From what I've been told, Granddaddy did most of his preaching at small country churches mostly in the state of Georgia. From stories my mama told me, he was a very strict disciplinarian when she was growing up. I only have vague memories him but I do remember him holding me in his lap and giving me hugs. I remember my Grandmama much better, because she came to live with us after Granddaddy died. One of the things that I remember most about my Grandmama was that she would let me crawl up on the bed with her in the mornings and sip coffee from her saucer. I've never liked coffee as an adult, but I sure enjoyed drinking coffee with my Grandmama. 

That's all for today. Thanks so much for stopping by! Your comments are greatly appreciated!! Until next time.....


Hugs!


Pin It!

Wednesday, June 15, 2011

OLW58 - Yellow, Orange, and Aqua

We have a new challenge this week from Susan at Simplicity.  Our challenge this week is to make a one layer card using the colors yellow, orange, and aqua.  The only difficult thing about the challenge this week was trying to decide what I wanted to color yellow, orange, and aqua!  I finally decided to use the Inkadinkado fish stamps I got a few weeks ago. I have no idea why I wanted fish stamps, but they seem to leap in my basket without me knowing it....really! I actually made two cards, the first one I wasn't overjoyed with, so I did another one and added a little more to it.  I think I'll show you my second card first...


I used a vertical fold card base (BTW, am I the only one that makes my own card base? Do you buy your card base, and if so, where?  I really like the vertical fold better than a horizontal fold...no idea why, I just do).  Now...back to the card.  I've been practicing with my brayer...see?  I actually did it without getting the dreaded lines across my card! YAY ME!  For this card, I stamped my fish with black Memento, then colored them with twinkling H2Os.  I rarely use the h2os but, I thought I'd give it a try on these fish.  I also cut a mask from paper to cover the fish while I brayered the tempting turquoise on to the card stock.  The sentiment is from Paper Smooches, and kind of fit the fish theme.

Okay, now here's the first card I did...


I used a "water" stamp that I've had for a while and stamped the little water lines, but then decided I just didn't like it very much.  I definitely like it better with 2 fish and the brayered water.

And last but not least, I also made a card for the technique challenge at Splitcoast which was to make a patchwork card.  Since I used to quilt (many moons ago), I decided to make a quilt block with the Ohio Star pattern.  After I adhered the paper pieces to a piece of card stock, I embossed it with a SU embossing folder.  Kinda cool....huh!


Playing along in all the different challenges has really made me step out of my comfort zone...and in the process, I've learned a lot.  If you haven't played in a card challenge, you should give it a try.  I still love to scrapbook and do it often, but card making is a source of instant gratification.  A layout may take me 4-5 hours (and sometimes I piddle with it for several days!), but a card is usually finished in under an hour. Like I said, instant gratification.

Thanks so much for stopping by! I appreciate all your comments...they make my day!  Until next time....

Hugs!


Pin It!

Saturday, June 11, 2011

Forever Together & My Mind's Eye

I haven't played in a challenge at My Mind's Eye in a while, so when I saw this great sketch, I thought I'd play along.  It really helps that I have lots of MME papers.  They have such a great variety of papers, and all of them are gorgeous!  The rules for this challenge is to used the sketch below (designed by Anam Stubbington).  Along with the sketch, we must also use this theme: Song Lyrics – and we choose the song.

MME_LayoutSketch_2011_06

I chose Forever Together  sung by Randy Travis.  I love to listen to Randy Travis, and this song really speaks to me.  I selected a couple of photos of me and my hubby.  The paper I chose for this layout is My Mind's Eye Stella Rose "Hattie" and "Mabel".  Another thing I love about MME papers, is that so many of the different collections can be mixed together beautifully.


This is a great sketch.  I matted the photos on dark brown card stock.  The title work was cut on the Silhouette from the same dark brown card stock. I added a few little white accents to the title work.  The large scallops were cut with a Quikutz die, and the smaller scallops were punched with an EK Success punch.  For the yellow strip across the middle under the photos, I inked the edges and stamped it in brown using a big sheet music stamp.  The hearts are chipboard that I sprayed with glamour mist and then added some stickles on top.  Three brads are added to top left and bottom right of the middle panel. The tag at the bottom right was added to cover a boo-boo with the perfect pearls I used to make beads on the scallops.  The journaling is a excerpt from the song that read:


Forever together
Til' death do we part
Forsaking all others
I'll give you my heart
Through good times and bad times
Wherever we are
Forever together
In each other's arms


Thanks so much for stopping by! I appreciate your comments!  Until next time...

Hugs!


Pin It!

LIM19 - I've Been FRAMED!

WHEW! It's Saturday again! The weeks sure do fly by! What a great challenge we have this week at Less is More.  This is our one layer card week.  Easy...right?  I do this all the time. In fact, most of my cards are generally one layer...cause I love the look of one layer.  Oh, I can make cards with more than one layer, but sometimes I think they're more difficult. At least I did until I worked on this week's challenge!  I had in my mind what I wanted to do.  I wanted to stamp and image in a square/rectangle, and perhaps add a little clear embossing (after all, my embossing definitely needs practice!).  So, I get out my cool new HA stamp and get to work.  This card below is the result of the 4th card I tried to do this way. When I finished the first card, I realized the rectangle was crooked.  On the second card, the embossing powder didn't stick in the right places and I had it everywhere and the inking wouldn't cover it.  Third card looked pretty good until I realized that I'd stamped on the BACK of the card!  The fourth attempt looked really good...the embossing was great, the inking was great....unfortunately I had ink on my pudgy little fingers and managed to get it all over the white area around the image! gaah!!!  So...not willing to toss it completely, I cut out the stamped, embossed, inked image, mounted it on black card stock and added it to a blank card with a few pop dots and stamped a sentiment below the panel.  Whew! I finally gave up on this idea!

Then....looking through my stamps, I found these new stamps from PTI and realized they haven't seen ink yet either, so I thought I'd give it a try with them.  


First I drew a light pencil line where I wanted the base of the plant to be and stamped the image in Mementos brown.  The sentiment is also from PTI (another set).  I stamped that too.  In hindsight, I probably should have used clear embossing powder on these, but I didn't think of it until it was too late.  I used quite a few different distress inks...yellows, reds, walnut, stormy skies, purple....just a big mix.  Using a Spellbinder rectangle, I cut the center out of a piece of paper the same size as the card front to use as a mask for the inking.  After all the inking, I used a ruler and did a little faux stitching around the edges of the inked rectangle for my frame. Not totally happy with either of these cards, but maybe I'll think of something different later in the week.  If you follow my blog, I'll post any addition cards I might make here, but I probably won't link them to the challenge blog.  There's so many people playing now that I don't want to make more work for Mandi and Chrissie!

I'm sharing another layout with you today.  This is our beautiful granddaughter, Camilah and her prom date.  


I used a Martha Stewart around the page punch to make the blue background. I layered it on white card stock and then added a tiny blue border to the outside edges.  The leaves are a Sizzix die, the flourish tag is a Spellbinder die. Prom 2011 is rub on letters and then I pop-dotted the title on the swirly frame.  The flowers are a combination of Prima blooms (big blue ones) and punched blooms (little blue ones and pink ones).  I added a small pearl to each of the flowers.  The stitching is stamped. The oval tag at the top left is an oval punch and then I trimmed the green backing with scalloped scissors.  I added journaling on the tag behind the pink mat with the three pieces of bling to keep it from sliding under the pink mat. I also added a small piece of lace across the bottom of the pink mat.  Fairly quick layout, once I finally figured out what papers to use! LOL!

Another long post...Thanks so much for stopping by!  I appreciate each and every comment...you make me smile!  Until next time...

Hugs!


Pin It!

Friday, June 10, 2011

Flourishes - A Sketch and Pretty in Pink

I love Flourishes stamps. In fact, every time I reach for a stamp to make a card, I find myself drawn to the Flourishes stamps.  So, when I saw that there were a couple of challenges at Flourishes this week, I decided to play along.  This first card is based on a sketch  Flourishes provided.  Here's the sketch...


and here's my take on the sketch....
I used one of the stamps from Flourishes Orchids.  I colored the orchids with Copic markers, then added a touch of glitter to the blooms. (If you click on the photo to make it bigger, you can see the glitter). Tied a ribbon around the middle and added a bow.  The birthday sentiment is from PTI and is stamped in SU Whisper White.

The next Flourishes challenge I wanted to play in is Pretty in  Pink using these shades of pink for inspiration:


For my card, I decided to use all solid color card stock.  I'm not sure why, but I seem to have difficulty mixing some patterned papers on a canvas the size of a card....so card stock it is!  


The card base is a light pink, then I made a couple of mats and scalloped the edges with the next two shades of pink.  The cherries are a Flourishes stamp in the Cherries and Peaches collection. I stamped the image on a 2.5 inch square, then stamped it again on another piece of card stock. I cut the cherries and the leaves out of the second piece after I'd colored them (I used Prismacolor and OMS for coloring).  Then I layered the leaves and cherries over the top of the 2.5 inch square with pop dots.  I punched a small scalloped border from the darkest pink, a 1/4 inch strip from the medium pink and then a 1/4 inch strip from the lightest pink (the card base color).  I added three pieces of bling that I colored with Copics to match the darker pink.  The  diamond shape (square turned on end) was also matted with the darkest pink.  The cherries are actually shades of pink, but for some reason, all I could get with my camera makes them look a little red.

That's it for the Flourishes Challenge. Thanks so much for stopping by...and thanks a Million for your wonderful comments! Until next time...

Hugs!


Pin It!

Wednesday, June 8, 2011

OLW57 - Summer Holidays - Sun, Sand, & Surf

It's Wednesday, and time once again for the One Layer Wednesday challenge.  This week our challenge is hosted by Jennifer at Styles Ink.  This week’s challenge is to create a card that is inspired by any or all of the following: summer, the beach, the sea, sun, sand, the lake, the cottage – pretty much anything that says summer and/or summer holidays.  Well...since I had to work today, and the drive to and from the bank was about 2 hours each way (that's 4 hours travel time and 7 hours working - through lunch!), I had plenty of think time to decide what I wanted to do.  So, when I finally got home about 6:30 pm, I crashed for about an hour before I could actually move. These long days really wipe me out!

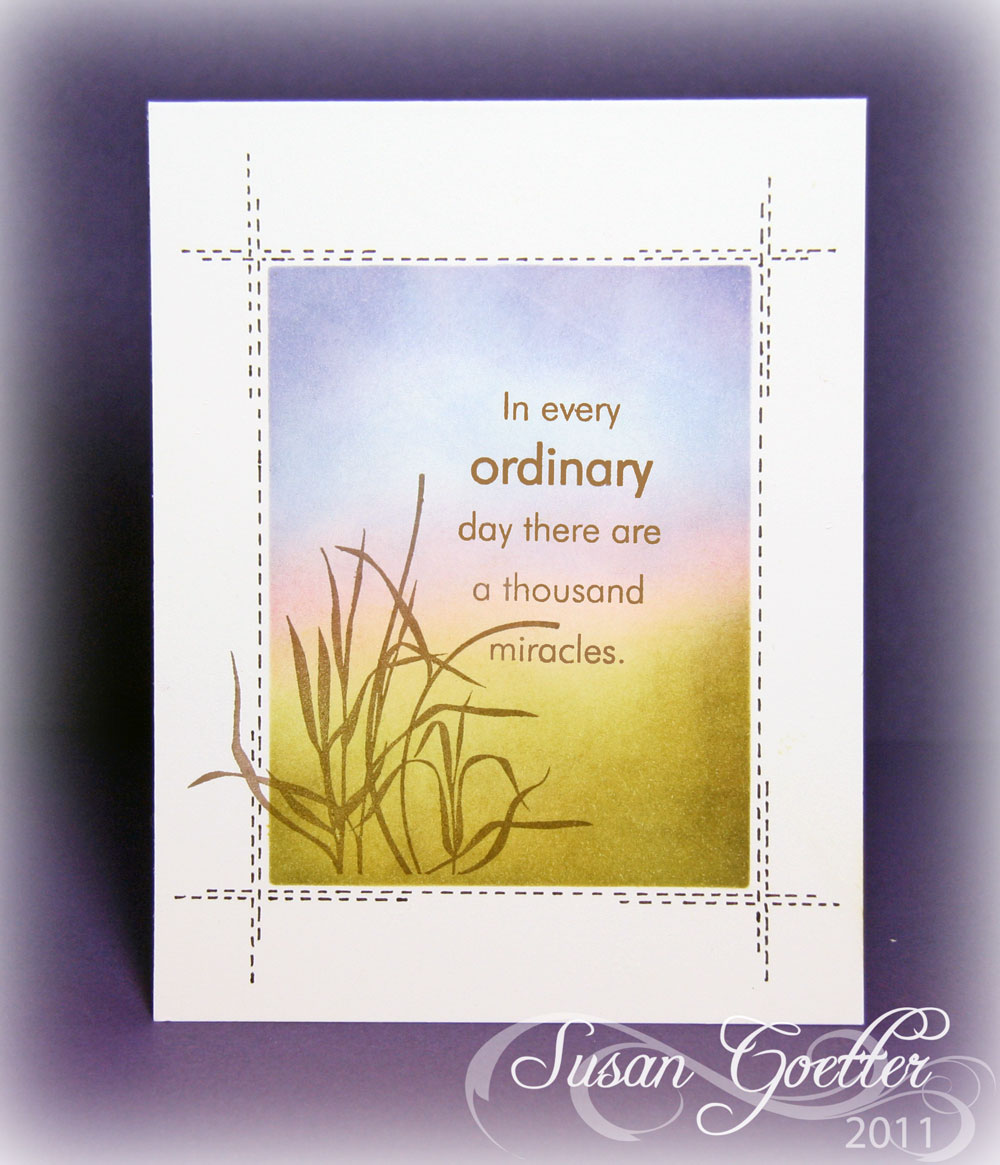
Anyway....back to the card.  I remembered this stamp, which was one of the first stamps I ever bought, and it's only seen ink once or twice.  I think I might have gotten a little carried away tonight, because honestly, I only intended to stamp the little girl with the little shells at her feet and the sentiment...and then I got all carried away and sponged in a little of the blue Gulf of Mexico (which is only 1/2 hr from me), and a golden sunset (sorry it looks orange here!)


I had to do a lot of masking on this card! First I stamped the little girl image and cut her out and placed the mask over my image on the card. Then I tore paper for the water's edge and masked off the sky with another piece of paper.  After sponging the water, I used the piece I tore off for the water to mask the water and sponge a bit of color on the sand. (you don't know how difficult that is for me since the sand at our beach is white sugar sand!) Then I masked the bottom of the card so I could sponge the sky.  I didn't get as much color difference as I wanted in the sky, but this was the second card I've made tonight trying to get it right, so I finally quit trying to change it.  The sentiment is from Flourishes.  I added a few doodled lines and little shells to carry the image across the card.  I also added some white lines and dots in the water for waves and foam.  All in all, I'm happy with how this turned out. My coloring with Copics could use a little work, but I'm sure I'll improve with more practice.

I also thought I'd share a layout I did recently of my youngest granddaughter, Maggie.  Memorial Day weekend, I volunteered to keep Maggie with me so that my daughter and her family could go with tubing down the river.  I didn't really think that was the place that an 18 month old needed to spend the day.  So, Maggie and I had a little time together that day. The layout is titled:

 There's nothing SWEETER...than the sweet sighs of a sleeping baby. Photos of my dgd, Maggie, napping last weekend. I used Echo Park's For the Record collection for this layout. The double scallops across the bottom were created by punching one inch circles from red and black and then adhered to the back of the polka dotted strip. I backed the printed piece with black to make it pop off the red background. Flowers are a mix of various Prima blooms that I've added black bling to for the centers. Title work is a combination of EP letters, Basic Grey letters, and the last part is computer generated. The green scalloped piece across the bottom is a sticker from the For the Record collection. I put all the layers on an off white background and added lots of doodling in red, green, and black. Journaling reads:

Maggie, you were so good the day you stayed with me while everyone else was tubing down Blackwater River. Your Mama said you would fight going to sleep, but you didn’t. When I told you it was time for your nap, put you up on my bed, and gave you your pacifier, you lay right down and went to sleep. You slept so long that we finally woke you up two hours later!
May 28, 2011

If you haven't played in the OLW challenge before, give it a try...you'll soon be anxiously awaiting Wednesday morning just like the rest of us! LOL!

Thanks so much for stopping by! Comments welcomed and appreciated! Until next time.....

Hugs!


Pin It!

Saturday, June 4, 2011

LIM18 - Monochromatic Cards

Wow! It's Saturday already! This week has flown by....probably because I took one week of vacation.  There was so much I wanted to do...and so much I didn't get done.  Retirement...sounds better every day!

First of all...Thank You to all of my fellow LIMettes! Your comments and congrats really made my day! I was so excited to see that I won the May prize. How great is that! What a wonderful group of ladies!  Chrissie and Mandi continue to offer us some fabulous challenges each week.  This week our challenge as presented at Less is More is  a colour challenge and for this week we are making a monochromatic card...the definition and rules are as follows:

DEFINITION:

Monochrome: in shades of one color: using or displaying only shades of one color or black and white.

You may choose any colour you wish, but please keep all the shades you use within your chosen spectrum.

Well, it's been a busy day for me, but I finally got around to making my card late this afternoon. Can't say I'm over the moon thrilled with it, but this was the third attempt and I just decided to leave it as is.

I used a white card base. I masked off a 1.5 in piece just off center and tried to use my brayer to apply the ink.  I say tried, because I could not get it to go on smoothly.  I don't know what I'm doing wrong, but obviously I need a lot more practice.  After I got the SU Baja Breeze brayered, I reversed my mask and covered the colored portion.  I stamped the butterflies (don't know who makes that stamp) with Versamark and TH Broken China Distress ink.  The first time I tried this, I didn't add my embossing powder soon enough and all the ink dried! The second time, I tried using ultra thick embossing powder and it wouldn't stick long enough for me to heat it! I almost gave up, but finally I used my detail embossing powder and after each butterfly was stamped, I did the heat embossing. Now, that took a while! LOL!  After finally getting all the butterflies embossed, I used a text stamp and stamped the text with the Baja Breeze over the top of the butterflies.  Then I added the happy birthday in SU Almost Navy. I also added a couple of scored lines above and below the center panel, but that kind of hard to see here.  I might just have to come up with something else for this challenge later in the week.

One reason I was delayed getting my card done, was that my sister, my niece and my sister's DIL decided to have a cyber scrapbooking challenge today.  They all live in Georgia and I'm in Florida, so we don't get to scrap together very often, so this was our solution.  Last night we chose a sketch from Pagemaps and today all of us were to have our pages finished and posted by 4 pm.  We did it and I must say, that although you can tell we all used the same sketch, our layouts are totally different!   


I chose to make a layout about my youngest daughter and her chicken coop.  I cut the limb and the little bird out of white card stock with the Silhouette, then colored them with Copics.  The Rooster and hen was a stamp that I purchased recently....and it was perfect for this layout.  The papers are Graphic 45s Domestic Goddess. (The black border was added digitally to keep the white background from disappearing)  Journaling reads:

Who knew that a girl who was raised in the city would one day fall in love with living in the country? I remember how excited you were when you called to tell me that Randy was building you a chicken coop and that your first batch of baby chicks was on their way to you. Having grown up on a chicken farm, I couldn’t imagine being excited about getting chickens! Your love of living in the country and having chickens reminds me of how much you are like your Grandpa Perdue. He would have loved seeing your chickens.       

That's it for today.  Thanks so much for stopping by! Your comments are greatly appreciated!! Until next time...

Hugs!


Pin It!

Wednesday, June 1, 2011

OLW56 - Father's Day

It's One Layer Wednesday time again....and this week, Susan at Simplicity has challenged us to make a Father's day card for the "father figure" in out lives. 

Oh how I wish I could make a Father's day card for my Daddy!  He's been gone for 11 years and I still miss him every day!  So, this year, I will make a Father's Day card for the man who has helped me raise my children.  My children's father died 33 years ago, and I was very fortunate to fall in love with a wonderful man who has helped me raise my children.  We've been married 30 years now, and he's the Daddy they know and love. He's been a wonderful daddy to my children, and I am truly blessed that he became part of our lives!

I used a stamp from  Flourishes Guiding Light collection for my card.  I stamped the image in Versamark and black Memento ink.  I added a little clear embossing powder and heat set it.  Then I cut a mask to go over the sails and the boat, and using two different colors of distress ink, I sponged in my background.  After I had sponged the ink, I decided that a moon would be nice, so I punched a circle, and placed it in the upper right hand corner and sponged a little more ink. I like the effect that I got (accidentally!).  It looks like clouds are passing over the moon! How cool!  Then I stamped the sentiment under the image...and I'm done!  Fifteen minutes...wow! 

Finished another layout last week and thought I would share that with you too.  This is my grandson, Allen.  Allen is notoriously difficult to get a photo of when he's smiling.  He just won't cooperate! LOL!  So...I tricked him.  I thought our conversation (as it were) was just too funny!


I used Echo Park Papers for this layout.  This collection is called For the Record and was just perfect for these photos.  I cut two different sized circles with my EK Success circle cutter.  The strips across the bottom were cut to resemble ribbons.  I backed the yellow piece with a piece of red card stock so that it would pop a bit.  The scalloped piece is a sticker from the collection.  The title "For the Record" is also a sticker from the collection.  I rarely place sticker directly on the layout, simply because I tend to want to move things around several times before I'm satisfied with the design, so the stickers I've used here were all put on white card stock and then I cut them out and used pop dots to put them on the layout.  The typewriter is also a sticker from the For the Record collection.  I typed the journaling strips in Word, then layered them on black card stock and added them to the layout.  The journaling reads:

Grandma: Allen…don’t frown! I want to take your picture. Give me a smile!
Allen: Hmmph!
Grandma: Come on, Allen….just one smile!
Allen: ~still frowning~
Grandma: Allen, how would you look if you had $100 bill in your pocket?
Allen: ~Big Grin~

BOYS! You gotta love 'em!

That's it for today.  I appreciate you stopping by and thanks for all the fabulous comments! They make my day!  Until next time....

Hugs!


Pin It!

LinkWithin

Related Posts with Thumbnails