Showing posts with label Echo Park. Show all posts

Tuesday, June 14, 2022

It's June 2022! Time Flies!


I can't believe how quickly time flies!  Seems like it was just January 2022! Now here we are in June already!  

Thought I'd pop in and share a few more layouts with you.  I finished a small folio with my grandson's graduation photos in it last week, but neglected to take and pictures of it! Shame on me!!  My daughter loved it though! LOL!

Let's get started...


Photo of my son taken in 1996 (or maybe 1997). I sent this photo to him via text and told him I would be scrapping it and asked what he thought the title should be and he said "Goober". LOL! I used EP Capture This collection for this layout. Mostly just layering papers and some of the tags that came with the collection...which were just perfect for this layout. The "goober" was cut with an old QK font - Star. I added some faux stitching...and I'd love to tell you that the camera makes the stitching across the top look crooked...but that wouldn't be true...I did it...and didn't even realize it was crooked until I photographed the layout and saw it on screen. LOL! Oh, well...it just adds character...right? Journaling is attached to the Moments Captured tag and slides behind the "today" layer. Journaling reads:

Matthew in 1996 or 1997? I sent this photo to you, Matthew and asked you what you thought I should title the scrapbook page and your reply was “Goober”. I had to laugh, but decided to go along with you. You might think you looked like a goober…but you’re my goober and I love you just the way you are!


Photos from the 80's. I used Carta Bella Our Family papers. The doily is a Prima die. Butterfly is from an old sticker sheet. I made his antenne by cutting a thin strip of black paper and glueing it to the butterfly's head. Butterfly trail was made with Nuvo drops. I used a border punch for the bottom of the beige mat. The "love" button is something I found in the bottom of a box of "scrappy stuff" and the "memories" embellie is a very old brass embellishment that used to be sticky on the back but that was all gone, so I used the holes on each end of the brass plate to attach it to the layout with brads. Quote I found online and printed. Title work was generated in the Silhouette program and cut out several times and layered for dimension. The thin red border around the checked background is just 1/8 inch strips glued around the edges. Journaling was computer generated and I inked the edges for a little dimension.


Photo of me...30 years ago! I used EP A Walk in the Park papers for this layout. I actually scraplifted myself...a layout I did in September 2010 called Sugar & Spice. I have scrapped so much lately, I couldn't get my mojo going, so I just looked back in my gallery for a layout that really caught my eye and just did a complete "lift". LOL! I used MS punches for both borders. The title letters are very OLD chipboard letters from my stash (I had to glue them down...the sticky was all gone!) I added some yellow Nuvo drops to the borders. The flowers are a stamp from Altenew's Botanical Gardens. Journaling is tucked behind the photo and reads:

Looking at this photo makes me realize just how quickly time goes by! I remember the night this was taken...it was our Sunday School Christmas party. I was 40 years old...much younger, much thinner, and definitely had more hair than I have now at almost 70! My, Oh, My...how time does fly!


Photo of my hubby when he was in the Air Force in the 60s. I used EP For the Record collection. I cut the title letter out 4 times (one time in red) with the Cameo, then highlighted them with white and a layer of Nuvo Crystal Glaze. The Air Force emblem was printed from the internet and popped on foam tape. The "be still my heart" sentiment was made in the Silhouette program and cut with the Cameo. The boots are a free clipart from online that I fussy cut. I added some borders to the two background mats as well as the photo and I also added a bit of faux stitching with a white gel pen. I forgot to insert the journaling tab before I took the photo of the layout, but it slips right behind the photo and reads:

This photo was taken when Butch was a Training Instructor (Drill Sergeant) at Lackland Air Force Base in San Antonio, Texas. He was transferred to this assignment on March 11, 1968. This was way before we were married, (because in 1968 I was just graduating from high school) and he would have been almost 32 years old.


Photo of my hubby and his brother at Hoover Dam. I used a white background. Patterned paper is from EP Fine and Dandy. I cut various sized circles with a stitched edge die cuts from Cottage Cutz (I found them on Amazon, I think). Title letters were cut four times with dies from Papertrey Ink and stacked for dimension. The top layer of the letters was cut from paper from the collection. I used Nuvo Crystal Glaze on each of the letters. I popped up some of the circles for dimension and added some different color Nuvo drops sprinkled around the circles. Journaling was computer generated, cut in strips, and adhered directly to the background. This was a very quick and simple layout.


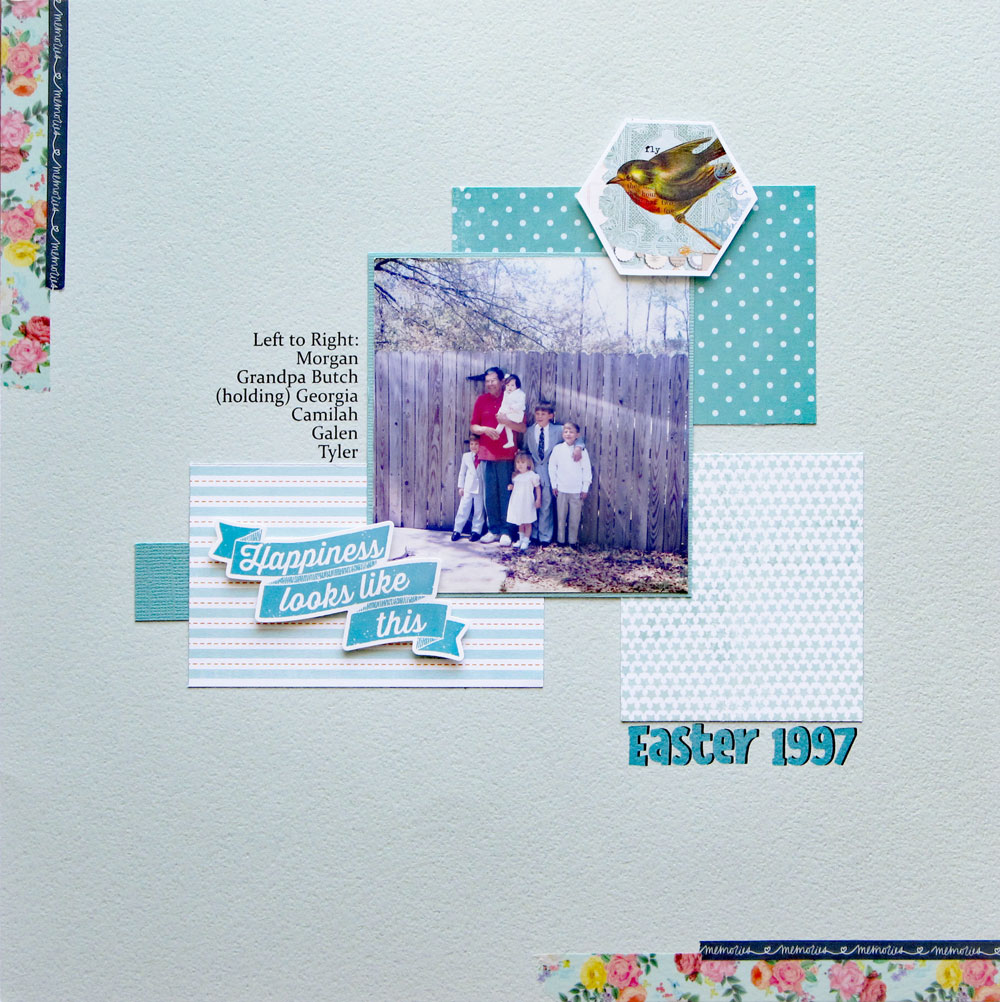
Photo of my hubby with 5 of our grandchildren. Background is a light seagreen/teal-ish card stock. I printed the title "Easter 1997" and the photo legend on the card stock with the printer. Other than the background, all ppr for this layout came from my scrap bins. The bird was cut from some ppr from MME (I think). The Happiness tag is a sticker from the EP Capture Life collection. I added some washi tape on the bottom edge and the top left edge (gotta do SOMETHING with all that washi tape I keep buying! LOL!) Super simple layout...the most difficult part was getting the printing exactly where I wanted it on the background!

This was a LONG post...so if you made it through...THANK YOU!  I have so many layouts that I haven't shared, so this could go on for a while.

As usual, if I've done anything on any of these that you would like to know how I did it, just drop me an email and I'll get back to you.

Thanks so much for stopping by...and if you leave a comment...an even BIGGER thank you!

Hugs!

Photobucket


Pin It!

Tuesday, May 10, 2022

Back Again!

Just popping back to share a few more layouts.  I think my ADHD is kicking in sometimes...I flit from one project to another.  Right now I'm heavy into scrapbooking and reading.  I read constantly...282 books last year and I believe I've already read about 100 books this year!  Just trying to keep busy so I don't notice how quickly I'm getting OLD!  LOL!

On to the scrapbooking...


Photo taken at the family reunion in 1999. You know, there's always that ONE person that clowns when you try to take a photo! LOL! I used EP So Happy Together ppr for this layout. The green scalloped strip is a sticker from the collection. The red check is a scrap from my stash. All other paper is from the EP collection. I cut the thin red circle with the Cameo from the same red as the large scalloped piece. I cut the large scalloped piece with a very old QK die. The "every Picture tells a story" tag was printed on vellum. The title work was cut from black cardstock 4 times and layered for dimension. I also added some wink of stella (clear) to the top of each letter and then coated them with Nuvo Crystal Glaze. The black dots are done with black Nuvo drops. I printed the little tag at the top on vellum and adhered it to a scalloped piece that was cut with a spellbinder die. No journaling...the photo says it all! LOL!


Photo of 2 of my DGS taken in 2009. I used Echo Parks Spring Market papers for this layout. The title "Boys" was cut with an old QK font - Blossom (and one of my favorites!). The large tag is part of the paper pack. The tree limbs are dies from Simon Says Stamps. The little birds are from Spellbinder and were colored with Copics. The two quotes were computer generated in the Silhouette program and popped up on foam tape. The title "boys" was also popped up with foam and covered with Nuvo Crystal Glaze. I also added a few pearls with green Nuvo drops. Journaling is behind the green checked background. Journaling tab was punched with a MS punch. Journaling reads:

Photos were made January 29, 2009, at Bertram Park in downtown Pensacola. You two had just turned 4. I'm not sure what it is about a boy and a stick, but both of you LOVED playing with a stick...it was everything from a gun to a sword. Seems like just yesterday we were taking these photos and now it's 2020 and both of you have your learner's permit and are learning to drive! Wow! Time has really flown by!


Photo from our cruise in 1990. The paper I used is from 49th & Market. I struggle to use paper like this because it forms a scene all on it's own with any embellishments. I tried to keep it simple so that this beautiful paper could shine! LOL! I made the "net" from tatting thread...yes it was time consuming, but I didn't have any netting laying around. :) I added real seashells from my stash. The little "happy" is a metal embellishment for LONG ago. The little birds are printed and cut with the Cameo. The palm tree is from my really old stash (I have NO idea who made it). Title work was generated in the Silhouette program and cut with the cameo. Journaling is in a sleeve attached to the back of the layout and reads...

For my 40th birthday, December 23, 1990, Butch and I took a Caribbean cruise with Tom and Diane. We flew to Puerto Rico to board the ship. We traveled on the Royal Caribbean Cruise Line. We were gone 9 days but we were only on the ship for 7 days. We boarded the ship December 30, 1990. The cruise line threw a big New Year's celebration, too. We visited 5 different islands. We had a wonderful time together, but it sure was great to get back home! Journaling 5-5-2020


Photo of my son taken in 1996 (or maybe 1997). I sent this photo to him via text and told him I would be scrapping it and asked what he thought the title should be and he said "Goober". LOL! I used EP Capture This collection for this layout. Mostly just layering papers and some of the tags that came with the collection...which were just perfect for this layout. The "goober" was cut with an old QK font - Star. I added some faux stitching...and I'd love to tell you that the camera makes the stitching across the top look crooked...but that wouldn't be true...I did it...and didn't even realize it was crooked until I photographed the layout and saw it on screen. LOL! Oh, well...it just adds character...right? Journaling is attached to the Moments Captured tag and slides behind the "today" layer. Journaling reads:

Matthew in 1996 or 1997? I sent this photo to you, Matthew and asked you what you thought I should title the scrapbook page and your reply was “Goober”. I had to laugh, but decided to go along with you. You might think you looked like a goober…but you’re my goober and I love you just the way you are!


Photos from the 80's. I used Carta Bella Our Family papers. The doily is a Prima die. Butterfly is from an old sticker sheet. I made his antennae by cutting a thin strip of black paper and gluing it to the butterfly's head. Butterfly trail was made with Nuvo drops. I used a border punch for the bottom of the beige mat. The "love" button is something I found in the bottom of a box of "scrappy stuff" and the "memories" embellie is a very old brass embellishment that used to be sticky on the back but that was all gone, so I used the holes on each end of the brass plate to attach it to the layout with brads. Quote I found online and printed. Title work was generated in the Silhouette program and cut out several times and layered for dimension. The thin red border around the checked background is just 1/8 inch strips glued around the edges. Journaling was computer generated and I inked the edges for a little dimension.


Photo of me...30 years ago! I used EP - A Walk in the Park papers for this layout. I actually scraplifted myself...a layout I did in September 2010 called Sugar & Spice. I have scrapped so much lately, I couldn't get my mojo going, so I just looked back in my gallery for a layout that really caught my eye and just did a complete "lift". LOL! I used MS punches for both borders. The title letters are very OLD chipboard letters from my stash (I had to glue them down...the sticky was all gone!) I added some yellow Nuvo drops to the borders. The flowers are a stamp from Altenew's Botanical Gardens. Journaling is tucked behind the photo and reads:

Looking at this photo makes me realize just how quickly time goes by! I remember the night this was taken...it was our Sunday School Christmas party. I was 40 years old...much younger, much thinner, and definitely had more hair than I have now at almost 70! My, Oh, My...how time does fly!

Thanks you for taking the time to visit my blog...if you leave a comment...I'm very grateful!  Hope you have a wonderful day!

Hugs!
Photobucket


Pin It!

Wednesday, May 24, 2017

Merry Monday and a Little Scrapbooking

Thought I'd play along with Merry Monday Christmas Challenge this week which is to create a card using mistletoe.  


Here's my take on the challenge...


I cut out the mistletoe on my Cameo...including the big bow.  I printed the sentiment through the Silhouette program, then cut the stitched border with a die from SSS.  I cut the berries separately and popped some of them with foam tape. I colored the mistletoe, berries and the bow with Copic markers.  I also added a touch of wink of stella to the berries. Added it all to a red card base...and done! 

I've gotten back to my scrapbooking a little more.  I hadn't scrapped in so long that it's like learning how all over again.  I've managed to complete about 6 layouts in the last week...so I must be getting my mojo back! LOL!


Photos of my youngest daughter when she was about 12 years old. I used October Afternoon papers along with some red card stock and a stripe from my scraps. I created the title work in the Silhouette Program. The little girl carrying the cake is a stamp that I colored with Copics and fussy cut. I added some Nuvo drops for the bumps on the cake and a little Wink of Stella on the stars and her headband. The "messy hair, Don't care" tags were created in the Silhouette program and printed. The red tags were stamped and heat embossed in white. The dog and the two red tags were MFT's four legged stamp set. The presents across the strip are a die from Simon Says Stamps. After die cutting it, I colored all the little present pieces and put them back in the die. Journaling was computer generated. 


Photos of my mother holding my second daughter, Kimberly when she was just 6 days old. Word paper is from Echo Park "Our Family" collection. Red paper is some really old paper from my stash. Hearts were die cut and punched. All were coated with Wink of Stella, and some of the hearts are covered with glossy accents. The leaf branches are a MS punch just joined together end to end. I added some faux stitching and some lines around the base pieces. The arrows were cut from paper in the EP collection. Journaling is tucked behind the word mat and there is a heart pull tab at the top. Title work was generated in the Silhouette Program and cut out 4 times and layered for dimension. The "family" tag is from the EP collection. 


I just finished this layout today, and thought I'd get it posted too.  Photos of my two youngest children with their elementary school PE coach.  He was a part of their lives from kindergarten through 5th grade.  We also attended church with him and his family.  I used the plaid papers from Lawn Fawn.  The title work was cut with the Silhouette (three times and layered for dimension).  The whistle and school bus are from the Silhouette store.  I colored the orange strip and the title letters with Copic markers. The wood grain paper is from Echo Park "It's a Boy" collection.  I added some black lines and faux stitching. The yellow circle behind the title work was cut with a die then embossed with a stitched die. School bus and whistle were adhered with foam tape. Journaling is tucked behind the solid yellow mat.

That's all for me today....As always, thanks so much for stopping in.  I appreciate your visit...and I appreciate each and every comment!
Photobucket


Pin It!

Sunday, October 9, 2011

LIM36 - One Layer with Heart(s)

I'm a little late with my card this week.  I've spent the last 4 days sitting at the hospital with my hubby. He's home now and on the mend.  I am thankful!

Our Less is More challenge this week is to create a one layer card with hearts on it.  Sounds simple...right?  Well, it took me a bit, but I finally remembered that I had a stamp perfect for this challenge.


All image stamps are from PTI.  The large bow and the jar base are from Friendship Jar Summer Fillers, the Hearts are from the Friendship Jar Spring Fillers collection.  The sentiment is from Hero Arts, and the pink gingham is from PTI.  I stamped the big bow, masked it off, stamped the jar under it, then added the hearts. the "xoxo" is another PTI stamp that I stamped each heart with.  Instead of putting a lid on the jar, I drew a little gathered top to look like the hearts are in a bag and tied up with a bow.  Then I colored it all with Copics.  Fairly quick and easy card once I figured out what I was going to do.  I wasn't going to add the gingham at first, but then the jar looked like it was floating on the card...and you know how I am about "grounding" an image! LOL!

Thought I'd also share a new layout that I finished last weekend.  This is photos of our little granddaughter, Helen Grace.


I used Echo Park papers for this and a SU graduation hat stamp.  The large arrow was hand cut and backed with a solid color.  The precious girl tag is a sticker from EP.  The Girly You Rock tag was made by stamping with a PTI sentiment, punching and circle, then punching 2 larger scalloped edged circles to back it. I'm telling you...these kids grow up FAST!

Tomorrow, I'll be at the hospital again...only this time it will be to welcome our newest grandson, Pierce.  He's scheduled to arrive around 1 pm on October 10.  Can't wait!  Now I'll have even more pictures to scrap! LOL!

Thanks so much for stopping by! I appreciate all of your wonderful comments! I understand that some people have been having difficulty leaving a comment, so I changed my comment box to a pop up box.  I've been told that helps...so maybe it will.  Until next time....

♥ Hugs! ♥


Pin It!

Sunday, September 11, 2011

LIM32 - Seeing Double

I've missed playing in the Less is More challenge for a couple of weeks.  It's been a busy two weeks for me. As some of you might remember from a previous post, my mother (who is 86) fell and broke her hip and had hip replacement surgery.  She's now in a rehab facility and is working hard to get her strength back so that she can go back home. It will probably be 6 weeks or more before they let her go home, but she's very determined to make it.  The doctors don't really want her to go back home alone, but that's what she wants, and we're determined to try and make it happen for her.

After returning from the 6 hour trip to check on my mother, my hubby and I took a little vacation to the beach at Sanibel Island which is about 9 hours in the opposite direction...WHEW!  So...it's been more than two weeks since I've done any stamping, card making, or scrapbooking...so my mojo has flown the coop!

Anyway....I digress, I wanted to tell you about the card I created for this week's Less is More challenge, where we've been challenged to create a one layer card using one image twice.  Did I mention that my mojo is still on holiday?...this is all I could come up with for this week's challenge.  Maybe my brain will kick into gear next week! LOL!

This finished size of this card is approximately 4.5 x 6 inches.  I cut a piece of white card stock 6 x 9 inches, then scored it 2.25 inches from each end to make my "doors".  Then, I cut a small 1.5 inch square and used the negative space as an embossing template with my light box, to score the three panels on each door.  I used a Copic marker to add shading to each panel and stamped a wreath in the top panel of each door.  The wreaths were stamped with Memento Bamboo Leaves, then colored with various markers.  I added a gold brad on each door for the "door knob".

 Here's a peek at the inside of the card when you open the "doors".  I stamped a tree (I believe it's a SU stamp).  Then I added a few baubles with red stickles.  The sentiments are both from Papertrey Ink.

Thought I also share another layout I did a few weeks ago.  These are my granddaughters, Camilah and Natalie.  


For this layout, I used Echo Park Splash collection. I love the bright colors in this collection. I made the kite by cutting a diamond shape and paper piecing for triangles for the kite, leaving a small red border for the crosspieces. The tail of the kite was cut with an craft knife then I tied tiny ribbon knots and adhered them to the kite tail. The circle embellies were punched circles from one of the papers and then I cut out the octagons and pop-dotted them on the circles. I added a bit of doodling to each circle and octagon. The large title letters are some old chipboard from my stash and the small letters are Basic Grey. I used two different punches for this layout - the loopy edge and the scallop with dots - both MS punches. The date was computer generated and I inked the edges with pink. The quote is a Hero Arts stamp - stamped in black Memento ink and then I inked the edges with pink. I added 3 dimensional dots in orange to the title letters and across the bottom between the circles and some teal dots to the kite. Journaling is tucked behind the top of the photo and reads: 

Camilah and Natalie, you two have grown up so fast and you are both beautiful young ladies. It’s so nice to know that you’re friends. You are also beautiful, sweet, kind, talented, and incredibly smart. We are truly blessed to have such wonderful granddaughters. 

Thanks so much for stopping by! I truly appreciate all your fabulous comments! Until next time...

♥ Hugs! ♥


Pin It!

Tuesday, August 23, 2011

Challenge 36 - Trying a new Tangle - Assunta

There's a new tangle challenge this week at I am the Diva blog spot.  Our challenge this week was to create a tangle using a new tangle called "Assunta" which you can find the directions to HERE.  I played around with it for a while, but I never could draw it using the "formula" given.  I finally resorted to just eyeballing it...and drawing each "bloom" individually.  I'll have to tell you that my initial try was really bad!  It found it's way to the circular file rather quickly! Here' what I ended up with for my entry:


Thought I share a layout I finished this weekend too.  This is my beautiful little granddaughter, Maggie.  My daughter came for a visit in April and they all went to the beach for a few hours on Saturday morning. Doesn't she just look adorable in her little teal bathing suit? 


 The title work and the waves were both cut with the Silhouette.  I've just learned to "weld" my letters together and I'm loving all that I can do with it.  The sand pail and the ball were also cut with the Silhouette.  I've read that there's a new 12" width Silhouette coming out...and I'll definitely have to have it! The waves were cut from the Echo Park Splash collection. (the background is also Echo Park Splash).  The title, ball, shovel, and pail were cut from white card stock and colored with Copics.  I tore a small piece of white paper for my "sand" and colored it with Copics. Then I added a light layer of glitter.  The sand in the bucket is actually micro beads adhered with very sticky double sided tape.  On the tips of each wave, I added a touch of white puffy paint and after it dried, I set it with the heat gun and the white puffed up....thought that was kinda cool.  I love that in the one picture, Maggie looks like she's throwing the ball!  I also added a bit of doodling at the corners of the photos to "frame" them.

Thanks so much for stopping by! I really appreciate your comments! They make me happy! Until next time....

♥ Hugs! ♥


Pin It!

Wednesday, June 1, 2011

OLW56 - Father's Day

It's One Layer Wednesday time again....and this week, Susan at Simplicity has challenged us to make a Father's day card for the "father figure" in out lives. 

Oh how I wish I could make a Father's day card for my Daddy!  He's been gone for 11 years and I still miss him every day!  So, this year, I will make a Father's Day card for the man who has helped me raise my children.  My children's father died 33 years ago, and I was very fortunate to fall in love with a wonderful man who has helped me raise my children.  We've been married 30 years now, and he's the Daddy they know and love. He's been a wonderful daddy to my children, and I am truly blessed that he became part of our lives!

I used a stamp from  Flourishes Guiding Light collection for my card.  I stamped the image in Versamark and black Memento ink.  I added a little clear embossing powder and heat set it.  Then I cut a mask to go over the sails and the boat, and using two different colors of distress ink, I sponged in my background.  After I had sponged the ink, I decided that a moon would be nice, so I punched a circle, and placed it in the upper right hand corner and sponged a little more ink. I like the effect that I got (accidentally!).  It looks like clouds are passing over the moon! How cool!  Then I stamped the sentiment under the image...and I'm done!  Fifteen minutes...wow! 

Finished another layout last week and thought I would share that with you too.  This is my grandson, Allen.  Allen is notoriously difficult to get a photo of when he's smiling.  He just won't cooperate! LOL!  So...I tricked him.  I thought our conversation (as it were) was just too funny!


I used Echo Park Papers for this layout.  This collection is called For the Record and was just perfect for these photos.  I cut two different sized circles with my EK Success circle cutter.  The strips across the bottom were cut to resemble ribbons.  I backed the yellow piece with a piece of red card stock so that it would pop a bit.  The scalloped piece is a sticker from the collection.  The title "For the Record" is also a sticker from the collection.  I rarely place sticker directly on the layout, simply because I tend to want to move things around several times before I'm satisfied with the design, so the stickers I've used here were all put on white card stock and then I cut them out and used pop dots to put them on the layout.  The typewriter is also a sticker from the For the Record collection.  I typed the journaling strips in Word, then layered them on black card stock and added them to the layout.  The journaling reads:

Grandma: Allen…don’t frown! I want to take your picture. Give me a smile!
Allen: Hmmph!
Grandma: Come on, Allen….just one smile!
Allen: ~still frowning~
Grandma: Allen, how would you look if you had $100 bill in your pocket?
Allen: ~Big Grin~

BOYS! You gotta love 'em!

That's it for today.  I appreciate you stopping by and thanks for all the fabulous comments! They make my day!  Until next time....

Hugs!


Pin It!

LinkWithin

Related Posts with Thumbnails