Wednesday, December 30, 2009

Happy New Year

What a wonderful time we've had this Christmas season! I love watching the grandchildren when their eyes light up with joy on Christmas! There's nothing like little ones to make Christmas even more magical.

We've had overnight company and some that just visited for a few hours during the day...but all of it was treasured time spent with family and friends.

This weekend we will ring in the new year with a little get together with more friends, and my daughter, Kimberly and her family will be visiting (and bringing Katie, Adam and my newest granddaughter, Maggie Elizabeth). It'll be a full house again this weekend and I can't wait!

From my house to yours...I hope the new year brings you great health, happiness, and prosperity! Here's to a FABULOUS 2010!!

Until next time...Hugs!


Pin It!

Wednesday, December 9, 2009

Christmas 2009

We finally got the tree up last night. Don't know if all the other Christmas decorations will make it out this year, but the tree is done.
Here's a few photos that I took after we were finished. Jacob was my little helper. He thought climbing the ladder was what he needed to do, but we finally convinced him that his Grandpa would be hanging the ornaments at the top of the tree.
I still don't have my lighting right, but I'm always ready to practice. This is my daughter with Jacob. Not sure why they look grainy to me...hmmmm...need to get the book out and read a bit more about photography.
I love this shot. Jacob was so intent on staightening the ornaments that he didn't notice I was taking his photo.
This one is cute because he was looking at his reflection in one of the ornaments and making faces at himself! LOL!
Just need to move this one just a little bit more.....
Ahhhhh...the tree is finished. Let's just sit here for a minute and look at all the pretty lights and ornaments.

Thanks so much for stopping by. My wish for you this season is that you will have a joyous and peace-filled Christmas with your family and friends. I know my family will spend time together at Christmas, and I hope you get to spend time with your family too.

Merry Christmas!

Hugs!


Pin It!

Friday, December 4, 2009

Time for Photography Practice

As usual, last weekend was jam-packed with activities! We had some of the kids over for dinner Saturday, and then on Sunday, we had a visit from our dear friends, Tim and Terri with their beautiful kids! The skies were clear, there was a nip of fall in the air, and the lighting was perfect for some outdoor photos.

Jacob loves to pose for the camera. It's amazing how fast the kids grow!

Traci and Jacob just clowning around. I love it when I get a funny-face photo!

Allen and Helen Grace peeking out of the window of the "fort" on the gym-set.

My son, Matthew, and his wife, Nichole, and of course, my beautiful little grandchildren, Allen and Helen Grace.

Matthew took this photo of Butch and me. I must admit . . . this is me. I just can't understand why I looks so OLD in pictures! I never look that old when I'm looking in the mirror. Come to think of it, I don't look this heavy in the mirror either...hmmmmm...maybe I should send my camera back and get a new "youthful" lens since it seems that mine is malfunctioning! LOL!!

Then I took some pictures of Tim and his family. They are such a photogenic family...and why wouldn't they be? Tim is one of the best photographers that I know! Whenever we get together, I follow him around with my camera, just hoping that I can absorb some of his awesome photography skills!

I had so much fun on Sunday! After we finished taking photos, we visited for a while, then headed off to Cici's pizza. Excellent day...good memories!

Thanks for stopping by...and until next time...

Hugs!


Pin It!

Tuesday, December 1, 2009

Trying one of Pammy's Templates

Here's a new layout that I just completed with some photos I took right before Thanksgiving. As a contributing artist for Ideas for Scrapbookers, I wanted to use one of Pammy's templates and this leaf template was perfect with these pictures of Katie and Adam.

The large leaf is part of the template and I used it for a pattern to print my journaling on. The smaller leaves were punched with a large leaf punch. I actually "made" the paper that the leaves are punched from with several different color inks and the Tim Holtz sponge applicator (this is the applicator with the felt pads, but I used the foam pad attachments).

I have posted the mini-tutorial with instructions on how to make the small leaves at Ideas for Scrapbookers. Take a minute to stop by Ideas for Scrapbookers and check out our awesome tutorials, templates, and layouts. We often have guest contributors and sometimes you'll find that you can win a RAK! Fun stuff...All the time!

Thanks so much for stopping by...and until next time...

Hugs!


Pin It!

Friday, November 27, 2009

Introducing MAGGIE ELIZABETH

This is Maggie. Isn't she just beautiful? She was born on November 16, 2009. She weighed 8 pounds 9 ounces and was 19 1/2 inches long. This photo was made when she was just 4 days old. She wasn't suppose to be born by Cesarean section, but she managed to turn herself around a few days before and was breach...so that meant a c-section for Kimmer.

I hurried back home for a few days while Kimberly was still in the hospital and managed to get 40 birth announcements finished for her. I couldn't get them prepared beforehand since they didn't decide on a name until just a couple of days before she was born.

The photo I used for the birth announcement was one that I took when she was just one day old. The one from the hospital when she was dressed to go home was just adorable, and I wish I had used it, but this one is cute too.

Did I mention that she looks JUST like her mama? I'm still hoping that her hair will be red. It's hard to tell right now, because she doesn't have too much hair yet.

I was able to go back to Kimberly's last Sunday and stayed with them through Thanksgiving. I definitely have a thankful heart this year, not only for Maggie Elizabeth, but for all of my family and all of my beautiful grandchildren!

Hope your Thanksgiving was a wonderful day. Thanks so much for stopping by!

Hugs!


Pin It!

Thursday, November 19, 2009

WIN A $20 GIFT CARD

Ideas for Scrapbookers is having a $20 dollar gift card giveaway! It’s so simple to enter…

All you have to do is FOLLOW the blog.

That's it.

When you sign up to follow the blog, your name will be entered into a chance at a $20 gift certificate to scrapbook.com! If you'd like to have your name entered into the drawing twice, share the news on your blog, facebook, twitter, etc.

You can follow the blog when you log in with google, blogger, AIM, or yahoo. Then click follow on the right sidebar! To let us know that you shared the news on your blog or somewhere else, just post a comment letting us know where you shared the news OR email Pam at scrappingpam73@yahoo.com to let her know.

You have until Sunday, Nov 22nd, to become a follower of Ideas for Scrapbookers. A name will be chosen randomly as a the winner from the followers listed on the blog sidebar, those who shared the news links, and the emails sent to Pam about where you've shared the news. One lucky person will win a $20 gift certificate to scrapbook.com!

Come play with us...win prizes, learn new things, and above all...have a great time!


Pin It!

Saturday, November 14, 2009

It's Time for a Change

I been trying to change my blog for the last few weeks. I really wanted a 3-column blog. Everything I tried didn't seem to work. At one point, I lost all the blogs that I follow. I have lost my patience MANY times trying to improve my blog!

Okay, so I got past all that and decided that changing to three columns would have to wait until I have more time to diddle with it. Then I decided that maybe I should just update my blog header. I think I put that off for a while because it was just easier to use a photo than to scrap a header. Now that I've scrapped my header, I have to wonder...WHY did I think it would be so difficult?

All the header is....is a 6 x12 layout! I used a Quickutz die for the flourishes, added a few blooms (some of which I punch, inked and doodled on) and a bit of bling. Super quick and I love the way it came out. The pen was an old sticker I found in my stash. I just pop-dotted it for dimension. The "scroll" was just printed paper that I tore and inked. I added some brown ink splats then highlighted them with glossy accents. The little ink jar was something I cut from cardstock and added a little white highlights and some glossy accents for ink dribbles.

I had fun creating this......Now...once again...WHY did I wait so long?

Thanks for stopping by...and until next time....

Hugs!


Pin It!

Saturday, November 7, 2009

Ideas for Scrapbookers - Meet the Contributing Artists

I am so excited about this new adventure!

I have been invited to be a Contributing Artist with Ideas for Scrapbookers! I found out yesterday that I would be a part of this awesome group! If you're not familiar with this site, you need to check it out. Pam has done a wonderful job of providing some great resources and inspiration for scrapbookers, and best of all -- it's free! You can visit the blog at: http://www.ideasforscrapbookers.blogspot.com/

I am so excited to be a part of this great group of scrapping artists and I plan to draw inspiration and ideas as well as contribute to the blog. Formal introductions won't begin until tomorrow but you can check out these wonderful designers by following the links to their blogs, below...

Delaina Burns: http://delainas.blogspot.com/ Danielle Holsapple: http://danielleholsapple.blogspot.com/ Heather Landry: http://miraclesmommadesigns.blogspot.com/ Julie Howard: http://retrojulie.blogspot.com/ Sarah De Guzman: http://redoaklines.com/ Melanie Holzwarth: http://www.arkmom-scrappilyeverafter.blogspot.com/

BTW...Did I mention how excited I am to be a part of this? Oh, and even better, one of Pam's good friends Heidi Sonboul at GDC Studios is having a contest for readers to use one of Pam's templates. Wouldn't you like to participate? Just visit... http://ideasforscrapbookers.blogspot.com/2009/11/chance-at-50-gc-to-gcd-studios.html for more information.

Things will be happening fast - loads of information and inspiration, so visit often in the coming weeks for more fun and excitement at Ideas for Scrapbookers. You WILL be inspired!


Pin It!

Friday, November 6, 2009

Quick - Easy - AND Inexpensive!

I've had a lot of fun this week making a few boxes of gift cards that I'll be using for Christmas gifts. It's a really quick and inexpensive gift...and besides...everyone needs a card occasionally. I wanted to show you a couple of the boxes that I've made this week. I plan to make several more of these in the next few weeks.

The first set is the Christmas card gift pack. The card box will hold five cards and five envelopes easily. The cards were quick and easy to make and I really loved how they turned out. I used plain white cardstock (like from the office supply store). I cut each 8.5 x 11 sheet in half crosswise, which gave me two cards from each sheet of cardstock that measure 4.25 x 5.5 inches.

(BTW...I recently purchased a Scor-Pal...and it was perfect for this project, although not necessary)

For each of the cards, I stamped the Christmas design in black ink in the corner of the card and then added a word phrase approximately 1/2 inch from the edge of the card. Using template (cut it the same size as the card front, then cut a rectangle from the middle leaving 1/2 inch on each edge) or use the Tim Holtz zero center ruler. Using the ruler, I drew a solid black line 1/2 inch from the edge of the card. When I came to a spot that was stamped...I just skipped over it and resumed my line on the other side of the stamped image.

This next set of cards is a set of all occasion cards that I did the same way. The possibilities are endless...and honestly, they're just darn cute!

Now, here's the pattern for the adorable little box. (I must insert here, that this is not my original idea, I saw one at Splitcoast Stampers and I've tweeked it for my use.)

You will need an 8.5 x 11 sheet of cardstock (paper won't work for this part - it must be cardstock).
1. On the 11 side, score the cardstock at 3 1/4", 3 3/4" and then at 8 1/4" and 8 3/4 "
2. On the 8.5 inch side score the paper at 3/4", 1 1/4" and then at 7 1/4" and 7 3/4"

3. Cut the flaps as shown in this photo - by cutting away where the black is.

4. The shorter end at the top is the flap of the envelope box. You might want to round the corners on that and on the side tabs that fold in.

5. Fold on all scored lines.

6. Use very stick double sided tape to adhere the bottom flap to the tabs that fold in. (it folds just like an envelope.)

7. Decorate as desired. I used a small magnet under the flap and on the envelope to snap the box closed, but you could use ribbon adhered with brads to tie it together or a small piece of velcro on each side.

Use your imagination..and remember...it's QUICK, EASY, and INEXPENSIVE! (And it makes a great gift!)

I'd love to see what you make, so be sure to let me know when you try it. If you have questions, don't hesitate to ask me!

Hugs!


Pin It!

Saturday, October 10, 2009

Guest Designer for My Creative Scrapbook - October

I'm a little late getting this posted, but here's my work as guest designer for My Creative Scrapbook using October's Main Kit. Beautiful Webster's Pages. Our work from the main kit is featured on the Webster's Pages blog too.
I distressed the light blue made and added a small scalloped border with my scallop scissors. I cut the designs in the paper so that I could slide my photo and mats behind the designs. Added a little faux stitching. The photo is behind an oval I cut with my scalloped scissors and then I added the three dimensional dots around the oval. Needless to say, this is a very old photo and was encased in a black and very stiff cardboard oval frame, so I had to scan it and then use the photo in it's oval shape. I cut out a couple of butterflies from the patterned paper and the larger butterfly is a MS punch that I coated with stickles. Journaling is tucked behind the mat and reads:
This is a photo of my (Great) Uncle Sidney McDowell. Sidney was born on May 5, 1892. I’m not sure how old he was in this photo, but I believe it was made in the late 1898 or 1899. He was my Grandmother Pace’s younger brother (Grandma Perdue’s Uncle). I think he was a very handsome young man, and I just fell in love with this photo the first time I saw it.

Some photos I took last year of my handsome little grandson, Adam. I used the Fiskars scalloped punch for the edges of the border. The butterflies were cut from another piece of paper and layered over butterflies on this paper for a 3-D look. I added a little sparkle to the butterflies with some stickles. Also used the apron punch for the border on the large blue mat. The bird was also cut from a piece of the paper and added to the layout with pop dots. Added some doodling, and the journaling around the frame reads: May the road rise up to meet you, may the wind be ever at your back, may the sun shine down upon your face, and the rain fall softly on your fields, and until we meed again, may God hold you in the hollow of his hands. ~Irish Blessing

This is a photo of my older brother when he was just a month or two old. I used a MS lacy scallop punch for the border, and my scallop scissors around the photo. I added lots of distressing and inking. Then I added some small flower buds and some punched flowers to the swirl bling. Journaling is tucked behind the big mat and reads:

This is my brother, Randy, when he was about 2 months old (probably in January 1950). He didn’t get to be the baby of the family for very long, because I was born just a year and three days after him. Although we don’t see each other very often now, when we were children, I was often his shadow.
My DGD, Helen Grace - picking flowers in my flowerbed! I used my scalloped scissors on the burgandy strip and around the oval cameo. I threaded cardstock through the ribbon that was included in the kit. Faux stitching was added to the scalloped edge of the large mat. The well was cut from another piece of the paper included in the kit. I made this card from scraps I had left over from the kit this month. Super simple card and it works up really quickly!
NOW....here's a little tutorial for making this cute card. Cut card stock 5 1/2 inches by 12 inches.
Using a bone folder or a scoring tool, score the card (on the dotted lines) at 2", 4", 8", and 10". Then cut the card on the solid lines (lengthwise) from the 2" scored line to the 10" scored line. Cut both solid lines this way. Then fold the card on the scored lines in a fan fold (first one way then the other).
Then...fold the middle section opposite the top and bottom sections. Like the finished card above. Decorate as desired. I used an oval shape on the front that I stamped a simple little flower on. Then backed the oval with some of the base card stock and trimmed it with my scalloped scissors. To dress it up a bit, I added dots on each of the scallops with some gold 3D paint. The butterfly was cut from the patterned paper and highlighted with a little glitter, then adhered with foam tape for dimension.
The sentiment inside is also on an oval circle...Happy Birthday is stamped and then I inked the edges to give it some definition. Adding doodling is always a nice touch. I also used my paper piercer to punch holes around the patterned paper that would be the "front" of the card when folded...give a really cool look!
Thanks so much for stopping by. If you make a card, be sure to let me know, so I can check it out! As always...love to hear from you.
Hugs!!


Pin It!

Saturday, October 3, 2009

Guest Designing for My Creative Scrapbook

I had to step down from my DT spot with My Creative Scrapbook in January. Sometimes life gets in the way of fun things! I've really missed playing with all the wonderful kits that Pam sends out each month. Pam invited me to be a guest designer for My Creative Scrapbook for the Month of October. The reveal will be on Monday, October 5, but here's a little sneak peek of what I did this month. I'll be back next week to post the layouts. I really enjoyed playing with all the pretty papers and embellies included in the Main Kit. Here's your little peek: Lots of pretties this month! Be sure to check back next week!
Until next week...signing off....


Pin It!

Saturday, September 19, 2009

Guest Design for Scrapbuck

I was recently asked to be a guest designer for Scrapbuck - an online store where most products are $1.00. Here's what I created with the fabulous supplies I received: This is a photo I took of my Grandson, Jacob. My daughters and I took all the grandchildren out to the country. They were all dressed in denim and white. We had no particular destination in mind when we started out, we were just looking for a nice setting to take some photos. When we passed this farm, I thought it looked perfect for our photo shoot. So....we just stopped, walked up to the door and asked permission from the sweet little lady who lived there, grabbed our camera and headed out to the field! A really fun photo shoot!

In April, I went to a scrapbooking retreat in Flowery Branch, Georgia for the weekend. One of our online friends had put the weekend getaway together for all of us. This little group shot was taken after a full day of scrappy shopping. Looks like we are all exhausted! LOL! It was a great weekend and I think all of us had a great time. Now I'm looking forward to getting together with these girls again ..... I think! LOL!

Thanks for stopping by...and check out Scrapbuck when you get a chance.


Pin It!

Friday, August 7, 2009

A Perfect Photo Corner - Every Time!

I know it's been a while since I last posted...but sometimes, life just gets BUSY! I've been meaning to do this little tutorial for a while...so here goes... To make these photo corners, you'll need cardstock or paper of your choice, scissors, a trimmer, some adhesive, and I sometimes use a bone folder (depending on how thick the paper/cardstock is. 
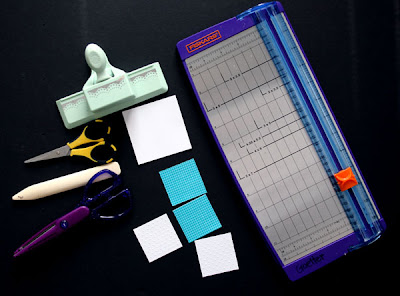
You will be cutting squares, so the larger the square, the larger the photo corner. For my examples, I cut several 2 inch squares and one 3 inch square. One way to use a bone folder is to align your opposing corners along the cutting groove in the trimmer and drag the bone folder down the grove. Some trimmers come with a scoring blade and that can be used as well. You will need to score your square from corner to corner - making and "X" design on the paper. 
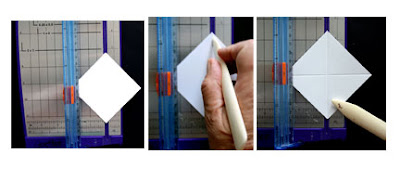
You can also do this by just folding the corners together and making a nice crisp edge on the fold with your fingers. Once you have the "X" shape, take your scissors and cut out ONE of the triangles. It doesn't really matter which one, they're all the same.
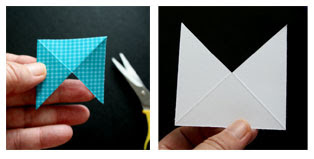
Once you've cut the ONE triangle out, simply fold the two edges on either side to the back and you've formed a little "pocket" that will slide over the corner of your photo. BUT...before you adhere the back pieces together, you might want to dress them up just a bit.
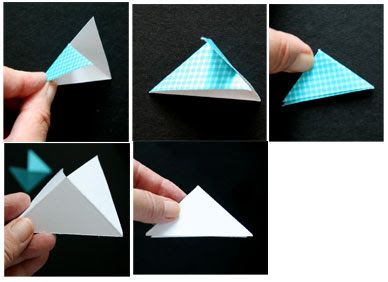
If you want to add a decorative edge - use your edge punches, decorative scissors, or you could simply tear a tiny bit off the edge. Here, I've used some scalloped scissors to cut out part of my corner on the white piece, and I used a Martha Stewart punch on the edge of the gingham piece. One REALLY important part of this step is to make SURE that you punch/cut the side opposite the cut out notch. That's the side that will be on the top of the photo. 
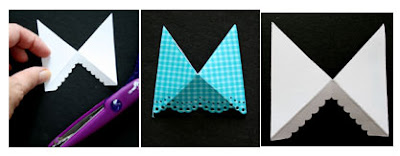
You might also want to add a little ink to the edges or doodle on the front of the photo corner before glueing the two back edges together. I've added a little doodling to the examples below.
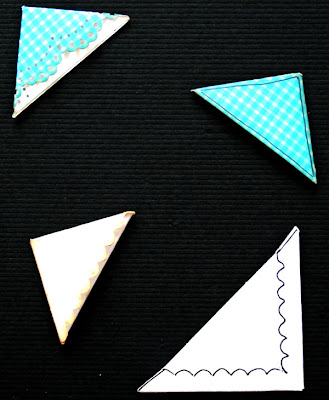
So...now you have the finished project. I just put the different corners on the photo so you could get an idea how they might look. Dress them up or tone them down...it really depends on the look you're going for. Once you've decided where your photo will be on the layout, then all you have to do is put some adhesive on the back of each photo corner and place it on the page. This is really a good way to add photos to a page that you might not want to put adhesive on the actual photo (especially if it is a vintage photo).
I hope you enjoyed this tutorial and find it useful. If you find this to be helpful, stop by and let me know. I always enjoy hearing from you! Happy Scrapping!


Pin It!

LinkWithin

Related Posts with Thumbnails