I know it's been a while since I last posted...but sometimes, life just gets BUSY! I've been meaning to do this little tutorial for a while...so here goes...
To make these photo corners, you'll need cardstock or paper of your choice, scissors, a trimmer, some adhesive, and I sometimes use a bone folder (depending on how thick the paper/cardstock is.
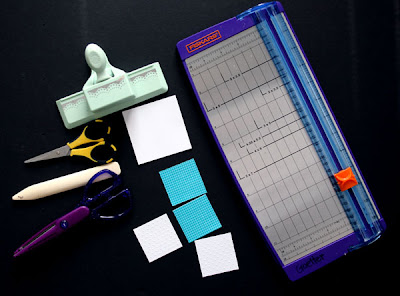
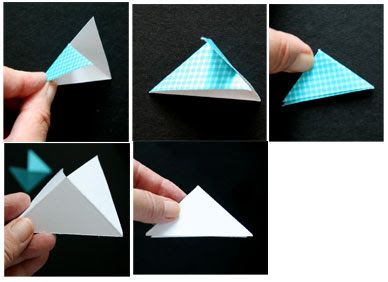
You will be cutting squares, so the larger the square, the larger the photo corner. For my examples, I cut several 2 inch squares and one 3 inch square. One way to use a bone folder is to align your opposing corners along the cutting groove in the trimmer and drag the bone folder down the grove. Some trimmers come with a scoring blade and that can be used as well. You will need to score your square from corner to corner - making and "X" design on the paper.
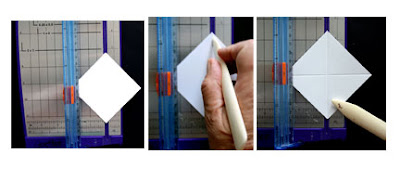
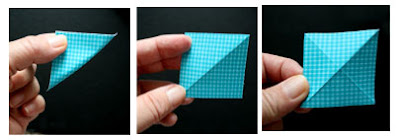
You can also do this by just folding the corners together and making a nice crisp edge on the fold with your fingers.
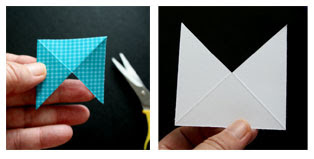
Once you have the "X" shape, take your scissors and cut out ONE of the triangles. It doesn't really matter which one, they're all the same.
Once you've cut the ONE triangle out, simply fold the two edges on either side to the back and you've formed a little "pocket" that will slide over the corner of your photo. BUT...before you adhere the back pieces together, you might want to dress them up just a bit.
If you want to add a decorative edge - use your edge punches, decorative scissors, or you could simply tear a tiny bit off the edge. Here, I've used some scalloped scissors to cut out part of my corner on the white piece, and I used a Martha Stewart punch on the edge of the gingham piece. One REALLY important part of this step is to make SURE that you punch/cut the side opposite the cut out notch. That's the side that will be on the top of the photo.
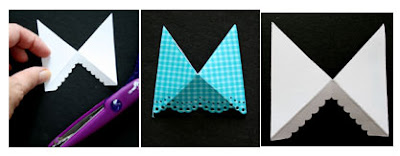
You might also want to add a little ink to the edges or doodle on the front of the photo corner before glueing the two back edges together. I've added a little doodling to the examples below.
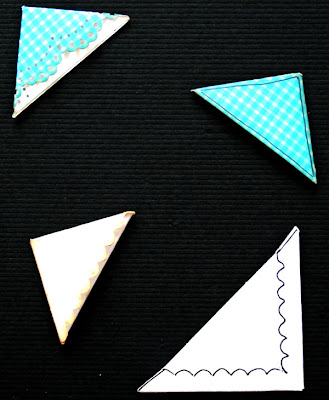
So...now you have the finished project. I just put the different corners on the photo so you could get an idea how they might look. Dress them up or tone them down...it really depends on the look you're going for. Once you've decided where your photo will be on the layout, then all you have to do is put some adhesive on the back of each photo corner and place it on the page. This is really a good way to add photos to a page that you might not want to put adhesive on the actual photo (especially if it is a vintage photo).

I hope you enjoyed this tutorial and find it useful. If you find this to be helpful, stop by and let me know. I always enjoy hearing from you! Happy Scrapping!


 Once you have the "X" shape, take your scissors and cut out ONE of the triangles. It doesn't really matter which one, they're all the same.

10 comments:
Awesome tutorial! Thanks for sharing :)
great tutorial Susan!! thanks!
Thank you so much for the tutorial Susan! I'm sorry I haven't been around much on sb.com lately, I'm slowly trying to get caught up on my comments and I hope to visit your gallery soon!
xxx Peggy
Umm, WOW!!great tutorial!!! I will have to try this!!
As for my moon shot...I did actually shoot in night mode here! I should have used my tripod because in the past that helped steady the lense which was my 75mm-300mm frame.
Oh my goodness! These are fabulous! Thanks for sharing.
Awesome tutorial, Susan - thanks! I'll definitely be trying this - especially the cute little doodled one. How fun!?
WOW that's really cool! :) I would never have thought of it
Great tutorial. TFS!
What a great idea! THanks so much for sharing! Lynn :)
Great tutorial Susan.....Thanks for posting this!!
Post a Comment