Showing posts with label stamping. Show all posts

Tuesday, June 14, 2022

It's June 2022! Time Flies!


I can't believe how quickly time flies!  Seems like it was just January 2022! Now here we are in June already!  

Thought I'd pop in and share a few more layouts with you.  I finished a small folio with my grandson's graduation photos in it last week, but neglected to take and pictures of it! Shame on me!!  My daughter loved it though! LOL!

Let's get started...


Photo of my son taken in 1996 (or maybe 1997). I sent this photo to him via text and told him I would be scrapping it and asked what he thought the title should be and he said "Goober". LOL! I used EP Capture This collection for this layout. Mostly just layering papers and some of the tags that came with the collection...which were just perfect for this layout. The "goober" was cut with an old QK font - Star. I added some faux stitching...and I'd love to tell you that the camera makes the stitching across the top look crooked...but that wouldn't be true...I did it...and didn't even realize it was crooked until I photographed the layout and saw it on screen. LOL! Oh, well...it just adds character...right? Journaling is attached to the Moments Captured tag and slides behind the "today" layer. Journaling reads:

Matthew in 1996 or 1997? I sent this photo to you, Matthew and asked you what you thought I should title the scrapbook page and your reply was “Goober”. I had to laugh, but decided to go along with you. You might think you looked like a goober…but you’re my goober and I love you just the way you are!


Photos from the 80's. I used Carta Bella Our Family papers. The doily is a Prima die. Butterfly is from an old sticker sheet. I made his antenne by cutting a thin strip of black paper and glueing it to the butterfly's head. Butterfly trail was made with Nuvo drops. I used a border punch for the bottom of the beige mat. The "love" button is something I found in the bottom of a box of "scrappy stuff" and the "memories" embellie is a very old brass embellishment that used to be sticky on the back but that was all gone, so I used the holes on each end of the brass plate to attach it to the layout with brads. Quote I found online and printed. Title work was generated in the Silhouette program and cut out several times and layered for dimension. The thin red border around the checked background is just 1/8 inch strips glued around the edges. Journaling was computer generated and I inked the edges for a little dimension.


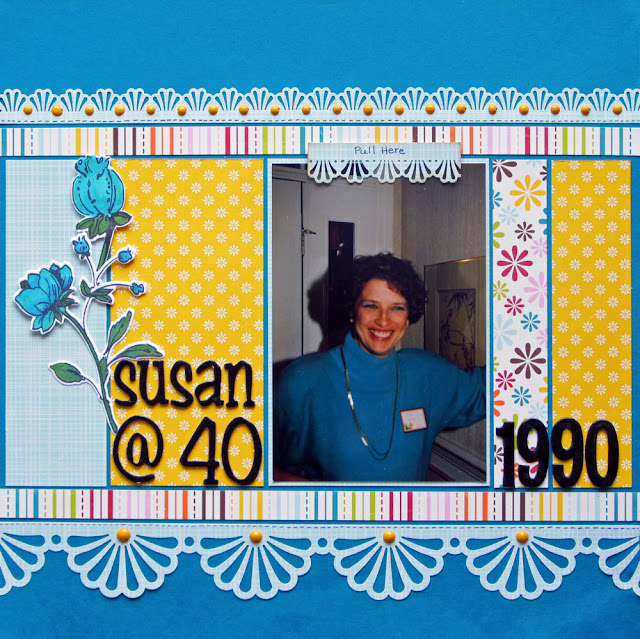
Photo of me...30 years ago! I used EP A Walk in the Park papers for this layout. I actually scraplifted myself...a layout I did in September 2010 called Sugar & Spice. I have scrapped so much lately, I couldn't get my mojo going, so I just looked back in my gallery for a layout that really caught my eye and just did a complete "lift". LOL! I used MS punches for both borders. The title letters are very OLD chipboard letters from my stash (I had to glue them down...the sticky was all gone!) I added some yellow Nuvo drops to the borders. The flowers are a stamp from Altenew's Botanical Gardens. Journaling is tucked behind the photo and reads:

Looking at this photo makes me realize just how quickly time goes by! I remember the night this was taken...it was our Sunday School Christmas party. I was 40 years old...much younger, much thinner, and definitely had more hair than I have now at almost 70! My, Oh, My...how time does fly!


Photo of my hubby when he was in the Air Force in the 60s. I used EP For the Record collection. I cut the title letter out 4 times (one time in red) with the Cameo, then highlighted them with white and a layer of Nuvo Crystal Glaze. The Air Force emblem was printed from the internet and popped on foam tape. The "be still my heart" sentiment was made in the Silhouette program and cut with the Cameo. The boots are a free clipart from online that I fussy cut. I added some borders to the two background mats as well as the photo and I also added a bit of faux stitching with a white gel pen. I forgot to insert the journaling tab before I took the photo of the layout, but it slips right behind the photo and reads:

This photo was taken when Butch was a Training Instructor (Drill Sergeant) at Lackland Air Force Base in San Antonio, Texas. He was transferred to this assignment on March 11, 1968. This was way before we were married, (because in 1968 I was just graduating from high school) and he would have been almost 32 years old.


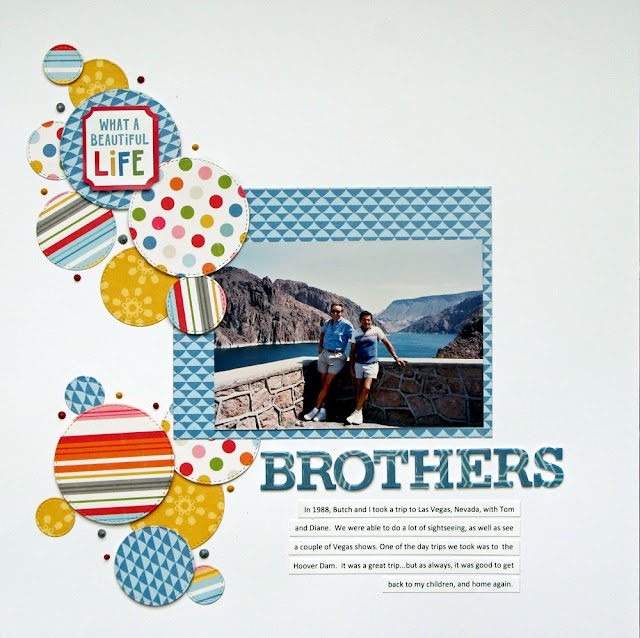
Photo of my hubby and his brother at Hoover Dam. I used a white background. Patterned paper is from EP Fine and Dandy. I cut various sized circles with a stitched edge die cuts from Cottage Cutz (I found them on Amazon, I think). Title letters were cut four times with dies from Papertrey Ink and stacked for dimension. The top layer of the letters was cut from paper from the collection. I used Nuvo Crystal Glaze on each of the letters. I popped up some of the circles for dimension and added some different color Nuvo drops sprinkled around the circles. Journaling was computer generated, cut in strips, and adhered directly to the background. This was a very quick and simple layout.


Photo of my hubby with 5 of our grandchildren. Background is a light seagreen/teal-ish card stock. I printed the title "Easter 1997" and the photo legend on the card stock with the printer. Other than the background, all ppr for this layout came from my scrap bins. The bird was cut from some ppr from MME (I think). The Happiness tag is a sticker from the EP Capture Life collection. I added some washi tape on the bottom edge and the top left edge (gotta do SOMETHING with all that washi tape I keep buying! LOL!) Super simple layout...the most difficult part was getting the printing exactly where I wanted it on the background!

This was a LONG post...so if you made it through...THANK YOU!  I have so many layouts that I haven't shared, so this could go on for a while.

As usual, if I've done anything on any of these that you would like to know how I did it, just drop me an email and I'll get back to you.

Thanks so much for stopping by...and if you leave a comment...an even BIGGER thank you!

Hugs!

Photobucket


Pin It!

Monday, April 11, 2022

Time Flies!

WOW!  It's been 2 Years since I last posted.  I've been very busy...you know....covid...and other stuff!

I haven't done as much card making as I used to.  Seems like I'm doing a little more scrapbooking now.  I have made numerous cards, just didn't get them photographed and posted.

Here's a few of the layouts I've done in the past year or so...


This first one is a photo of my grandson, Allen, taken in 2006. He's 17 yrs old now! Made this layout totally from scraps (except for the white background paper). Matted each of the photos with dark blue as well as the ppr piece in between the photos. I printed the tile work (designed in the Silhouette program) directly onto the white background. The Surprised "face" was also designed in the Silhouette program. I added some faux stitching to the banner tabs across the top and drew some lines around the edges of the background. Fairly quick and easy layout. No journaling...just added his name and the date of the photos on the layout.


My dgs, Tyler on his 4th birthday. I made his t-shirt birthday cake that year. I used EP Everyday Eclectic papers for this layout. The round photo was matted on a scrap of red polka dot paper and both the photo and mat were cut with a stitched edge die. Balloons are a die from Simon Says Stamp and were cut from white card stock and colored with Copics. String on the balloons is tatting thread. I designed the title work in the Silhouette program and cut it out 4 time to layer for dimension. I also added Nuvo Crystal Glaze to the top of the letters. The little cake embellie is from the Silhouette design store, as are the tags that I added information to them. I also added thin red strips of card stock around the blue background. No journaling on this one...photos tell the story.


Photo of our oldest son Glenn when he was about 18 months old. I used some OLD Basic Grey papers - Hopscotch and the blue is from BG Blitzen Collection. I kind of follow a sketch from Pagemaps...with a twist. I created the "Family tag in the Silhouette program and journaling was also done in the program. Circle was cut with a large circle die. Border strip across the top was punched with a MS punch (OLD). I added some faux stitching and some black Nuvo drops. Butterflies were cut with a Simon Says die and I added some tiny blue bling to the bodies. The butterflies were sprayed with some sparkle mist but it's difficult to see in the photo. The title tag reads: Family - today's little moments become tomorrow's precious memories.


Photos of my son and my grandson (his nephew). I used REALLY old Basic Grey papers - Marrakech. Really digging back into some of my stash now! I used the threading waters border punch to punch the scalloped mat (found a video online to remind me how to use just a border punch without the corner punch). The "laugh with me, giggles, laughter, and just plain silly" are all rub ons that I found in my stash. I punched circles with a 2 in, 1 3/4 inch and 1 inch punches. I printed the "uncle Matthew & Jacob" on the circle punch after I punched it. Did a bit of doodling on some of the circles. The image on the light blue circle on the right is an old SU image I stamped in black. Title work was designed in the Silhouette program, printed, and cut with the Cameo several times for dimension. Working on using some of my old stuff instead of buying so much new stuff! 


Photos taken at our family reunion in 1999. I matted each photo and the ppr with black card stock. The flowers are from my "bits and pieces" basket (things I've cut out/made but didn't use) Top quote was computer generated and cut out with a Spellbinder die. Big flowers are stamps from Altenew. I'm not sure about the smaller flowers...maybe Altenew? Ppr is from EP Anything Goes collection. Title work tag was computer generated and popped on foam for dimension. Butterfly is a MS punch and the trail is a part of some black bling swirls. I cut 1/4 inch strips of black card stock and made a box around the photos and ppr. Journaling is tucked behind the top left piece.

Maybe I'll get better about posting...one can only hope! LOL!  Thanks for taking the time to stop by!  I appreciate any and all comments!  Have a great day!
Photobucket


Pin It!

Saturday, May 20, 2017

LIM #329 - Geometrics

I hope none of you faint!  Here I am back again for the 3rd day in a row!!  I've had a productive day today.  Finished a dress for one of my granddaughters, bought groceries to prepare dinner tonight for two of my children and their families and made two cards for the Less is More Challenge!

And....I'm getting my cards posted on the same day I made them! WooHoo!!!


For this first card, I used a wood mounted stamp (that I coveted) from the wonderful Darnell of djkardkreations and leader of the NBUS challenges.  So...thank you, Darnell!  I stamped the image in versamark and heat embossed it with gold embossing powder.  I colored in parts of the image with two yellow Copic markers.  The butterfly is from Hero Arts, and was also stamped and heat embossed with gold.  I fussy cut the image and added some yellow to the butterfly.  The sentiment is from SSS. I colored the side of the card and the sentiment strip with one of the Copic markers, then heat embossed the sentiment in gold.  Added a few drops of Nuvo to match, and popped the white panel with some craft foam.


Not too sure about this card.  It might not be CAS enough for the challenge.  I got this new 6 x 6 image from Concord and 9th.  I think I might need just a "little" more practice with the stamp! After my attempt at stamping, I added some Wink of Stella to the blue triangles and the orange stripe down the right side.  I wiped the blue ink on a scrap of white to make the sentiment tag.  Sentiment is from SSS and is heat embossed with white.  Added just a few Nuvo drops and popped the panel with craft foam.

That's all for me today....As always, thanks so much for stopping in.  I appreciate your visit...and I appreciate each and every comment!
Photobucket


Pin It!

Friday, May 19, 2017

CAS Watercolour and CAS Mix Up Card Challenges

Can you believe it!  Two days in a row!  

I finished a card yesterday that works perfectly for the CAS Watercolour Challenge and the CAS Mix Up Card Challenge.  I'm really starting to enjoy doing more water coloring!


This is probably one of my best to-date water color cards!  I used a NBUS stamp set from Altenew called Garden Treasure.  I stamped the flowers and leaves in versamark and heat embossed with white.  Then I used some Prismacolor Watercolor Pencils to add bits of color to the blooms.  After coloring with the pencils, I used a Silver brush to move the color around a bit.  To get the splashed background, I simply wet my brush and flicked it over the point of the pencil.  Too cool! I trimmed the finished piece down to 4 x 5.5 inches and mounted with craft foam over a pink card base.  The sentiment is stamped in Versafine Black and is from SSS Uplifting Thoughts.  A few sequins sprinkled around and it was complete!


Also from my NBUS stack, was this marbling layer stamp from Waffle Flower.  I struggled a bit getting the pieces lined up, but I still think it turned out okay. I mounted the marbled piece over gray card stock, then added a strip across the top with foam tape.  I used foil paper to add a stripe over the dark gray strip and then die cut the oval from the shiny foil paper to add a sentiment.  I heat embossed the sentiment on the shiny foil oval...and I can tell you...It is NOT easy.  Even using an embossing buddy, that embossing powder stuck to everything!  I finally got one that looked "okay"....

That's all for me today....As always, thanks so much for stopping in.  I appreciate your visit...and I appreciate each and every comment!
Photobucket


Pin It!

Friday, February 10, 2017

Four Challenges...

I've made a few cards this week, and thought I'd link them up to several challenges.  I even made a card or two that would fit more than one challenge!  Yay, Me!

I will be playing along with the following challenges:  CAS(E) this Sketch, Happy Little Stampers, CASology, and Merry Monday!  Whew! That's a LOT of challenges for me!


So, let's get started....


This first card is for CAS(E) this Sketch.  I used a really old "Magnolia" stamp.  When I saw this one, I just had to have it...and I probably haven't used it 2 times!  The little girl was facing the wrong way, so I scanned the stamped image into my Silhouette program and flipped her horizontally, then used the trace feature to trace her and then welded the image into a rectangle, so that I could cut out just her legs with the Cameo.Much easier to do than to explain! LOL! I cut the cloud (SSS) from the rectangle, then ink blended the blue sky before popping the cloud back in (raised with foam). The little girl is colored with Copics and the sentiment is computer generated.


This second card is for the CASology challenge with a cue word of "hero".  My youngest grandson is a HUGE fan of Batman, and even though his birthday is a ways away, I thought I'd get his card done for him.  The Batman image is from the Silhouette Store.  I created the "Bam" accent in the Silhouette program as well as the sentiment.  I printed all of this out and cut it to 4 x 5.25 inches.  I colored in some "ground" under Batman.  I also printed out another of the "Bam" stars and popped it over the one on the card.  I added a very small black border and adhered it to a white card base.


This third card is for a couple of challenges - Merry Monday and HLS - Anything Goes with Dies.  I used a Christmas tree die that I've had for a while and cut it from a card panel.  I had to add a piece of acetate behind the aperture so that I'd have something which I could used to adhere my tree back in the aperture.  I then popped that panel over a inked panel.  To make the inked background, I used the TH spritzer, and my Tombow markers and spritzed two different colors of ink on a small panel that would fit behind the tree.  I then used my WOS silver and gold pens and flicked some of the sparkly WOS onto the green.  It's difficult to see, but there's really a lot of shine behind the tree.  I cut the sentiment "merry" (SSS) from card stock and from foam, then added a bit of glitter to the bottom portion of the letters.  The "Christmas" is from DRS Designs.  The star is popped with foam tape, and painted with gold WOS. (Cut with a SSS die)


This last card is just me playing around with some water colors again.  I wanted to create a "scene", but this one fell a little short of what I was trying to do...but it's okay.  If practice really makes perfect, then I should be getting better at this, don't you think?! LOL!

That's all for me today....As always, thanks so much for stopping in.  I appreciate your visit...and I appreciate each and every comment!
Photobucket


Pin It!

Saturday, January 28, 2017

LIM #313 - Balloons

It just so happened that I just made a card this morning that fits perfectly with the LIM challenge for this week!  I needed a card for a new baby, so I made this cute little gift card holder card. 


The only part that opens on this card is the light blue striped piece on the very front of the card base (and is the actual card).  The flap that says "welcome Ezra" is held down by the elephant's trunk.  When you slide the sentiment tab out from under the elephant's trunk, the card will open to display a gift card and a message.  The elephant is from W Plus 9 Unforgettable set, the "welcome" part of the sentiment is from PTI, and the name was stamped with Concord and 9th's Perfectly Penned set. The sentiments was stamped in versamark and heat embossed with white.  I colored the elephant and balloon with Copics and cut them out to pop on the front of the card. I would say this was a quick and easy card...and it probably would have been if I hadn't totally messed up the elephant's eyes on the first one I cut out...so that meant that I had to re-stamp, re-color, and cut another one out! Other than that little mess up, it was quick! LOL!

As always, thanks so much for stopping in.  I appreciate your visit...and I appreciate each and every comment!
Photobucket


Pin It!

Tuesday, January 24, 2017

NBUS Challenge - Week 2


I thought I'd play along with Darnell's NBUS #9 Challenge this week, which is to use NBUS (never before used schtuff).   


I've made a couple of cards thus far...so off we go...


This first card will make you dizzy if you look at it long enough!  The new schtuff I used on this card is the diagonal striped background from MFT and the Kindness die cut from Sugar Pea Designs. The diagonal stripe is actually a wide stripe, but I used my MISTI to stamp a second image under the first by shifting the card panel down a tad to stamp the second time. I cut the "kindness" from the card panel, after adhering it to some fun foam, then inserted it back into the card panel.  The trick with these type of cards is not losing all the little bitty pieces that go in the holes in the letters! And...in a word like this, you have to make sure you put the right pieces back in the holes or the pattern won't line up.  I had to trim the panel down a bit, so I used the dark pink (SSS) ink to color the edges of the card base, then popped the panel off set on the front of the card base.  SUPER simple and quick card!


This is the second card I made with NBUS.  The only NBUS on the card is the flower.  It's a stamp set that I've probably had for several years, but it's never seen ink (bless it's little heart!).  It's from an old Flourishes set called Chrysanthemums.  I cut the sending from the card base just like the first card using the fun foam.  The word "hugs" is from SSS Best Hugs sentiments. I also used the peek-a-boo die to cut the aperture in the card panel.  Flower was colored with Copics and I added a little wink of stella for sparkle. Flower is mounted on card base and panel is popped over it with fun foam.

Darnell...I don't need a prize...just doing this for the fun of it! MWAH ♥

As always, thanks so much for stopping in.  I appreciate your visit...and I appreciate each and every comment!
Photobucket


Pin It!

Monday, January 23, 2017

CAS Watercolor and CAS Mix Up Challenges

I think I'll just make these two challenges...CAS Watercolor and CAS Mix Up.  So here we go...


I actually made 2 cards for each of these challenges...hmm...which shall I chose to enter...


This first card is for the CAS Mix Up challenge and was made using alcohol inks.  I used glossy paper and added drops of three different alcohol inks (sailboat blue, sunshine yellow, and citrus).  I dropped the ink on one or 2 drops at a time and using the Tim Holtz Air Spritzer tool to spray burst of air at each of the drops.  I repeated the process until I was happy with the results.  You really get a different look every time you spray air at the alcohol ink.  I cut it at an angle and popped it on a card base. Sentiment is from Altenew's Beautiful Quotes set.


This was the second card I made and I wasn't as crazy about it as I was the alcohol ink card.  For this card I used the shaving cream technique that Loll talked about with distress ink re-inkers for the background of the card panel. I stamped the flowers from Sweet 'n Sassy - layering them using masks.  I added some yellow Copics to the flowers. Of course, I also added a touch of wink of stella for a little shine.


This was actually my second card for the CAS Watercolor challenge, but I like it best. I'm really loving playing with water colors. I think I discover something new every time I try it!  I cut a panel larger than I ended up with, and water colored the background. I think I needed a little more blue in the sky...but I'm happy with it. The trees are an older stamp from Flourishes...stamped twice and heat embossed with white. Sentiment is from PTI. Cut the watercolor panel down quite a bit and added a tiny dark blue border behind it, then popped it on a card base that I had embossed with a snow embossing folder.


This was the first card I made for the water color challenge.  I water colored the background, and after it was dry, I stamped some tiny snowflakes (from a really old stamp set).  I cut snowflakes with dies from MFT from glitter paper and added them on top of the painted panel.  Then sentiment is heat embossed with white and is from Flourishes.


This is a card I just thought I'd share since I was posting.  LOVE how this turned out!  More water coloring (but no snowflakes!)  It's kind of all in sepia tones.  Sentiment is from PTI.  

As always, thanks so much for stopping in.  I appreciate your visit...and I appreciate each and every comment!
Photobucket


Pin It!

Saturday, October 22, 2016

LIM #299 - Acetate or Vellum

It's been a while since I've played along with the Less is More Challenge.  This week the challenge is to use acetate or vellum on a card.

Here's my take on this week's challenge...


I guess it's been a while since I made a card...this card took me ALL day long to finish!  I have no idea why it was so slow!  

This is a new die from Hero Arts...cut twice (once in red and another in white) and layered slightly off center.  I cut an aperture from the center of a card panel with a stitched circle die (also cut the edges with a stitched-edged rectangle die).  The holly leaves were cut with a very OLD die that I'm not even sure where I got it! I backed the circle with a piece of vellum, then stamped part of the sentiment with Stazon ink and added the layered "joy".  The leaves were colored with Copics and I added some Wink of Stella for a little shine. For berries, I used red pearls.  Popped the panel with craft foam....and done!

I really loved the end result...just took me a while to get there! LOL!

As always, thanks so much for stopping in.  I appreciate your visit...and I appreciate each and every comment!
Photobucket


Pin It!

Saturday, October 8, 2016

One-Layer Simplicity Challenge #32 and The Flower Challenge #1

This is my second post for today....I have a two cards to share with you...one for the One-Layer Simplicity Challenge #32 and the other for a new challenge at The Flower Challenge #1.....So let's get started!

     OLSWe would love you to display our banner !


This was a fun card to create.  I haven't done much ink blending lately (mostly because I've been playing with my water colors!).  I masked off the rectangle in the center with some post-it tape and blended some distress inks (candy apple red, carved pumpkin, and squeezed lemonade).  I removed the post-it tape and stamped the silhouette image from Paper Smooches in versafine black.  After making sure the distress ink was completely dry, I stamped the sentiment from SSS and heat embossed it in white. I added the faux stitched border with a dark orange memento marker.  Super simple card...but I love how it turned out.

And now...here's the card for the Flower Challenge....


I absolute LOVE this flower from Penny Black!  I stamped it on Bristol paper and colored it with Zig Clean Color Markers.  Then....I fussy cut this flower!  Those tiny stems are VERY fragile!  I also used a black marker to color all of the edges of the image after I cut it out.  I cut a panel of white card stock about 4 x 5.5 inches and used an embossing folder (Tim Holtz, I think) to emboss the bricks.  I cut the center of the panel out using an oval die from Spellbinders BEFORE putting it in the embossing folder.  I used a little distress ink on the card base for the background and some splatters from the ink as well as some water splatters.  The sentiment is from Winnie and Walter...stamped in black.  I fussy cut the word hello and then cut a small rectangle for the word friend. Both words are adhered directly to the brick panel. I slipped the flower behind the oval and popped ups the blooms with some foam tape. I added a dark pink border down each sided of the card (it actually matches the blooms IRL!).

I know I'm going to love this flower challenge!  It seems that most of my cards feature a flower of some kind!

As always, thanks so much for stopping in.  I appreciate your visit...and I appreciate each and every comment!
Photobucket


Pin It!

CAS Watercolour Challenge #1 and One-Layer Simplicity Challenge #32

There's a new challenge this month - the CAS Watercolour Card Challenge.  I've been working on my water coloring skills.  I'm beginning to see some improvement.  I also love the colors of Autumn! The second card also meets the requirements for the One-Layer Simplicity Challenge this month.


    OLS


Here's my first card for the challenge....


I LOVE this card.  The colors are so rich and vibrant!  For the water color on this card, I used a panel of Bristol paper and stamped the image multiple times (using a mask for some of the leaves) in Versafine black ink (which is a great ink for water colors).  I colored the leaves with a red, orange, yellow, and green Zig Clean Color markers, then used my Silver #4 brush and water to blend the colors together a bit.  You might notice that there is one leaf popped up over the other leaves...that one was stamped on another piece of Bristol paper and hand cut.  The stamp is from SU...one I've had forever in my stash...but I use it often. After coloring all the leaves, I used a stitched rectangle for SSS to trim it down a bit.  I backed it with a piece of dark brown and adhered it to a white card base.The sentiment is also from SSS. It's a little difficult to see on here, but I added some Wink of Stella to each of the leaves.  

And...here's my second card for the CAS Watercolour Card Challenge...which also works for the One-Layer Simplicity Challenge this month.


Same leaf stamp...different water coloring technique.  I colored the leaf with water color crayons in red, orange, and yellow.  I haven't really tried using the water color crayons before and wasn't sure what I would get.  I practiced on some scrap card stock first...and trust me...it makes a LOT of difference how much water you spritz on the stamp after you color it with the crayons.  You really need to let the water sit on the stamp for a little bit before you try to stamp with it.  You can also get second and third generation images with this technique.  After I had stamped each of these leaves, the card just seem to need something else, so I added some splatters with "ink" I created with the same crayons used for coloring the stamp. This is also a one layer card.

I'm really going to love this challenge because it keeps me using my water colors!

As always, thanks so much for stopping in.  I appreciate your visit...and I appreciate each and every comment!
Photobucket


Pin It!

LinkWithin

Related Posts with Thumbnails