
 3. Once you have selected the “style” a new screen will pop up. This is where you will type your journaling and select your font and font size. I’ve used the default font and font size.
 4. Click OK and the journaling will be placed in your document and looks like this:
 5. In the WordArt Styles section there is an “A” with a drop down box on the right. Click on the down arrow and you will get a selection of styles to chose from. Click on the circle and then grab a corner of the box and drag out your circle. (You may have to play with this part in order to get a true circle) It helps if you have your rulers turned on so that you can see the size of the circle as you stretch out the circle.
 6. This is what it will look like when you've selected the circle: Then grab the lower right corner box of the journaling frame and drag it out into a circle.

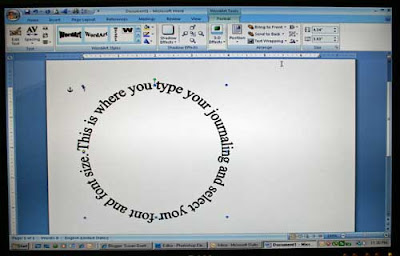
 7. This is your completed “circle journaling” :
 8. On this same Word Art format screen, click on: text wrapping - behind text. You’ll notice the little “anchor” on the upper left.

 9. Once you have selected the “behind text” and have the little anchor in the upper left corner, those of you who are a little more industrious can add a second circle of journaling inside or outside this one. Here’s all you do.
10. Go back to step 2 and begin again. You will follow all of the same steps. Once you select behind text again, you can move the new circle inside/or outside the first circle.
9. Once you have selected the “behind text” and have the little anchor in the upper left corner, those of you who are a little more industrious can add a second circle of journaling inside or outside this one. Here’s all you do.
10. Go back to step 2 and begin again. You will follow all of the same steps. Once you select behind text again, you can move the new circle inside/or outside the first circle.

 11. To change the font color, you must select one circle at a time. There are two drop down selections in the WordArt Styles box. One has a pencil on it and the other a paint bucket. Set both to the same color and your journaling will be all one color. The pencil is the “outline” of the letter, and the bucket is the color of the letter.


 So, I hope these are easy to follow. My apologies for the quality of my screen photos. I know they aren't the best, but I couldn't get a screen print of each step in my blog entry for some reason, so I resorted to taking a photo of each screen.
 After you do it a time or two, it's really not that many steps. I was just trying to take photos of each thing that I did so that it would be (hopefully) a little easier to follow. If you have question, please let me know and I'll help any way I can. I've also saved this as a word document if you would like me to email it to you. Just let me know.
Be sure to let me know if you try it. I'd love to see your layout!
Hugs!
Susan

19 comments:
Looks good to me - of course you walked me through it yesterday - but it will be nice to know that this is here when I finally get around (no pun intended) to trying it on an actual page - Great job!!! Thanks! Betty
Great tutorial Susan!!! I have always wondered how to do this! Will definitely give this a try! Thanks!!
Love your new blog header....that photo is so serene!!
Too cool! I will definitely be trying this.
This looks great Susan!! I've actually tried this out before and it works great!!....awesome job on the tutorial!
~Gabi xx
Oh Wow Susan...thanks for the tutorial. I can't wait to try this out!!!!!
THANKS FOR THE TUTORIAL!!!
Thanks for posting this Susan!! I will have to try this soon:)
Great tutorial, thanks for sharing this with us!!! Have a great NSD!!!
Hugs!
Believe it or not - as computer dum as I am - I have done this one before. I'll have to come back when I want to do it again. I can be a little forgetful sometimes. :)
Awesome tutorial.. You did a great job with the print screens!.. Have a great day internet buddy ;-)
awesome tutorial!! I hardly ever thingk to do tings like this!!!
What a fantastic Tutorial Susan,I've added a link to it on my site,hope that is ok
wow Susan that was an awesome tutorial!! I didn't know you could do it that way! How cool! Thanks!
Thank you Sue! I'll definitely have to try that out!
UMMM...I'm waiting for a new update!! LOL!!
Wow, this is pretty cool!! I just happened across this blog - I don't have a blog and am finding all of it very confusing but just wanted to leave a comment thanking you for showing me how to do this, I've always wondered... Renee
Susan you are worth your weight in my scrap budget lol this an excellent tutorial and one I have looked for in ages. thank you sweetie. xx
Wonderful tutorial!
Here's one extra trick to get the sizing perfect:
In step 5, after clicking the circle style
~ right click on the shape
~click the size tab
~ enter your desired dimensions
~ click ok
Enter the same measure [it's inches] for height and width for a circle, or any other dimensions for an oval.
The same steps work for an upper half or lower half arch; just pick the correct style.
Thank you for posting this -- I hadn't figured out Word Art in Word 2007 yet.
super cool. gonna try this! thankyou!
Post a Comment