Friday, July 9, 2010

Color Throwdown #100

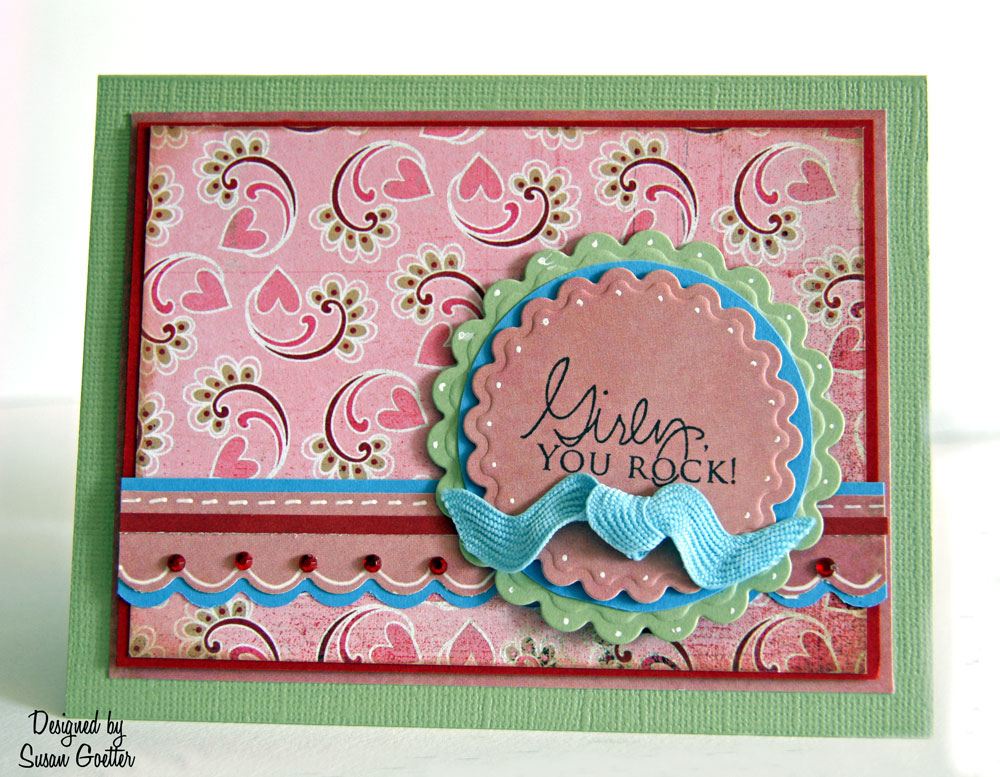
These are the colors for the Color Throwdown #100. When I first saw the colors, I wasn't sure I could actually do anything with them....but WHOA!!! These colors are fantastic together!

I pulled cardstock, patterned paper, and ribbons just trying to find the perfect combination for this challenge. This is what I finally came up with. The pink heart paper is Basic Grey, then I added the green, blue, pink and red cardstock. I cut the scalloped circles with Spellbinder dies, and then added a blue circle between the two. The large mat is pop dotted on the green background. I punched two scalloped borders with the pink and blue, layered them and then added the tiny red strip. I also added a little doodling with a white Signo pen. At the peak of each scallop, I added a tiny red bling. The Sentiment is from PTI. I tied a little bow with some large blue rick-rack, and then pop dotted the circles on top of the scalloped strips.

I'm not sure why the blue looks so bright, but it's really a much softer blue IRL.

It's a girly card....but I'm sure I can find a sweet girl to send it to! Thanks so much for stopping by....Until next time....

Hugs!


Pin It!

CAS-tastic Challenge

I thought I'd play along with another challenge...at the CAS-tastic Wednesday Challenge. The challenge today was to make a clean and simple card using Kraft paper. Here's my take:

I used Kraft cardstock for the base of the card. Then added a scalloped punched edge with the Fiskar's apron punch. The white ribbon is a sheer ribbon with just a touch of sparkle. The cherry blossoms are a stamp from Flourishes that I colored with my Copic markers. I cut the flowers out with the Spellbinders Labels 10 nesting dies. I just love that nestability! I added a few pearls to the scalloped edges of the die cut, then stamped the word "Celebrate" with white ink. It didn't show up very well, so I had to trace over it with my Signo white pen. And so it's ready to be mailed to someone special!

Thanks so much for stopping by! Have a wonderful day...and until next time...

Hugs!


Pin It!

Thursday, July 8, 2010

One Layer Wednesday - Funny

The One Layer Challenge this past Wednesday from Susan Raihala's blog Simplicity was to create a "funny" card. After a thorough search of my stamps, I realized that I don't have a stamp that could be considered funny. So what's a girl to do? Go shopping, of course! Since I really didn't have the time to go to a store (that pesky working for a living sometimes gets in the way of my creativity! LOL!), I did the next best thing and searched for a digitial stamp that I could use for a funny card...and I found this - Two Ladies with Purses from River City Rubber Works.
Here's the end result.
I placed the image in a Word document then added the sentiment with a text box...printed it on my cardstock, and then colored it with my Copic markers. I thought this would make a great birthday card for my good friend, Polly. We've been friends for over 25 years...and we've been through quite a bit together...and of course, most of it was her fault! LOL!! On the inside of the card, the sentiment is:....and I enjoyed every minute of it!
Thanks for taking the time to stop by. Hope you get a chuckle from my card. Until next time....
Hugs!


Pin It!

Saturday, July 3, 2010

More Card Challenges!

Okay...so I'm completely addicted to some of the new card challenges I've found. I seem to have lost my scrapping mojo...so, I've been spending a little more time making cards. I'm just trying to keep ahead of the game, by having LOTS of cards ready when I need them!

This first card if for the Fall-To Layout (FTL97) challenge over at Clean and Simple. The sketch was done using butterflies...and since I'm a huge fan of butterflies, of course, I had to make my card using the butterflies. My butterflies were punched with two different Martha Stewart punches. The sentiment is a Hero Arts stamp. I added a little bling to my butterflies and then pop dotted them. Then because I am notorious for adding...and adding...and adding...okay, so maybe I'm not that bad! LOL! Anyway, I decided that the edges of the card needed just a little color, so I rubbed the edges with a golden yellow ink. Finished!

This next card I made for a card challenge I found at Crazy 4 Challenges. The challenge was to use ribbon (at least 2 different ribbons...and more if you want). For this card, I made the card base from a light pink textured cardstock. I used a deep edge punch from Martha Steward for the lacy edge. Then I layered a dark brown satin ribbon with a hot pink 1/8 inch ribbon on top. The sentiment is a PTI stamp, which I stamped on white cardstock and then cut with the small oval spellbinder, and backed it with a brown cardstock also cut with a spellbinder die.

I'm definitely having fun with my cards. Who knows, maybe it will spark my scrapping mojo and I can get a few layouts finished too!

Thanks so much for stopping by! Until next time....

Hugs!


Pin It!

Wednesday, June 30, 2010

One Layer Wednesday - Patriotic Card

The challenge today from Susan Raihala's Simplicity blog (should you chose to accept it)...and I did...is to create a patriotic card in honor of the Fourth of July and to celebrate our country's heritage. Rushing home from work, I began to frantically go through my stamps. Darn! No flags...no patriotic sentiments! What's a girl to do?! Searching through my closet...I happened upon my creative hat. What?! You don't have one? I admit I misplace mine all the time, and never know where I might find it...but you should definitely get one!

I knew if I dug through my stash long enough, that I'd come up with something! I found my Fancy Pants stamps buried waaaaaayyyy back in the back of a cabinet....and low and behold...there's a star...and a star burst! Now, settling my creative cap tightly on my head, I began to stamp. Okay, so I totally messed up 3 cards before I finally finished a card that I "sorta" like.

I simply stamped three stars (Fancy Pants stamp), then the sentiment (Hero Arts) and topped it all off with the starburst (Fancy Pants). It still looked kinda plain, so I added a couple of red lines to hold it all together. So there! It's finished...and now that I think about it...it would make a great card to send to my grandson who is graduating from boot camp! Alright!

Thanks so much for stopping by. I love it when you leave me a comment...so...Until next time....

Hugs!


Pin It!

Sunday, June 27, 2010

Creative Scrappers - Sketch #110 Revealed

It's reveal day at Creative Scrappers! Today reveal is sketch #110 and layouts by Team P. Here's my take on the sketch:

This is a photo of my handsome grandson, Allen. It's very difficult to get a smile from Allen. He loves to laugh and smiles a lot...just not when I get my camera out! LOL!

The papers I used are Bella Blvd - Man of the House Collection. I love the argyle print...just very "boyish" to me. I added some rust and blue cardstock to finish it off. The scalloped edge is cut with "cloud" scissors from Ek Success. Life is good is a rubon that I placed on a circle punched with a 1" circle punch. The frog embellie is just one I found in my stash...no idea who makes that. The other circles were punched with a circle punch. I added a little journaling block. All papers and the photo are matted with a dark brown in order to make the patterned paper pop.

Here's the sketch:

Thanks so much for stopping by...leave a comment and let me know you stopped by!

Until next time....

Hugs!


Pin It!

Wednesday, June 23, 2010

A Color Throwdown Challenge and Trying Something New

These are the colors for the Color Throwdown #98. The colors were chosen from Basic Grey's Cappella Collection, which I just happen to have...since I just completed a layout for Basic Grey's newsletter. I really love the colors in these papers, so this challenge was perfect for me.

Here's the card I created. I used a soft pink cardstock base. The sentiment is stamped on a Nestabilities Labels 11 die cut. I inked the edges of the patterned paper with a soft brown. The scalloped edge is a Martha Stewart punch. I added a piece of lace, a few pearls, and a pink and brown flower layered with a pearl center. I love the finished card! I think it turned out a bit feminine, so I'll have to think of someone special to send it to.

This second card is something new I was trying. I found a great tutorial at Splitcoast Stampers and it was super easy to follow. The first photo is with the card closed...and the second photo is with the card opened.

I made this card for our grandson who will soon graduate from basic training at Lackland AFB.

I used a combination of papers...some Cosmo Cricket - Mr. Campy, the red is My Mind's Eye, and then added some gold cardstock. The image is from PTI, stamped on white cardstock, and colored with Copic markers. You can't really see it here, but I covered the vase with some glossy accents. It gives it a nice finish.

Thanks a bunch for stopping by. Leave a comment and let me know what you think of these cards.

Until next time....

Hugs!


Pin It!

Friday, June 18, 2010

OLW 9 - Use a Flourish

Well, I'm just now getting around to the One Layer Challenge from Simplicity blogspot. This week the challenge was to use a flourish on our card. Okay...each week I keep thinking that I will begin to get better at this, but once again, I was wrong! I made this first card, didn't like the blue...and my blue lines are smudgy (is that a word?). Very simple...just a flourishy Thank You...a black border drawn with a fine pointed black pen...then a little blue highlighting with a blue Copics marker. The piercing was done as an afterthought...maybe I should have left that off...hmmmm....

So, after finishing the blue card...I thought...what the heck...I'll just try it again in pink, space my piercing out a little and try to draw a bit straighter with my pink Copic. Maybe a little better?

Having decided that I really didn't "Love" the way the first two came out, I decided to try something TOTALLY different! This was done with some pink Bazzill textured cardstock...but I find it almost impossible to stamp on the texture, so I used the smooth side. I rounded the corners with my handy-dandy Crop-A-Dile Corner Chomper. The flourish had some big dots at the ends of each swirl....so trying to dress it up...and thereby losing my "one-layered" look...I decided to add a few purple bling...I do love my bling! The butterflies were another afterthought...but I kinda like the balance of them. The "Thinking of You" sentiment is from a CTMH stamp set I've had forever.

I'm not so sure I adhered to the rules on this one...but I did give it the good ol' college try!

Thanks so much for stopping by...Until next time....

Hugs!


Pin It!

Sunday, June 13, 2010

My First Layout for Creative Scrappers DT

Today is the first reveal for Design Team P at Creative Scrappers. Our sketch this weeks is Sketch #108...as shown below.

Here's my take on the sketch. Photos of my granddaughter, Helen Grace playing at the park last fall. This was really a pretty tall slide, but Helen Grace wasn't scared at all!

I used a white background with touches of orange (a color I rarely use). The border is the loopy punch by Martha Stewart. Large circle was cut with the EK Success Circle Cutter. I inked the edges of the patterned paper with some orange ink to make it stand out from the white background.

And here's the sketch...

Thanks so much for stopping by....Until next time...

Hugs!


Pin It!

Friday, June 11, 2010

Me and Basic Grey

The June issue of the Basic Grey newletter is out. And....I have a layout in the newsletter! I was asked to design a layout using one of Basic Grey's sketches and to use some of their new papers. Here's the sketch from Basic Grey.

I chose to design my layout with the Cappella Collection. I must say, these are some beautiful papers!

These are some photos I took just last month of my beautiful little granddaughter, Maggie Elizabeth. I just LOVE her pretty bald head...reminds me of her mama when she was that age!

I punched the flowers, then inked them and did a little doodling on them. I added a pretty piece of pink bling for the centers of the flowers. The edge punch is a Martha Stewart punch. Then I just added a little inking...and a little doodling...finished!

Thanks so much for stopping by....Until next time...

Hugs!


Pin It!

LinkWithin

Related Posts with Thumbnails