Sunday, May 20, 2012

LIM68 - For a Baby or Child

Yesterday, our new challenge from Chrissie and Mandie was posted at Less is More.  This week is a "theme" week and we've been challenged to create a card for a baby or a child. When I first saw the theme yesterday, my first words were "Oh NO"...I didn't think I had anything that would be suitable for a child or baby...but after an exhaustive search through my stash of stamps....I did manage to find a few that would work.  Since our family is about out of the "baby" stage, I only made one "baby" card and the rest are for children....and we DO have plenty of children (18 grandchildren!) Of course, they're growing up so fast, soon a "child" themed card will not work!  Anyway...enough babbling....and on to this week's cards:


The baby shoes stamp is from All Night Media (Susan Branch).  I've had this stamp for several years.  I bought it just to make the birth announcements for one of my grandchildren. I stamped the shoes on white, lightly shaded them with Copics and cut them out. I printed the sentiment on white card stock, then cut out an oval shape with a Spellbinder die.  I cut a scalloped background from blue using the SB scalloped die.  The white oval is pop dotted over the blue scalloped oval.  The shoes are adhered to the white oval.  I embossed a strip of white card stock and mounted it on the same blue then scored a line above and below the embossed strip.  The most difficult part of this card was cutting out the shoes!

For this card, I stamped the Magnolia girl on white and colored her with Copics, then cut her out.  The balloons I stamped again and cut them out separately, so I could add the black floss for strings.  Then I threaded a needle and put the threads through her hand where the original "lines" were for the balloons.  I coated each balloon with glossy accents.  To ground my image, I just tore a piece of paper and sponged on peeled paint DI, and added a few blades of grass with a DI marker.  The sentiment is from PTI and just seemed to "go" with this cute little girl.


This card was made by tearing a piece of card stock for the "dirt" and then sponging it with two colors of DI.  I added some grass with a couple of different PTI stamps.  The "worm" and the sentiment are both from Paper Smooches.  I stamped the worm and colored him with Copics, then added googly eyes and popped dotted him over the mound of dirt. I also stamped the image under him so that I would have the "hole".


Not too sure about this card.  The images are HA stamps.  Colored with Copics and cut out, the popped dotted over the arrows.  I made the arrow using one end of a banner die.  I cut out the banner, then moved the strip down and cut again to get the point.  Sentiment is part of the same HA set.  Added a few doodled lines around the arrows.


I seemed to be into the hand cutting this week.  I stamped the frog (from the same set I used last week), then colored him with Prisma pencils and cut him out.  I sponged a blob of blue to ground him (he's jumping out of the water...can you tell?).  The sentiment is from PTI.  I also added a bit of stickles to the bloom.  I didn't try to cut out the stem of the flower, I just stamped the image in a light grey then positioned the frog over the stamped image and colored in the stem with markers.

And just when you thought I'd finished, I've added in a layout I finished this weekend.


Photo of my hubby with five of our granddaughters. I used MME The Bright Side collection two and collection one for this layout. The big heart title was created at this free website that I found thanks to Kim.  You can make your own title by visiting Tagxedo.

The "my family" tag was a punched out shape from the Bright Side collection. I attached it with some jute string. I also stitched some lines with the jute string down the right hand side. A bit of faux stitching was added to the other layered pieces. The journaling tag is also a punch out shape from the same papers. I recently found some burlap 5" wired ribbon, and so I cut a piece of that...took the wires out, and frayed the edges...and used it behind the photo. I added a wooden button at the top left corner of the burlap, and tied a big jute string bow behind it. A scallop punch was used for the bottom border, and the white dots are Ranger's white enamel paint. The journaling tag just list the names of our granddaughters that are in the photo. We have 8 but only 5 were in the photo. 

Okay...I'm finally finished! Whew! If you stuck through the whole thing...you're fabulous!  Thanks a million for stopping by!  I always enjoy your comments and I appreciate you taking the time to leave me a comment!  Until next time...

Hugs!
Photobucket


Pin It!

Friday, May 18, 2012

OLW88 - 2 x 2

This week, the One Layer Wednesday challenge is hosted by Heather Telford at Bits and Pieces. You should visit Heather's blog...it is filled with gorgeous creations!  Heather's challenge to us this week is to keep it small;  to create a mini masterpiece. Your stamped image area has to be no larger than 2″ by 2″. You can add a sentiment outside that if you like. You can choose one stamp or a few stamps or mask off a 2″x2″ area like me if you like, just keep it within the limits.  What a super challenge....had to put the thinking cap on for this one. 


For this first card, I masked of a 2 x 2 area and sponged in a background using three different colors of DI (peeled paint, spun sugar, and tumbled glass).  Then I stamped with a stamp from SU Pocket Silhouettes, added a few dots from a TH stamp, then stamped my butterfly (Hero Arts).  I stamped the SU and TH images with HA wet cement ink (it's kind of a light grey).  The butterfly was stamped with Mementos black, then I colored him in with TH distress markers to coordinate with the background inking.  The sentiment is from Flourishes.  Then, unable to leave well enough alone..I added a bit of glamour dust to the butterfly's wings.  I like how this turned out.


My second card for this challenge is a bit different.  I masked off the 2 x 2 area, then stamped my butterfly (HA) in the center of the square.  Using a black micron pen, I filled in the background with lots and lots of circles (doing a little tangling here!).  I colored the background and the butterfly with Prismacolor pencils and used a colorless blender pencil to smooth out the colors.  Then, just because I can, I decided to add just a touch of glitter to the butterfly wings....so cool!  The sentiment if from PTI and is stamped in black.

That's it for me...Thanks a million for stopping by!  I appreciate you taking the time to stop by and leave me a comment!  Until next time....

Hugs!
Photobucket


Pin It!

Tuesday, May 15, 2012

Challenge 70 - Adding a touch of BROWN

The challenge this week from Laura at I am the Diva is designed to gently dip into colour.  Instead of the whole colour palette - we pare it down to just one... brown - or sepia. Once I scanned my tiles in, the color appears more grey than brown, but trust me, it's brown.  I used a sepia pen for some of the tangles and I shaded with a dark brown Prisma color pencil.


I think this second tile is my favorite.


That's my take on the challenge....now off to check out some of the other entries! Thanks so much for stopping in!  Your comments are always greatly appreciated! Until next time...

Hugs!
Photobucket


Pin It!

Monday, May 14, 2012

LIM67 - Three and Only Three

It seems that the weeks are flying by this year! On Saturday, our new challenge at Less is More was posted by Chrissie and Mandi...and this week is a doozy!  We've been challenged to create a one layer card using Three stamps...not four, not two...but THREE!  Ordinarily, this would seem to be a simple challenge, unless of course I'm asked  to created within strict parameters!  After great thought and a lot of digging around in my stamps, I finally came up with a few ideas....not necessarily good ideas, but it's the best I could come up with this week!


This was my first idea...using 2 of the leaf images from a PTI collection, I inked them up with SU Old Olive and then highlighted each of the leaves with a light green and stamped off the edges with each of the images.  Added the PTI sentiment in the same Old Olive color. ~~yawn~~ moving on....


For my next card, I used two of the images from SU French Foliage (text and leaf). I masked off an area in roughly the center of the card and sponged it with Wild Honey DI, leaving the center a bit lighter.  I then stamped the leaf in Rusty Hinge DI.   Sentiment if from PTI (I think) and is stamped in the same brown I used to stamp the text .


This one was stamped using a set from PTI - the stems are one stamp and the blooms are the second stamp and then the sentiment (also PTI).  I inked up the blooms with some soft pin, then added a little darker pink to the edges of each bloom with a Memento dark pink ink.  Then I decided to add some sparkle  to the blooms, so I added glue to each bloom with a glue pen and sprinkled on a touch of glitter dust. IRL it has a nice sparkle.


Then I stumbled across my Magnolia stamps and found this cute little girl and a bench.  Normally, when I use these stamps, I cut out the little girl and then just pop her over the bench.  Since this is a one layer challenge, I had to do a little masking.  I can tell you...I had a very difficult time getting the bench stamped behind her!  I must have re-made this card at least 4 times!  I finally resorted to stamping the bench first (using a mask of the little girl on the card to stamp over...THEN I stamped the girl.  My problem was the I couldn't seem to get her "sitting" on the bench....she kept levitating off the bench! LOL!  Sentiment is from PTI.  I colored the image with Copics.  


My last card was just for fun...I found these cute frog stamps and decided to combine a couple of the images.  I love the look on the middle frog's face!  Looks like he's a bit surprised by the frog jumping over onto his lily pad! Images were colored with Prismacolor pencils and the water was colored with Copics.

Got another scrapbook page to share with you today...


Photo of two of our granddaughters, Helen Grace and Audrey that I took last November. I used Basic Grey's Lauderdale Collection for this layout. I love the bright and bold colors in this collection. I used a large white mat over a piece of the patterned paper, then arranged a collage with several of the patterned papers around the photo. The big circle, flowers, date tag, heart and the tiny zig zag at the top are all stickers from the collection. The title was cut with the Cameo and colored with Copics. I added some doodled borders in blue around the collage. The large zig zag piece across the bottom was made by folding a 1 inch strip. I posted instructions in this tutorial. I added journaling in strips across the green layer.

Thanks so much for stopping in for a visit!  I really appreciate you taking the time to leave me a comments!  Until next time...

Hugs!
Photobucket


Pin It!

Thursday, May 10, 2012

OLW87 - Outside the "Box"

I haven't been able to play in the One Layer Wednesday challenge for a while, but this week I managed to get three cards finished!  The challenge this week is hosted by Jennifer at Styles Ink and she has challenged us to create a card that is not a square or rectangle...so here we go....


I guess my first card could be construed as a rectangle, but I choose to think of it as shaped card.  I cut it out using my largest die in this Spellbinder's label set.  To leave a fold at the top of the card, I just positioned the die so that the folded edge was below the cutting edge at the top of the die.  I've chosen to draw my designs this week and the only stamping on any of my cards is the sentiments.  The sentiment for this card is from PTI.  I drew my tangles with a black micron pen, then added some color with Prismacolor pencils.  I've been wanting to try coloring my tangles for a while, because I've seen some beautiful tangles with color added and I was determined that I would figure it out! LOL!  I've used quite a few different colors and done a lot of layering, blending, and shading with the colored pencils. After I finished this first card, I was hooked on adding color! I love how this turned out!


For my second card, I chose to use a scalloped Spellbinder die and using the same method, I cut the die leaving a fold at the top of the card.  For this card I stamped the sentiment from PTI, then added my tangles and coloring.  I didn't get it quite centered on the card...but hey, I tried! 


I guess you could say this third card is REALLY out of the box!  I used my large scalloped banner die from Spellbinders and cut my card using the same method as those above to have the fold at the top.  I stamped my sentiment from PTI on the top near the fold, then drew my tangles around the sentiment.  I had a hard time figuring out if I wanted this in a portrait or landscape orientation because it won't stand up either way.  The red/pink area was drawn using the tangle Nzeppel.  After I finished this card and looked at it for a minute, I decided that the Nzeppel reminded me of a stained glass window.  

I must say, I've really gotten into coloring my tangles...and I'm loving the results!

Thanks so much for stopping by! I appreciate all your wonderful comments and that you took the time to leave me a comment!  Until next time...

Hugs!
Photobucket


Pin It!

Wednesday, May 9, 2012

A Chevron Tutorial

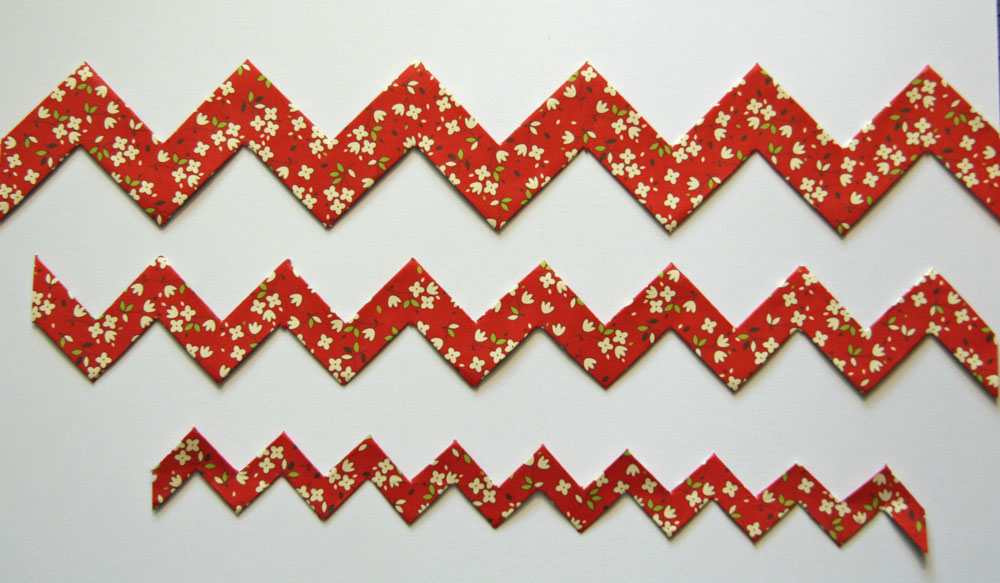
I probably spend too much time on Pinterest, but I've found some of the most interesting things there.  This tutorial is my spin on this Chevron tutorial that I found there recently.  I worked out a way to make varying widths of chevrons and here are the steps you'll need to make your own.


For purposes of my tutorial, I've cut three strips of paper...1 inch, 1.5 inches, and 2 inches.  Basically, you can use any width as long as you follow these steps.  The wider the paper strip, the deeper the depth of the "v".  


Using a pencil, on the back side of your paper, draw a line down the center of the strip.  As you can see above, I've drawn a horizontal line down the length of the strip at 1 inch on the 2 inch strip, 3/4 inch on the 1.5 inch strip, and at 1/2 inch on the 1 inch strip.


Now it's time to draw some vertical lines.  For each width strip, I've draw a vertical line with spacing the same as the width of half the strip....on the 2 inch strip, the vertical lines are at intervals of 1 inch...and so on.


Starting at the first vertical line on the top (or bottom-doesn't really matter...it only matters how you cut the opposite side) cut straight down to the center line.  Now cut to the center line on every other vertical line.

Now working on the opposite side, you'll be cutting the vertical line that falls between the two cuts above...do this on the length of the strip.  When you finish, you should have sections on each side of the center line that have two squares each in them.


Now comes the folding part...as I mentioned, each cut section on either side has two squares in it.  Fold from the outer edge to the center vertical line in each section.  Do this all the way down each side.  If you've cut it right, you'll have a chevron forming with each new fold.


This is the front side after a few folds on the back.


Maybe with this close up you can see a little better....


No matter how much you crease your fold, it won't lie flat.  My solution to that was to add a drop of fast drying glue to the back side of the paper under each triangular fold and press it together...and then it will lie flat.


Here's the finished pieces.  I noticed in the original tutorial, stitching was used to hold the chevron flat.  I kind of like it without the stitching.  You'll also notice how the different widths of paper made the different sized chevrons.  They don't take long to make...and they'd look great on a card or a layout.

Hope this all makes sense.  Thanks so much for stopping by!  As always, I appreciate your comments! Until next time...

Hugs!
Photobucket


Pin It!

Saturday, May 5, 2012

LIM66 - Yellow....really?

The Less is More weekly challenge is hosted by Chrissie and Mandi and this week is a color challenge.  We always have a color challenge on the first week of the month, and this week the challenge color is YELLOW.  Isn't yellow a happy color!  Really, it is a happy color...unfortunately, it's not MY happy color!  I really had a difficult time today trying to come up with a card(s) made with yellow.  I ended up making 5 cards, but I can't honestly say that any of them really make me say WOW!...But...it's the best I could come up with. So here we go....


This first card was made by cutting an aperture in a piece of yellow card stock that was cut the same size as a card front (4.25" x 5.5").  First I ran the yellow piece through the Cuttlebug with a PTI texture plate, then cut the opening with a PTI die.  The image is Lenten Rose (Flourishes) and is colored with Copics.  The sentiment is from PTI. I stamped the image on the front of the card and then popped the yellow die cut opening over the top.  I also added a touch of yellow glitter to the centers of the roses.

This was the second card I made and it just didn't turn out as well as I had envisioned.  I recently acquired the HA images and couldn't wait to use them...but hmmmm....not sure about this one!  I masked off an area and sponged it with DI - mustard seed and wild honey.  Then I stamped the image and sentiment in marigold DI.  It really looked a little plain so I thought I'd add some scored lines...I like them under the images, but not crazy about the scoring running through the images.  So...back to the drawing board.


This card took all of 5 minutes.  I cut the butterfly (Darla - Memory Box) from a piece of bright yellow card stock, then cut the filigree butterfly (MB) and adhered it on top of the yellow butterfly.  The embossing was done straight to the card front and is a Tim Holtz EF.  The sentiment is from PTI and stamped in Mustard Seed DI.  Simple....super simple.


For this card, I wanted to try a technique we learned recently in TH Chemistry 101 class via Online Card Classes.  He showed us how to ink up an EF and run it through for this colored background effect.  I used the same sentiment and embossing folder for this card. No butterfly, but I did add a touch of bling.  Not to sure about this card...maybe it's all the bright yellow!


I decided to give it one more shot...mostly because I found this sunflower colored and cut out in my "maybe I'll use it one day" box....you have one of those...right?  Anyway, I stamped a sentiment (Flourishes), and then just added the sunflower with a few pop dots.  Super easy...and it's yellow...so I guess it fits the bill.

I also finished a layout this morning.  This one went together so quick and easy, I was amazed!  Of course, it could be because I was scrapping a photo of my adorable little grandson! And lookie here....it's mostly YELLOW! LOL!


For this layout, I used Echo Park This and That collection (boys).  I used a solid yellow card stock for the background and some green and brown card stock for various accents.  The banner flags across the bottom were simply cut from a piece of the patterned paper and then I added a few faux stitches to each banner.  It's actually all one piece  and is part of the word strip.  I added a small strip of green to the top of this border.  I used several stickers and a chipboard piece from the coordinating embellishments.  The yellow journaling tag was a "telegram" tag that I cut from the backside of one of the papers.  Title work was cut using PTI alphas.  I cut three different banner strips to go behind the photo and over the green plaid paper.  I also added a bit of doodling in brown around the photo, the plaid mat, and on the banner strips under the photo.  The only journaling on this page is the handwritten journaling on the yellow "telegram" paper.

Thanks so much for stopping by!  I hope to do a better job getting around to visit everyone this week.  Now that my hubby is home and we're slowing getting him back to his regular routine, things should calm down a bit.  

As always, your comments and your visits are greatly appreciated!! Until next time...

Hugs!
Photobucket


Pin It!

Thursday, May 3, 2012

LIM65 - It's a little bit sketchy.....

I'm running so far behind this week - in everything!  I actually made a few cards last weekendfor the Less is More challenge , but haven't had the time to post them.  Our challenge this week was to create a card using one of these sketches:


It's a super simple sketch this week as are my cards.


This first card was actually the last card I made, and I believe it's also my favorite.  I cut the music hexagon from some MME paper.  The bird and cage were cut from another hexagon on the same paper, and pop dotted on top of the music.  Then I layered it all on some dark blue/teal paper for a pop of color.  Sentiment is from Hero Arts, I believe.


For this card, I used a card base that I scored with my new diagonal score board from SU.  I think I might need some practice as I got my scores a bit off.  The image is an old SU image stamped in Ranger Perfect Medium and then colored with chalk.  I added glue to the wings and sprinkled them with glamour dust.

For this card, I used some of the scraps of die cuts using the tessatina die from Memory Box and adhered them to a piece of pale green card stock, which is popped up on a darker green card stock.  The image was colored with several different colors of Memento markers and stamped on white card stock.  I cut around the image and popped it over the die cuts.  Image and sentiment are both from SU.


This card took all of 3 minutes.  I used a Kraft card base, stamped the sentiment in brown, and added a layered flower sticker and leaf....couldn't get much easier than this!


This card was kind of an afterthought when I was playing with the other dragonfly image.  I wasn't as happy with the colors, but then when I backed it with the pink, I decided that I'd go ahead a make a card anyway.  I used some postage edge scissors to trim the edges.  Then I scored a couple of frames around the image.

That's all for me today.  We've had a tough week at our house.  My OH was hospitalized for 4 days with bronchitis, pneumonia, and an upper respiratory infection.  We finally got to come home yesterday.  Now we'll have to work to get our routine back in place so that he'll settle in and relax.  I haven't had a chance to see any of the beautiful cards that I know have been entered in the challenge this week, because of everything going on around here, but I hope to make it by as many as I can before the next challenge!


Edited to add:  With all that's going on in my life, I completely forgot to add that I was showCASed last week!  I have to say, it never ceases to delight me when I'm showCASed!! Thanks so very much to Chrissie and Mandi!

Thanks a million for stopping by!  Your thoughtful comments are appreciated so very much!  Until next time...

Hugs!
Photobucket


Pin It!

LinkWithin

Related Posts with Thumbnails