Sunday, July 29, 2012

OLW 98 - Summer

The One Layer Wednesday challenge is hosted this week by Cheryl at A Paperie Journey.  Cheryl has challenged us to create a one layer card  that says "Summer" to us.  Well, living near the beach for the past 30+ years ...what else would I think of for a "summer" theme?

I've actually made a couple of cards this week, so here they are:


This first one is my favorite!  I LOVE my new stamps from Sweet and Sassy!  This beach scene is just SO me! I stamped on watercolor paper, colored with watercolor crayons and then used my water brush to smooth out the colors.  The umbrella was colored with Prisma color pencils and blended with OMS.  Sentiment is also from S&S stamps.


The second card was made by printing a digi image on white card stock and coloring with Prisma color pencils.  I did just a small amount of blending.  The sentiment is a bit too large for the space, but it'll do.

Thanks so much for stopping by! Your comments are always welcomed and appreciated!! Until next time...

Hugs!
Photobucket


Pin It!

LIM78 - We're sketchy this week!


I'm running a little later than usual with my submission for the Less is More challenge this week.  This week, Chrissie and Mandi have challenged us to create a card using this sketch:


While I realize that this isn't a difficult sketch, I had a bit of trouble getting something done that I really liked.  Anyway, I finally got a few cards made and here's the results of an afternoon of card making.


I believe this card is my favorite this week.  The stamp is a new stamp I had to have from Sweet and Sassy stamps (and it's all Kim's fault! LOL!).  The stamp isn't wide enough to stretch across the 5.25 inches, so I had to added a few little doodled lines of my own to stretch the stamp.  Colored the water and sand with Copics and then paper pieced the umbrella and popped it up a bit.  The chair was highlighted with a touch of light grey.  The sentiment is from the same stamp set. Border was punched with an EK Success punch.


I think this is my second favorite.  I've had this die from PTI for a while and just never used it, so I wanted to use it today.  The little hexagons are all cut out when you cut with the die, and there are matching hexagons patterned stamps to use on them.  I trimmed the hexagon panel to size then stamped each of the individual hexagons with SU real red ink using four of the different patterned hexagon stamps.  Paper pieced it...then added a PTI Merry Christmas sentiment, also stamped in real red.


This card was stamped with another one of my new stamps from Sweet & Sassy stamps.  I masked off the horizon and sponged in the water, then did some clouds by using a torn mask. The stamped piece is matted on some teal paper, and I added a small scalloped border (Spellbinder).  Sentiment is also from the S&S stamp collection.


This was the last card I did for this week's challenge, and my least favorite of them all.  I was trying something new.  I inked my embossing folder with some HA ink (pool), then embossed a piece of white card stock.  I cut a piece of the embossed image and then punched a border backing.  The border was punched with a MS deep edge punch.  Then I added a touch of glitter and a few pearls.

I have another layout to share with you today too.


This is a photo of my Mama and my Grandmother with me and 3 of my siblings. I used some MME paper for this layout. I used a piece of off-white for the background and stamped some text, and a few old clock faces, then spritzed it with some walnut/gold glimmer mist.  I also sponged the left side with some gold ink.  The chipboard swirls were plain cardboard that I inked with some green and blue inks then touched them with some gold highlights.  The heart was also stamped with some text and inked.  I added a metal key and a few blooms with dewdrop centers.  The stitching on this layout was some really old tape from DaisyD paper company that I've had for years. The title letters were cut with PTI number dies (4 of each number) that were layered.  I also stamped a bit of text on the letters with a PTI stamp.  The other text was stamped with the text stamp from SU French Foliage. The journaling is tucked behind the photo with the pull tab that says "The story behind the photo" and reads:

I remember when this picture was taken.  We lived in what we’ve always call “the old gray house” on Jackson Street in Waycross, Georgia.  The house is no longer there.  Your Grandma told me that the house was moved to another location and turned into a church.  In this photo from left to right is:  Mike, Ruth Perdue (Mama – holding Karen), me, Grandmother Pace, and Randy.  I’ve put the date as 1954 – I’m not really sure of the exact date of this picture, but it was probably close to the end of 1954 or early in 1955, since Karen was born in March of 1954 and Grandmother Pace died on April 19, 1955.  I remember crawling up behind my Mama and Grandmama, so that I could be next to both of them.  The photo on the wall above the mantle was a picture of pink flamingos on a beach.  I think I was always fascinated by that picture when I was a little girl.

Thanks so much for stopping by.  I truly appreciate each and every comment! Until next time...

Hugs!

Photobucket


Pin It!

Sunday, July 22, 2012

LIM77 - Sew and Sew...

Once again, I've completed several cards for this week's Less is More challenge.  Chrissie and Mandi have challenged us to complete a card(s) that include sewing...machine or hand sewing.. faux or stamped...even  sewing related images will work.

I've used several different "types" of sewing on my cards....so here we go...


This first card is my favorite of all my cards this week.  I used my new MB flower die for this.  I cut it once in green and again in red, then pieced it together. I cut a white panel and stitched a couple of wonky lines of stitching around the edges.  The sentiment is stamped on a Spellbinder banner and I added three teeny-tiny pieces of red bling. (I almost out of these time pieces of bling and NEED to find some more!)  The white panel and the sentiment banner are both backed with a piece of red.  I know it looks like a lot of layers...but honestly...it's still got lots of white space...right???


I think this is my next fave.  I cut the hexagons from some card stock and a piece of scrap paper using a die from My Favorite Things.  I adhered them to the card base and then added some "faux" stitching with a red pen between the hexagons.  Sentiment if from Flourishes.


This card was the result of something I wanted to try...probably won't try it again.  When my children were small, I made almost all their clothes and did a lot of hand stitching, and French hand sewing...pleats, insertion lace, entreduex, etc....so I thought I would see if I could still remember how to do a "faggoting" stitch.  I punched the holes using a EK Success border punch, then cut it apart between the holes.  I then punched the embossed scalloped border.  I adhered both pieces of the red on some copy paper so that I could keep my stitches evenly spaced and then joined the two pieces using the faggoting stitch with some light pink embroidery floss.  Very time consuming...and I might have liked it better if I'd used a different colored floss....live and learn. Sentiment is a very old SU sentiment stamped in SU real red.


I found some gold and silver "thread" in my old sewing things (I haven't dug around it that for a while!) and was playing around stitching a grid on a piece of white card stock.  It wasn't too bad, so I decided to add a little to it and make a card.  The ornament was cut with a Spellbinder die and the sentiment is from PTI.  I heat embossed the sentiment...and YAY ME!!! I didn't smear it all over the card!! Added a small gold border and layered it on a white card base.


I don't know why I'm even posting this one...I didn't like the end result at all, but I had these never been used chevron dies and just wanted to do something with them!  Cut three pieces of card stock, adhered them to a white panel, pierced down each side of the chevron and connected the piercing with a black pen...giving me a semi-realistic stitching.  Sentiment is a SU stamp that I found in my stash...don't know how long I've had it.


This was the last card I made...and only because I had colored these pears (Flourishes) several weeks ago and they were just lying there on my table staring at me....and all but saying ...put me on a card!!!  So....I did a couple of rows of stitching around the panel, stamped the sentiment (Flourishes), then distressed the edges of the panel before popping it on a green background on a white card base.  Is there enough white space.....I just don't know...you be the judge.

Also wanted to share another layout I did recently.  This is photos of my son when he was just a month or so old.


His Grandmother and Great Grandmother came over to our house to meet him for the first time.  I used My Mind's Eye papers for this layout.  I cut the hexagons with a QK die....notice that there's two sizes here. I added a label over the banner on the top...it was just too much pink for my "boy" layout. I've been trying to incorporate my stamps in my scrapping when I can, so the title work was stamped using a PTI stamp as was the name, Matthew.  The "ribbon" I ran through the name tag was embossed with the grosgrain embossing plate...kind of hard to see that here.  I also added quite a bit of faux stitching to each of the hexagons and on the tags.  This little boy is now 33 years old! It's so hard to believe how quickly time passes!!

Thanks so much for taking the time to stop by for a visit.  If you leave a comment, please know that I appreciate each and every one! Until next time...

Hugs!
Photobucket


Pin It!

OLW 97 - Get in Line

I'm finally getting around to playing in the One Layer Wednesday challenge again.  This week the challenge is hosted by Heather Telford at Bits and Pieces.  Heather has challenged us to make a card with lines one it...they can be straight lines, zig-zags or curves, just as long as they are obviously lines.


My card was super quick and super simple....one piece of Kraft card stock folded in half.  Stamped the dotted lines from PTI and added the PTI sentiment.  Then I colored random dots with Prisma color pencils and added a touch of stickles to the dots.  Easy-peasy...

Thanks so much for stopping in!  Your comments are always appreciated! Until next time....

Hugs!
Photobucket


Pin It!

Sunday, July 15, 2012

Diva and Dare....read on....

I've been slow to post lately...just lazy I guess!  This week Erin has again provided a template for our weekly Dare Challenge.  Here's what our template looks like this week.


Here's my finished piece.  Can you see the template?  I didn't think I would be able to do this one...but once I finished, I think I might just give it another try!

Another challenge I like to play in when I have the time is the challenge from Laura at I am the Diva.


The founders of Zentangle, Rick and Maria, recently designed a new tangle called Auraknot.  Last week Rick and Maria showed us the new tangle in their newsletter.  I find that I'm really enjoying this new tangle. I still need some practice, but I'll get there!

Thanks so much for stopping by!  Your comments are always appreciated!! Until next time...


Hugs!

Photobucket


Pin It!

LIM76 & OLW 96 - - One layer week

Yesterday a new challenge was posted at Less is More.  This week just happens to be the week for making a one layer card.  Chrissie and Mandi also told us that we've been challenged to use three of anything...that is...three colours, three images, three stamps, three words, the number three.... it's up to you, but don't forget the white space, a simple design and just one layer!

Once again this week I was challenged to create a card that I was happy with.  So...without further adieu...here's my  cards for this week's challenge.
 

This first card was actually the last card I made and I think it's my favorite card.  I used...3 trees and three birds...and I guess you could add three stamps (trees, birds, sentiment)....and three different color inks...green, blue, and black.  I stamped the trees from Heartfelt Creations in distress ink (peeled paint).  Then I masked off the strip and sponged the ground with the peeled paint and the sky with tumbled glass (DI).  The birds are from a Gina K set.  Grass was random swipes with the peeled paint distress marker. The sentiment is from a really old HA set, I think.


This card was created using these three Papertrey Ink stamps.  They're all from the same set and made so that you can use them to create grids. Here are the three stamps I used to create the above image.  Added a touch of glittery-sparkle and stamped a sentiment from HA. ( I think this would qualify for the OLW challenge too...Woohoo...look at me combining two challenges! Almost NEVER happens!)


This card was my first attempt at using these three stamps...and as you can see, I had to change direction when I managed to get the image off-center, so I just cut it down and matted it with the teal and popped it on a card...definitely not one layer, but at least I was able to salvage the image...because I actually like it better than the one above!


This fish card was actually the first card I made and it just didn't come out quite like I'd envisioned.  It's not bad...just not what I wanted.  To make this card, I punched three squares in a post it and masked the card.  Then I sponged the blue (water) and stamped the fish.  The fish stamps are from Hero Arts and it was actually three fish on one stamp, so I cut them apart (GASP!) to use them separately.  The bubbles were actually on a stamp with another fish in the set and I cut them off to use here.  Sentiment was handwritten.  You can't really see it here, but the bubbles have a coating of glossy accents. Maybe I can use this for one of our grandchildren.

This last card looks a little blurry...sorry.  I used the same sentiment stamp and stamped it three times....scored a few lines on either side and added a couple of square blue bling to separate the phrases.  This card would also work for the OLW challenge this week, which is to make a one layer birthday card with bling.

I finished a layout yesterday too.  This is my granddaughter, Helen Grace.


This is her kindergarten picture...cute isn't she!  I used some papers from MME Be Loved collection.  The scalloped edge was punched with a EK Success border punch.  The mats were layered with some orange card stock.  The books, apple, Little Miss Giggles in the upper right corner, the abc's, and that adorable little bookworm were cut with the Cameo.  The strip across the bottom under the books was punched with an EK Success punch also. The blooms on the journaling block were cut with a Lifestyles flower die and layered.  Journaling reads:

Helen Grace, it’s hard to believe that you’ve already finished kindergarten.  It seems like yesterday that you were getting ready to start your first day of school.  You were so excited to start school.  In fact, I heard that the one thing that you asked your teacher on that first day is, “am I going to learn to read today?”  You were so excited about learning to read.  Now you’re heading to first grade and you are a great reader.  You were able to read some Dr. Seuss books to me before you finished the first half of kindergarten.  You are so smart and I’m very proud of all that you’ve accomplished!

Just one more post today and I'll be all caught up! Whew!  I know this was a long post...and if you've hung in there to the end...bless you!  Your comments are appreciate so very much! Until next time...


Hugs!
Photobucket


Pin It!

CASology

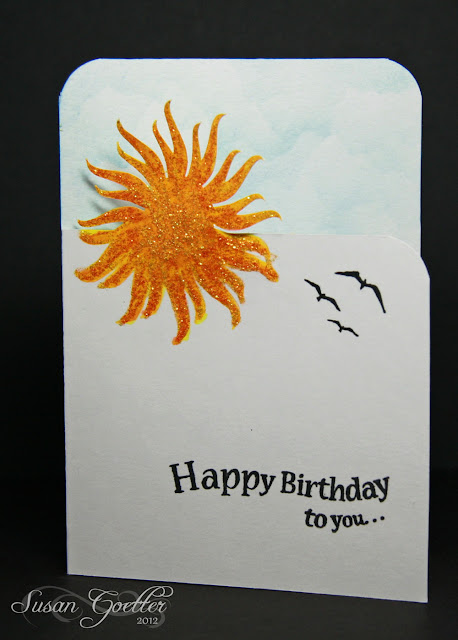
I really wanted to play along with this new challenge at CASology, but the week just got away from me!  I think I'm barely squeaking in before the challenge ends!  The cue card word for this week is "SUN".


I actually finished this card yesterday, just got lazy and didn't get it posted!


I cut the card with the sun peeking over the top of the short edge of the front of the card (did that make sense?)  I had also cut another sun so I used it to trace the lower half of the sun onto the card front under the edge.  Colored the sun with Copics...then added a touch of glitter...and stamped three little birdies flitting off into the sunset.

Thanks so much for popping in...Until next time....well, actually in a little bit I'll be posting again...

Just dawned on me...this is a one layer card and would probably fit the OLW challenge as well as the LIM challenge....DUH!

Hugs!
Photobucket


Pin It!

Monday, July 9, 2012

Glue, Paper, Scissors....

I've managed to finish a few layouts recently.  Some of these have been in an unfinished state for a while, so it was a good feeling to get them finished so I can put them in an album.


This is my grandson's first grade photo.  I think photos have improved drastically since my children were in school!  I used my Cameo to cut the number border, the title work and the tag the title work is on.  The border down the side of the photo was made by cutting 1 inch squares and adding a star brad to the center of each.  I also added some larger silver stars to the bottom striped piece and the top striped piece.  I added quite a bit of doodling around the page.  I also made several number "1's" to layer over the 1 in the number border to emphasis that this was his first grade photo.  Paper are from a couple of My Mind's Eye collections.


This layout was made using the graduation invitation from our granddaughter, Camilah.  Just some random paper scraps from my stash.  The title work "2012" was cut with the Cameo.  I cut several layers and stacked them for added dimension.  I also added some liquid pearl dots in turquoise to each letter.  Tags were cut and punched with a corner chomper, and the sentiments from Papertrey Ink were stamped in black on each of the tags.  I added a bit of doodling to the layout also. The owl was cut with the Cameo, colored with Copics, and paper pieced.  The large journaling block was cut with a Spellbinder die and the verse was printed on the computer.  The verse printed on the tag is the verse on the invitation - Philippians 1:6.  Journaling reads: And I am certain that God, who began the good work within you, will continue his work until it is finally finished on the day when Christ Jesus returns.  


I found these photos of my children when they were young and scanned, cropped, and re-sized them for scrapping.  I've found that most of the photos of my children that were taken in the 70s and 80s have turned yellow/orange and I have to scan them to return them to (sort of)  the original colors.  The little people are cut with the Cameo, as is the title work and the bug.  I used a punch for the scalloped border and the journaling tag pull. Lots of doodling on this one too.  Journaling tag reads:


Just look at the three of you…so little… and just a cute as can be!  Sometimes it’s difficult to remember the days when you were this small.  These photos of you two girls “holding” your baby brother are so precious to me.  I’m so glad I have these photos to remind me of these precious moments!  

Thanks so much for stopping by for a visit!  As always, your comments are greatly appreciated!  Until next time...

Hugs!
Photobucket


Pin It!

Dare Challenge #13

It's been a few weeks since I played along with the Dare challenge. This week along with the template Erin has provided, we're also challenged to  have some fun playing with papers we would not normally Zentangle with.  The only rule is that we cannot use traditional Zentangle paper or tiles. We can use scrapbook paper, stationary, a brown paper lunch sack, or old gift wrap.  I chose to tangle on a scrap of white scrapbook paper.  My paper is approximately 5 x 5 inches.


I have a couple of additional tiles I'd like to show you today.  This first one is a template from the Dare challenge #10.  I've had it done for a while, just never got it posted.


Not sure I was crazy about it when I finished it...the center kind of looks like a bug/insect to me!  This last one is one of the round Zentangle tiles I purchased some time back and I'm slowly working on them.  I think I'm purposefully working on them slowly, just because I don't want to use them up too fast! LOL!


Thanks so much for stopping in.  I have some scrapbook layouts that I'll probably post sometime today or tomorrow.  As always, I truly appreciate all of your wonderful comments!  Until next time...

Hugs!

Photobucket


Pin It!

Sunday, July 8, 2012

LIM75 - Show Us the Gold

As some of you have noticed, I haven't played in the LIM challenge for a couple of weeks.  I want to take a minute to say thank you to those of you who sent me a card.  For all the thoughts and prayers of those who left me a message on my blog, I'd also like to say thank you for your messages.  It's been a tough couple of weeks, but I'm working on moving forward.

It's difficult to get back into the swing of things and Chrissie & Mandi's challenge this week at Less is More is to make a card with "gold".  Maybe I should have waited another week before jumping back in!  As usual, I've made quite a few cards, none of which I'm overly delighted with, but I do kind of like this first one.


The butterfly was cut from a dull gold paper.  I embossed the diamond panel with an EF, and added the half pearls.  I didn't have gold pearls, so I colored them with a gold leafing pen.  The tag was cut with a Spellbinder die and the sentiment was stamped in gold.  I added a gold ribbon to hold the tag.


For this second card, I cut a flourish from gold paper with my Cameo. The sentiment is embossed with gold, and I added a gold layer behind the white and cut the corners with a (Deco) corner chomper. Then I popped it with pop dots on a white card base.


Very quick and simple...cut the dandelions from gold paper with the Cameo. Stamped the sentiment with gold ink.


This card was a pain and didn't turn out at all like I'd planned.  I cut the ornaments from gold textured paper with the Cameo.  I used a gold cord to hang the ornaments.  Originally this was going to be a red card base until I realized that I had adhered the ornaments and stamped the sentiment on the card upside down. So...I had to cut it apart and just use it as a topper on a white card base.  The sentiment is stamped in gold ink and is a SU image.  I tied little bows from the gold cord to add to each ornament.


This card is probably totally out of the ballpark, but I had a piece of glossy card stock that I'd played with using alcohol inks.  I'd also added some gold to the alcohol ink process.  I punched some flowers out of the inked up glossy card stock and added gold brads for the centers.  The leaves were cut from gold paper with a Memory Box die.  The sentiment was computer generated (and probably would have looked better moved over a little further to the right...sigh.

So, this is my take on the "gold" challenge.  If you'd like to see some really great cards, hop on over to Less is More and check out all the other cards.  

Thank you so much for all the nice comments you leave for me...they mean a lot and help to brighten my day!  Until next time....

Hugs!
Photobucket


Pin It!

Tuesday, July 3, 2012

Life is Short - Make Every Minute Count!

My Mama....Ruth Pace Perdue - April 3, 1925 - June 23, 2012.  She was the last of ten siblings and now she has gone on to her heavenly reward.  I will miss you, Mama.  

Ruth Pace Perdue
~circa age 20

Ruth Pace Perdue
~circa age 86
I wanted to share a poem that my Mama wrote...

God's Way

My God is always with me,
As I live from day to day,
His Hand is there to guide me ---
His word shows me the way.
Sometimes the task seems long & dreary-
And oft times – goes undone,
As the devil tries to lure me,
From a lost one – waiting near.
But--- if I will have more faith
And trust Him
God will give me words to say,
And the lost one will find salvation
In God’s own --- & wondrous way.
                                  - Ruth Pace Perdue


An excerpt from her obituary...

Ruth Pace Perdue was born April 3, 1925 at Chula, Georgia to the Reverend William Wesley Pace and Susan Ola Catherine McDowell Pace.  She was married in 1945 to Edward Pierce (E.P.) Perdue for 54 ½ years and he passed away May 19, 2000.  Mrs. Perdue accepted the Lord and was baptized at the age of 11 ½ at the Springhead Baptist Church, Plant City, Florida, where her daddy was the pastor.

Both of my parents are gone now.  It feels so strange to know that I can no longer call them and chat for a while.  

If you're lucky enough to still have your parents, take a minute right now to give them a call and tell them you love them.  Life is short, and before you know it, they won't be there for you to tell them you love them. Go visit with them...give them a hug and kiss...make every minute count.  Have no regrets...

Photobucket


Pin It!

LinkWithin

Related Posts with Thumbnails