The
Less is More challenge this week is a one layer card with the theme of leaves. Of course, I just made a card last week using leaves....just saying, Chrissie and Mandi! LOL! Oh well...last week's card wasn't one layer, so I had to do a little thinking about this one.
I'd also like to say
Thank You to Chrissie and Mandi for selecting my card to be showCASed from week 39. I was certainly surprised to see
this ornament snowflake card in the showCASe! I'd also like to say that I'm sorry that I haven't made it around to very many blogs in the last few weeks. I do look at most of the cards, but life has been so hectic lately that I just haven't had time to leave comments!
So Sorry!! I'll try to do better this week...although with this late start I'm getting, I'm not sure how that will work out!
Moving along...I've actually made two cards this week. I'm still working on my Christmas cards, so I wanted to make one of them a Christmas card.
For this first card, when I was looking through my punches, I realized that I have three similar punches in three different sizes...so I decided to create something with them. I punched the leaves (using the 3 different sizes) down the right front of my card base. To add color without layers, I masked off part of the inside of the card (just enough to fill the leaves) and sponged on distress ink in Worn Lipstick, Spiced Marmalade, Pine Needles, and Mustard Seed. With just the sponged ink the leaves looked a little blah, so I decided to add a touch of color in splotches. To do this, I crumpled up a piece of paper and tapped it on the darker ink pads and then used the crumpled paper to "stamp" some random lines/splotches on the sponged background for each leaf. On the bottom leaf I tapped with Worn Lipstick and Pine Needles and for the two smaller leaves I tapped it with Spiced Marmalade. I think it gave a very nice effect. The sentiment is from Flourishes. Now...about that sponged strip on the left....I added that because I managed to get my inky fingers on the card and leave a smudge...so what to do? Cover it up with a little sponging to match the inside! Saved!

Here's a photo of the card from an angle so that you can see how the inking was done.
For my second card, I used a holly leaf stamp that I've had forever. I'm not sure, but it might be an Inkadinkado stamp. I stamped in Memento black. The stamp has three leaves and some berries on it. To make it conform to the shape I wanted, I drew a circle with a pencil so that I could line up my stamping. I also cut a mask from a post it note. The image was actually stamped 6 times to get this shape. I colored with Copic markers, then using my Sakura clear star pen, I highlighted all the leaves and the berries. After that dried, I went back and coated all the berries with glossy accents. In real life, this card is very sparkly and pretty. The sentiment is from Flourishes.
I wanted to share another layout while I'm posting. This is the first layout I've completed since my hubby got home from the hospital...and it seemed to take forever to finish. I hadn't scrapped in over a month, and it seemed like I'd forgotten what to do! LOL!

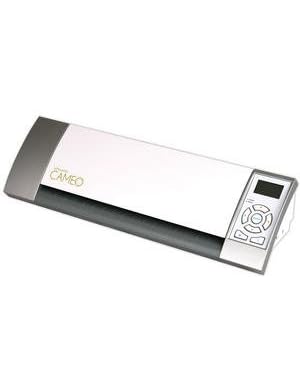
This is my precious little granddaughter, Maggie. Photography by Amy P Photography. I just love these cute pictures...and Maggie is just adorable!! For the layout, I used Echo Park Little Girl collection. The photos are backed with a dark pink card stock. All the little circles were punched from the design on on of the papers. All small circles are pop-dotted on the page. I added a touch of glitter to the center of each circle. The little birds on the bottom were also cut from one of the papers in this collection. I punched a dark pink border with a MS edge punch that embosses along the scallop. The title work was all cut with my new Cameo. The Cameo is new from Silhouette - it will cut up to 12x12 inches and all the files from my Silhouette work with it. So far, I'm loving it! The ballerina was also cut with the Cameo, and I added a sparkly top and a tulle skirt with a bow to the ballerina. I also added some sparkly toe shoes, but I don't think they show up very well. I used a dot of stickles on each of the letters and also on the tulle skirt. The title work and the ballerina are all on pop dots. IRL this is a very glittery, girly layout. I used a Sakura clear star pen to outline each of the title letters. The pen give just a hint of glitter to the edges. The journaling is tucked behind the top of the pink mat and reads:
Maggie, you are so adorable in your little pink tutu. You have the brightest eyes and such a solemn expression on your face. Your crocheted hat is just precious with your tutu, but it covers up all your blond curls. You are so precious and I wish that I could see you more often than I do. These photos of you make me want to pick you up and give you lots of hugs and kisses. Photos – April 2011
Here's a photo of my new toy cutting machine.... the Silhouette Cameo. THIS is a cool cutting machine!

That's all for me today...bet you thought I'd never stop! LOL! Thanks so much for stopping by! Your comments are greatly appreciated! Until next time...
♥ Hugs! ♥