Showing posts with label Cameo. Show all posts

Monday, April 11, 2022

Time Flies!

WOW!  It's been 2 Years since I last posted.  I've been very busy...you know....covid...and other stuff!

I haven't done as much card making as I used to.  Seems like I'm doing a little more scrapbooking now.  I have made numerous cards, just didn't get them photographed and posted.

Here's a few of the layouts I've done in the past year or so...
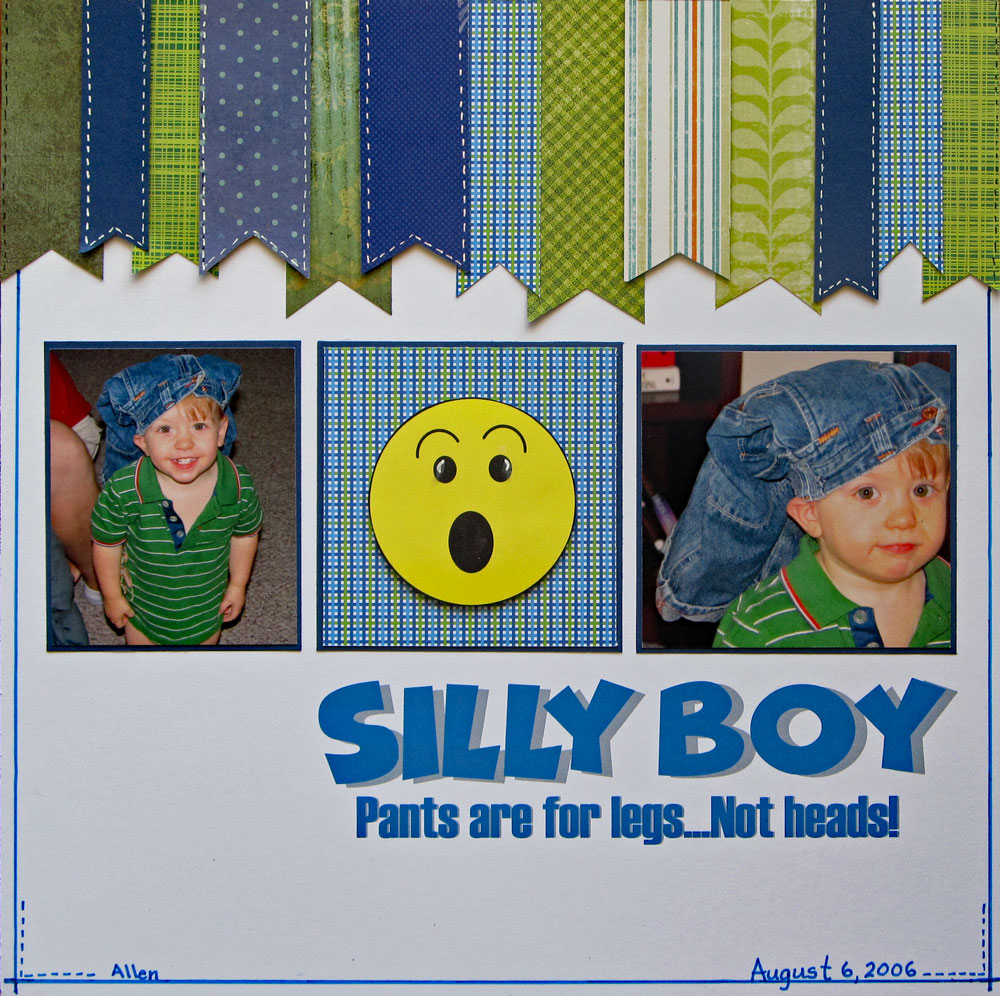


This first one is a photo of my grandson, Allen, taken in 2006. He's 17 yrs old now! Made this layout totally from scraps (except for the white background paper). Matted each of the photos with dark blue as well as the ppr piece in between the photos. I printed the tile work (designed in the Silhouette program) directly onto the white background. The Surprised "face" was also designed in the Silhouette program. I added some faux stitching to the banner tabs across the top and drew some lines around the edges of the background. Fairly quick and easy layout. No journaling...just added his name and the date of the photos on the layout.


My dgs, Tyler on his 4th birthday. I made his t-shirt birthday cake that year. I used EP Everyday Eclectic papers for this layout. The round photo was matted on a scrap of red polka dot paper and both the photo and mat were cut with a stitched edge die. Balloons are a die from Simon Says Stamp and were cut from white card stock and colored with Copics. String on the balloons is tatting thread. I designed the title work in the Silhouette program and cut it out 4 time to layer for dimension. I also added Nuvo Crystal Glaze to the top of the letters. The little cake embellie is from the Silhouette design store, as are the tags that I added information to them. I also added thin red strips of card stock around the blue background. No journaling on this one...photos tell the story.


Photo of our oldest son Glenn when he was about 18 months old. I used some OLD Basic Grey papers - Hopscotch and the blue is from BG Blitzen Collection. I kind of follow a sketch from Pagemaps...with a twist. I created the "Family tag in the Silhouette program and journaling was also done in the program. Circle was cut with a large circle die. Border strip across the top was punched with a MS punch (OLD). I added some faux stitching and some black Nuvo drops. Butterflies were cut with a Simon Says die and I added some tiny blue bling to the bodies. The butterflies were sprayed with some sparkle mist but it's difficult to see in the photo. The title tag reads: Family - today's little moments become tomorrow's precious memories.


Photos of my son and my grandson (his nephew). I used REALLY old Basic Grey papers - Marrakech. Really digging back into some of my stash now! I used the threading waters border punch to punch the scalloped mat (found a video online to remind me how to use just a border punch without the corner punch). The "laugh with me, giggles, laughter, and just plain silly" are all rub ons that I found in my stash. I punched circles with a 2 in, 1 3/4 inch and 1 inch punches. I printed the "uncle Matthew & Jacob" on the circle punch after I punched it. Did a bit of doodling on some of the circles. The image on the light blue circle on the right is an old SU image I stamped in black. Title work was designed in the Silhouette program, printed, and cut with the Cameo several times for dimension. Working on using some of my old stuff instead of buying so much new stuff! 
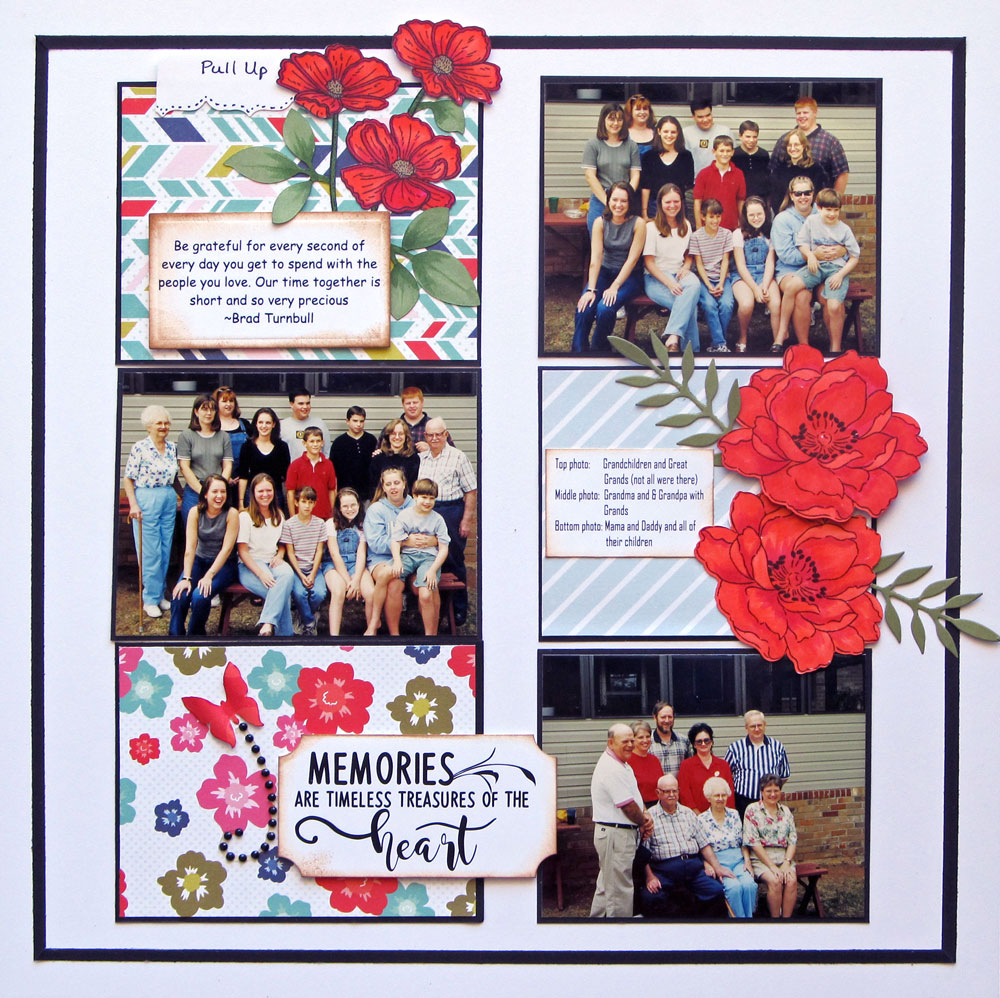

Photos taken at our family reunion in 1999. I matted each photo and the ppr with black card stock. The flowers are from my "bits and pieces" basket (things I've cut out/made but didn't use) Top quote was computer generated and cut out with a Spellbinder die. Big flowers are stamps from Altenew. I'm not sure about the smaller flowers...maybe Altenew? Ppr is from EP Anything Goes collection. Title work tag was computer generated and popped on foam for dimension. Butterfly is a MS punch and the trail is a part of some black bling swirls. I cut 1/4 inch strips of black card stock and made a box around the photos and ppr. Journaling is tucked behind the top left piece.

Maybe I'll get better about posting...one can only hope! LOL!  Thanks for taking the time to stop by!  I appreciate any and all comments!  Have a great day!
Photobucket


Pin It!

Saturday, August 25, 2018

Back Again!

I've managed to get a few things done in my craft room this week.  A couple of cards and a new layout to share with you.  


This first card is one I made after watching this video from Jennifer McGuire.  This is a super cute card when it's all finished.  I used the inside rectangles on the front of the card. All the flowers I used are from Altenew's Garden Treasure stamp set.  The greenery is die cut with a MFT Leafy Greenery Die set.


I stamped lots of images and then added them to the layers inside the card.  The background was stamped with a large background stamp from IO.  You should go watch the video...super cool techniques


This second card was created using 1/4 inch washi tapes.  I just layered them on a card sized rectangle, then trimmed it and added it to a card base.  The sentiment is Birthday Palooza from SSS.  I cut the "Happy" directly from the washi tape background, then popped it with craft foam. Added a few sequins and it was complete!


This is a layout I just completed.  Photos were taken over 10 years ago.  I was working in St. Augustine and my husband decided to make the trip with me and we spent each evening exploring this wonderful city.  Full description of what I used can be found in my gallery at scrapbook.com.

Thanks so much for stopping by!  If you've left me a comment, please know that I sincerely appreciate each and every one!   Hope to see you again soon!
Photobucket


Pin It!

Thursday, August 16, 2018

A few more cards to share...

Surprise! Surprise! I'm back again!  I know this breaks from my normal wait a month before posting...just trying to keep you on your toes! LOL!  I have a few more cards to share!  Unfortunately, I had to make a sympathy card and a card for a friend who recently broke her foot.  So, trying to stay on top of things, I thought I'd share them with you!


This first card I made for my DIL who recently lost her mother.  I used Altenew's Garden Treasure stamps.  I made the striped background as well as the gray strip in my Silhouette Cameo program. I stamped the blooms in shades of gray (however, I think one of the stamps must have had a touch of pink ink on it still, because the blooms have just a touch of pink in them...weird!) Stamped the leaves in green and fussy cut all images.  The sentiment is also from Clearly Besotted. Grey striped panel is popped off the card base with craft foam.


Stamp used for this card is from Penny Black.  I used a small strip of black strip that I made and printed. After stamping and coloring with Copics, I fussy cut the edge of the bloom so that they would hang off the edge.  Popped the panel with craft foam and put some pink card stock on the right side. Sentiment is also from Clearly Besotted.  I added a few drops of Nuvo morning dew to finish it off.


Always in need of restocking my birthday cards, I made this card following a video from Jennifer McGuire.  Super easy to make. I used craft card stock.  I stamped the white background with white ink with a stamp from Impressions Obsession.  The candles were created in the Silhouette program and cut out with the Cameo as was the sentiment inside the card. I added a touch of sparkle with a clear wink of stella brush to the flames and I added glossy accents to the candles on the front of the card. Sentiment on the front of the card is from PTI. The circles on the front are the circles I cut from inside the card.


It's difficult to photograph the inside of this card...this was the best shot I could get.

Thanks so much for stopping by!  If you've left me a comment, please know that I sincerely appreciate each and every one!   Hope to see you again soon!
Photobucket


Pin It!

Monday, April 16, 2018

What I've been up to lately....

I can't believe how busy my life is sometimes!  I thought I was busy when I was working...but retirement...WHEW!  I really stay busy now!  I think I might also have a bit of an attention problem too.  I have so MANY hobbies that I love, that I tend to flit from one thing to another!  Am I the only one that does this??  I love quilting, sewing, scrapbooking, card making, reading, tatting...the list could go on and on!  Lately I've also been doing a good bit of volunteering at my church.  Vacation Bible School is coming up and there's lots to be done.  

Here's some of the boards I made last week for VBS.  I cut all the images on my Silhouette Cameo...bearing in mind that the Cameo only cuts a 12 inch wide image....that meant I had to cut all of these in pieces and then piece them together!  I've never worked on anything this large, and was scared to death that I'd ruin the boards the church had made for me to make the signs!


To give you a little perspective on how large these boards are...I stood beside them to have my photo made.  Seeing a photo of me makes me realize just how "old and fat" I am! LOL!


I've also done a good bit of scrapbooking recently.  I scrapbook on 12 x 12 papers.  I'm trying to get some of my older photos done so that my children will know more about who their ancestors are.  If you want more information on how I made these layouts, I've given descriptions in my gallery at scrapbook.com (here's a link...sgoetter)  Here's a bit of what I've done in the last few months....


I've also made a few cards in the last couple of months, but nothing specific for any of the challenges.  I miss playing in the challenges, but I just can't seem to get everything done that I want to do!

Thanks so much for stopping by!  If you've left me a comment, please know that I sincerely appreciate each and every one!  I know this is a photo heavy blog post, but if you've managed to make it through to the end....bless you!  Hope to see you again soon!

Hugs!
Photobucket


Pin It!

Saturday, January 13, 2018

CASology - Hugs

Still working on replenishing my card supply.  Finished another card to share with you today...this one is for the CASology challenge. 


Here's my card for the challenge....


This card was made entirely with the Cameo.  I printed the "sending you big" and "for your birthday" on the card then cut out the word "hugs" that I designed in the Silhouette Studio program.  I also added a line of stitching around the edges of the card front with the Cameo. The hearts were cut from red card stock.  I colored the word "hugs" with Copic markers, then added a layer of clear wink of stella.  I also added the wink of stella to the red hearts.  Then I coated them all with some glossy accents.  The word "hugs" was also cut 4 times and layered to give some dimension.

As always, thanks so much for stopping in.  I appreciate your visit...and I appreciate each and every comment!
Photobucket


Pin It!

Wednesday, May 24, 2017

Merry Monday and a Little Scrapbooking

Thought I'd play along with Merry Monday Christmas Challenge this week which is to create a card using mistletoe.  


Here's my take on the challenge...


I cut out the mistletoe on my Cameo...including the big bow.  I printed the sentiment through the Silhouette program, then cut the stitched border with a die from SSS.  I cut the berries separately and popped some of them with foam tape. I colored the mistletoe, berries and the bow with Copic markers.  I also added a touch of wink of stella to the berries. Added it all to a red card base...and done! 

I've gotten back to my scrapbooking a little more.  I hadn't scrapped in so long that it's like learning how all over again.  I've managed to complete about 6 layouts in the last week...so I must be getting my mojo back! LOL!


Photos of my youngest daughter when she was about 12 years old. I used October Afternoon papers along with some red card stock and a stripe from my scraps. I created the title work in the Silhouette Program. The little girl carrying the cake is a stamp that I colored with Copics and fussy cut. I added some Nuvo drops for the bumps on the cake and a little Wink of Stella on the stars and her headband. The "messy hair, Don't care" tags were created in the Silhouette program and printed. The red tags were stamped and heat embossed in white. The dog and the two red tags were MFT's four legged stamp set. The presents across the strip are a die from Simon Says Stamps. After die cutting it, I colored all the little present pieces and put them back in the die. Journaling was computer generated. 


Photos of my mother holding my second daughter, Kimberly when she was just 6 days old. Word paper is from Echo Park "Our Family" collection. Red paper is some really old paper from my stash. Hearts were die cut and punched. All were coated with Wink of Stella, and some of the hearts are covered with glossy accents. The leaf branches are a MS punch just joined together end to end. I added some faux stitching and some lines around the base pieces. The arrows were cut from paper in the EP collection. Journaling is tucked behind the word mat and there is a heart pull tab at the top. Title work was generated in the Silhouette Program and cut out 4 times and layered for dimension. The "family" tag is from the EP collection. 


I just finished this layout today, and thought I'd get it posted too.  Photos of my two youngest children with their elementary school PE coach.  He was a part of their lives from kindergarten through 5th grade.  We also attended church with him and his family.  I used the plaid papers from Lawn Fawn.  The title work was cut with the Silhouette (three times and layered for dimension).  The whistle and school bus are from the Silhouette store.  I colored the orange strip and the title letters with Copic markers. The wood grain paper is from Echo Park "It's a Boy" collection.  I added some black lines and faux stitching. The yellow circle behind the title work was cut with a die then embossed with a stitched die. School bus and whistle were adhered with foam tape. Journaling is tucked behind the solid yellow mat.

That's all for me today....As always, thanks so much for stopping in.  I appreciate your visit...and I appreciate each and every comment!
Photobucket


Pin It!

Tuesday, May 16, 2017

Graduation...and SO much more!

Once again, I've been missing for over a month!  I just don't know where the time goes!!!  It's not that I haven't been creating....I've just been BUSY!  I have so many creative interest, that I tend to jump from one activity to another!   I've knitted several hats and booties sets and have done quite a bit of sewing for our sewing ministry at the church...sewing blankets, burp cloths, and bibs for the mission team to take to Alaska in a few months.  I've also done a little scrapbooking in the last few weeks. In working to clean up some of my projects, I've found 2 quilts tops that were pieced by my grandmother and two that were pieced by my mother. Would love to get them quilted sometime this summer! I've made just a few cards, but didn't manage to get them photographed before I sent them off in the mail.  WHEW!  

I told my children recently...When I die and you all start cleaning out my house....I can hear you saying..."Did Mama EVER finish anything!!!"  It seems that I have a LOT of projects about half finished.  Just for the record...I have finished a lot more than I have left to finished! Is anyone else out there as bad as me?!

Anyway...let me show you what I finished this week...


My granddaughter, Katie, graduates next week, so I made this card just for her.  Above is the front of the card, and below, is the inside of the card. 


This is the first time I've made a step card like this.  I cut it out with a file from the Silhouette store. Super simple to make once you have the pattern! I made the "congrats" paper on the front side of the step in the Silhouette program.  I added a verse to the right side that I thought was perfect for a graduate. It's 1 Timothy 4:12.  Then I added the "so proud of you" ...then I cut it with the Silhouette Cameo.  I made a little pocket on the left side to slip some $$$ into...I love how this turned out!  The front of the card was stamped with a PTI sentiment and heat embossed.  The graduate is a design for the Silhouette Store.

I shared a photo on my last post of Katie's senior prom...and then finally got around to scrapping a couple of the photos I took.


The filmstrip and music across the bottom are both washi tape.  I cut the doily with the Cameo.  The flowers and leaves are from Altenew and Tim Holtz (blue flower). Journaling is tucked behind the photo mat.


This second layout has a lot of glitter paper and foil paper accents.  I cut the title work with the Cameo and layered it 3 times for dimension.  Again the blooms are from Altenew.


I've been digging through some of my old photos recently...and I have BOXES of them! I found these photos of me and my first husband (my children's father who died in an accident before our 3rd child was born)  Although the photos aren't really great, I know my children will enjoy these layouts. Made a grid layout and accented with stickers, die cuts and rub-ons.


Just finished this layout a couple of days ago.  My girls with their daddy's parents.  Simple layout...made the title letters on the Cameo, then used glossy accents to give them a little dimension. The three scalloped circles were cut with Spellbinder dies. Wooden accents are just some old stuff from my enormous stash! Journaling was computer generated and raised from the layout with some craft foam.

So...I have been busy, just not very consistent about getting photos taken and posting it! If you have any questions about any of this, just send me an email by clicking on the contact me envelope on the sidebar.


That's all for me today....As always, thanks so much for stopping in.  I appreciate your visit...and I appreciate each and every comment!


Photobucket


Pin It!

Friday, February 10, 2017

Four Challenges...

I've made a few cards this week, and thought I'd link them up to several challenges.  I even made a card or two that would fit more than one challenge!  Yay, Me!

I will be playing along with the following challenges:  CAS(E) this Sketch, Happy Little Stampers, CASology, and Merry Monday!  Whew! That's a LOT of challenges for me!


So, let's get started....


This first card is for CAS(E) this Sketch.  I used a really old "Magnolia" stamp.  When I saw this one, I just had to have it...and I probably haven't used it 2 times!  The little girl was facing the wrong way, so I scanned the stamped image into my Silhouette program and flipped her horizontally, then used the trace feature to trace her and then welded the image into a rectangle, so that I could cut out just her legs with the Cameo.Much easier to do than to explain! LOL! I cut the cloud (SSS) from the rectangle, then ink blended the blue sky before popping the cloud back in (raised with foam). The little girl is colored with Copics and the sentiment is computer generated.


This second card is for the CASology challenge with a cue word of "hero".  My youngest grandson is a HUGE fan of Batman, and even though his birthday is a ways away, I thought I'd get his card done for him.  The Batman image is from the Silhouette Store.  I created the "Bam" accent in the Silhouette program as well as the sentiment.  I printed all of this out and cut it to 4 x 5.25 inches.  I colored in some "ground" under Batman.  I also printed out another of the "Bam" stars and popped it over the one on the card.  I added a very small black border and adhered it to a white card base.


This third card is for a couple of challenges - Merry Monday and HLS - Anything Goes with Dies.  I used a Christmas tree die that I've had for a while and cut it from a card panel.  I had to add a piece of acetate behind the aperture so that I'd have something which I could used to adhere my tree back in the aperture.  I then popped that panel over a inked panel.  To make the inked background, I used the TH spritzer, and my Tombow markers and spritzed two different colors of ink on a small panel that would fit behind the tree.  I then used my WOS silver and gold pens and flicked some of the sparkly WOS onto the green.  It's difficult to see, but there's really a lot of shine behind the tree.  I cut the sentiment "merry" (SSS) from card stock and from foam, then added a bit of glitter to the bottom portion of the letters.  The "Christmas" is from DRS Designs.  The star is popped with foam tape, and painted with gold WOS. (Cut with a SSS die)


This last card is just me playing around with some water colors again.  I wanted to create a "scene", but this one fell a little short of what I was trying to do...but it's okay.  If practice really makes perfect, then I should be getting better at this, don't you think?! LOL!

That's all for me today....As always, thanks so much for stopping in.  I appreciate your visit...and I appreciate each and every comment!
Photobucket


Pin It!

Wednesday, September 21, 2016

Lots to Share....

First of all...I must warn you....this is a VERY photo-heavy post! 

I've been extremely busy making cards, and just never could get around to posting them.  I needed quite a few cards for the widow's group meeting this month, as we ended up mailing out almost 30 cards to the home bound members from our church.  

So...off we go...and I'll give a brief description for each card, but as always, if you have specific questions, use the contact me button on my blog and I will get back with you as soon as possible.  


Water color with Zig clean color brushes on Bristol paper, mounted on a pink background. Added drops of irResistable.  


One layer card, stamped with Harvest berries from PTI in shades of blue from Hero Arts.  Sentiment is from a very old Flourishes stamp set. Berries are coated with glossy accents and a little wink of stella added to the leaves.


Image cut with Silhouette Cameo, colored with Copics and adhered to card base...with flowers popped off the paper with foam tape.  Sentiment is from SSS.


Image from SU on Bristol paper, and colored with Zig Clean Color brushes.  Sentiment is from Hero Arts.  Added wink of stella on the blooms.


Same image...another color and colored this time with Copics.


Image from SSS and sentiment is from PTI.  Stamped on Bristol paper and colored with Zig Clean Color brushes.  Popped on a deep purple background.


Image from Power Poppy, brought into Silhouette program and made a cut file to cut the flowers out. Printed the sentiment from Silhouette and cut out the oval on the card panel. Put the flowers inside the oval and inked the card base (background) with Distress Inks.


Image from Uniko. Stamped the flower in black, and added the stem with a Copic multi-liner pen. Sentiment is from Jillybean Soup and is stamped in Versafine black.  Added quite a few dots of irResistable drops.


LOVE this (digi) image...from Power Poppy.  I also have this as a Flourishes stamp that I bought years ago (same artist), but I'm able to resize the digi to fit (can't do that with a regular stamp).  Printed this out on water color paper (Canson), and colored it with Inktense water color pencils and then used a water brush to smooth out the pencil and add shading. Sentiment is part of the digi image download. To be able to print both the image and the sentiment at the same time, use something like Photoshop Elements to change the background on the apples to transparent, then when you put the sentiment to the back layer, the two images do not overlap.  When changing the background to a transparent background, you have to save the image as a .png file.  I wasn't able to change the background on the sentiment as the lines are so small, but just taking the white background off the apple image allowed me to print both images at the same time.  I'm sure to some of you this sounds like a foreign language...LOL! But...to those of you that use Photoshop Elements, you'll know what I'm talking about.  Remember...you can learn almost anything watching YouTube videos!

As always, thanks so much for stopping in.  I appreciate your visit...and I appreciate each and every comment!
Photobucket


Pin It!

LinkWithin

Related Posts with Thumbnails