Showing posts with label Happy Little Stampers. Show all posts

Friday, February 10, 2017

Four Challenges...

I've made a few cards this week, and thought I'd link them up to several challenges.  I even made a card or two that would fit more than one challenge!  Yay, Me!

I will be playing along with the following challenges:  CAS(E) this Sketch, Happy Little Stampers, CASology, and Merry Monday!  Whew! That's a LOT of challenges for me!


So, let's get started....


This first card is for CAS(E) this Sketch.  I used a really old "Magnolia" stamp.  When I saw this one, I just had to have it...and I probably haven't used it 2 times!  The little girl was facing the wrong way, so I scanned the stamped image into my Silhouette program and flipped her horizontally, then used the trace feature to trace her and then welded the image into a rectangle, so that I could cut out just her legs with the Cameo.Much easier to do than to explain! LOL! I cut the cloud (SSS) from the rectangle, then ink blended the blue sky before popping the cloud back in (raised with foam). The little girl is colored with Copics and the sentiment is computer generated.


This second card is for the CASology challenge with a cue word of "hero".  My youngest grandson is a HUGE fan of Batman, and even though his birthday is a ways away, I thought I'd get his card done for him.  The Batman image is from the Silhouette Store.  I created the "Bam" accent in the Silhouette program as well as the sentiment.  I printed all of this out and cut it to 4 x 5.25 inches.  I colored in some "ground" under Batman.  I also printed out another of the "Bam" stars and popped it over the one on the card.  I added a very small black border and adhered it to a white card base.


This third card is for a couple of challenges - Merry Monday and HLS - Anything Goes with Dies.  I used a Christmas tree die that I've had for a while and cut it from a card panel.  I had to add a piece of acetate behind the aperture so that I'd have something which I could used to adhere my tree back in the aperture.  I then popped that panel over a inked panel.  To make the inked background, I used the TH spritzer, and my Tombow markers and spritzed two different colors of ink on a small panel that would fit behind the tree.  I then used my WOS silver and gold pens and flicked some of the sparkly WOS onto the green.  It's difficult to see, but there's really a lot of shine behind the tree.  I cut the sentiment "merry" (SSS) from card stock and from foam, then added a bit of glitter to the bottom portion of the letters.  The "Christmas" is from DRS Designs.  The star is popped with foam tape, and painted with gold WOS. (Cut with a SSS die)


This last card is just me playing around with some water colors again.  I wanted to create a "scene", but this one fell a little short of what I was trying to do...but it's okay.  If practice really makes perfect, then I should be getting better at this, don't you think?! LOL!

That's all for me today....As always, thanks so much for stopping in.  I appreciate your visit...and I appreciate each and every comment!
Photobucket


Pin It!

Tuesday, May 10, 2016

Happy Little Stampers - Inlaid Die Cutting

Today I made a card that I've been wanting to try for quite some time.  I've had this die and actually used it a time or two, but I really wanted to use it and inlay all the pieces back into it...(which I haven't done because I never could keep up with all the little pieces!)


So here it is...


Just LOOK at all those itty-bitty pieces!  I finally figured out a way to make it a little easier.  I die cut the piece, then turned it over while it was still in the die and put some post-it tape all over the back of the cut image...then I pealed it out of the die.  It's a little fiddly...but much easier to figure out where all the little pieces go! With the complete die cut adhered to the post it tape, I did a little ink blending over the entire die cut piece with 4 different shades of yellow distress inks.  I cut the same die again to get another white grid and added wide score tape to the back of the white grid.  Then it was simply a matter of removing the yellow inked pieces from the post it tape and inserting them into the white die cut.  It makes it easier to remove the small pieces to insert into the white grid if you remove the grid part of the yellow ink blended piece.  Does that make sense? Once I had all the pieces in the white grid, I removed the paper from the back of the score tape on the back and adhered the pieced panel to a white card base.  I added just a few tiny pearls and a sentiment stamped on black and heat embossed in white.  The sentiment is from Hero Arts....it kind of goes with the bright sunshine yellow, don't you think?

Thanks a million for stopping in! I appreciate every visit and if you leave a comment...you'll make my day!

Hugs!
Photobucket


Pin It!

Friday, October 9, 2015

Happy Little Stampers - October Christmas Challenge

The October Christmas challenge at Happy Little Stampers is a good one this month! I love poinsettias and always have several around my house during the holidays.


I made a second card for the October challenge...Love how this one turned out!


The poinsettia stamp is an old one from Flourishes. I stamped it in the upper left corner and then did a partial stamp in the top right corner.  I stamped with Memento black ink and colored the image with Copics.  The sentiment is from the same stamp set. I popped the white poinsettia panel with some fun foam.  I added some gold borders on the card base with a gold leafing pen.  It's really very bright gold IRL.  I added some glossy accents to the berries and a little clear Wink of Stella to the petals of the poinsettia.

Thanks so much for taking the time to stop by for a visit!  Hope you'll come back soon!  Your comments are greatly appreciated! Until next time...
Photobucket


Pin It!

Thursday, October 8, 2015

Happy Little Stampers Christmas Challenge - October 2015

The October Christmas challenge at Happy Little Stampers is a good one this month! I love poinsettias and always have several around my house during the holidays.


I used a Spellbinder poinsettia die that I've had for several years, but rarely use.  I cut the largest layer from the white card base, then cut it again in red card stock.  I inset the red layer into the white card panel, then after "fluffing" each of the next 3 layers of the flower, I glued each of them onto the card red base.  I used some gold pearls for the center of the poinsettia.  I cut the panel to 4 inches wide and stamped the sentiment  (SU) in Versamark and heat embossed it with gold embossing powder.  I found some glittery gold washi tape in my stash and added a strip to each side of the card base, then popped the poinsettia panel using fun foam onto the card base leaving the glittery gold borders on each side.  I also touch up some of the flower petals with some Copics, then added my favorite clear Wink of Stella to all of the petals.

Thanks so much for taking the time to stop by for a visit!  Hope you'll come back soon!  Your comments are greatly appreciated! Until next time...
Photobucket


Pin It!

Thursday, September 10, 2015

LIM 240, Happy Little Stampers, and Merry Monday

I'm running behind getting my photos taken again!  I finished the cards on Sunday, but somehow my week has just slipped away!

The challenge this week at Less is More is to create a card using green and gold. As usual, I have several cards to share with you.  Here goes....


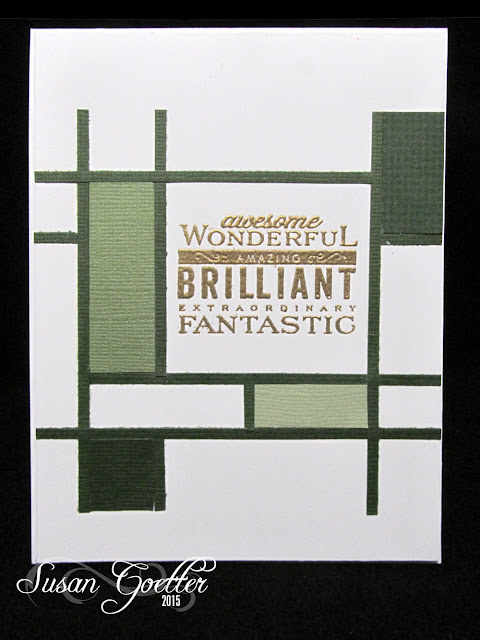
 For this first card I used the September sketch from Happy Little Stampers, so I'll put putting it there too.  I fell in love with this sketch.  I used card stock in several shades of green to fill in some of the rectangles formed when I added the thin green strips.  The sentiment is from PTI and is heat embossed in gold. The finished panel was adhered on a white card base and popped up using fun foam.


This second card I cut using a cut file from the Silhouette store.  I cut the holly in the white panel then put a piece of dark green card stock behind it.  I also cut just the berries from some gold foil paper and then popped those dots over the holes in the original cut.  The sentiment is from SU.  I believe I'll enter this card in the Merry Monday Challenge also, as they are requesting cards with "holly".

This card did not look like what I had in my mind when I started it!  I inked up some card stock with several shades of green DI, then cut a stitched circle with a SSS die.  For the ornament, I heat embossed a background in gold on some white card stock, then cut out the ornament with a Spellbinder die.  I added a bow at the top and popped the ornament on the green background.  The sentiment doesn't really show up very well...but it's heat embossed in gold also.  I used the large rectangle stitched die to create the stitched border on the card base.

It's always exciting to me when I can create a card that fits more than one challenge!  I'm usually amazed when I accomplish it too!  Which card is your favorite?

Thanks so much for taking the time to stop by for a visit!  Hope you'll come back soon!  Your comments are greatly appreciated! Until next time...
Photobucket


Pin It!

Thursday, August 27, 2015

Masking...for Happy Little Stampers and AAA Cards

I had some fun with masking today.  I made a card that fits 2 challenges - Happy Little Stampers and AAA Cards!  YAY Me!!  This card was fun to make....a little time consuming, but fun.


I used Uniko's Gerber Daisy stamp for this card.  I stamped the first bloom, cut out a mask and then stamped the second bloom.  I trimmed the panel down slightly so that it would be slightly smaller than the card base.  I colored the daisies with Copics then trimmed around the outside edges.  I adhered a piece of scrap green paper onto the card base, then popped the flower panel over it with fun foam.  The sentiment is from PTI and is heat embossed in liquid platinum.

Thanks so much for taking the time to stop by for a visit!  Hope you'll come back soon!  Your comments are greatly appreciated! Until next time...
Photobucket


Pin It!

LinkWithin

Related Posts with Thumbnails