Saturday, March 30, 2013

LIM Lucky Dip and ATCAS - Spring

Happy Saturday everyone!! The sun is shining bright today...unfortunately, it looks like Easter will be rainy and wet!  

Since March has 5 Saturdays, this week's Less is More challenge is a "lucky dip"....and our hosts, Chrissie & Jen have asked us to use scallops on our cards. Oh Happy Day!  I do love scallops (the kind you eat and paper scallops that you can put on a card).  This first card is also for the Addicted to CAS challenge which is Spring.
I really got carried away this week making cards.  I'll post them in order from my favorite to my least favorite.


This first card was actually the last card that I made today.  I used my Cameo to cut out the flower.  I cut it from a white piece, a green piece, and a pink piece.  With the Cameo it's really simple, you can cut all three pieces at the same time just by placing the different papers on the sticky mat where you have the cut file situated. I cut the scalloped green piece with a pair of deco scissors and adhered it to the left side of the white panel that I'd cut the first flower from.  Then I "paper pieced" the pink flower tops and put the green portion of the third flower I cut into the stem and leaves portion.  In order to get it to say in place, it helps to put some double sided tape behind the opening in the white panel. After I got all the flower pieced into place, I added a little shading to the flowers, stems, and leaves with some pink and green Copics.  The sentiment is from PTI.  I rounded the right-hand corners of the card base and the white panel, then pop dotted the white panel on the card base. I love how this one turned out!


This second card was made using a piece that I made the other day when I was playing with some new stamps from Avery Elle.  I was also playing around with some different colored inks with my stamping.  I'm still not 100% sold on stamping in colors, but I keep practicing.  I used the diagonal striped stamp and stamped it in 3 different colors.  The sentiment was stamped in black and then I colored in the word "celebrate" with Copics.  The scalloped edge was punched with a border punch that I believe I got from SU.  I adhered the orange scalloped border to the white card base then pop dotted the white "celebrate" panel over it.


 For this third card, I was playing around with my Cameo and designed this scalloped border.  I even added some small slits at the top in order to thread my ribbon through it.  This card is super simple.  I ran the green ribbon through the slits, adhered the scalloped lace piece to the card base.  Stamped a sentiment from PTI.  Added a few tiny little pieces of emerald green bling and topped it all off with a pretty green bow.  Easy-peasy!


This fourth card was so quick and easy.  I folded a white card base, used a scalloped punch to punch off part of the front of the card, then added a piece of patterned paper behind the scallops to replace the piece that I punched off.  The stars and ribbon match IRL...not sure what happened to the color when I took the photo.  I scored several lines above the scallops, then stamped the PTI sentiment and added a few more scored lines to "frame" the sentiment.  I tied a ribbon around the card base then added a couple of pieces of bling.  


This was the first card I made and although I really love CAS cards, this one was maybe just a little to CAS for me.  I used a die from my new Spellbinder set to cut out the white oval with all the little holes.   Then I measured the oval and created a scalloped border in my Silhouette (Cameo) program that would "fit" the oval leaving just a small scalloped edge showing.  I also cut out the stars with the Cameo.  I pop dotted one of the stars and all of the stars and the scalloped backing were colored with a blue Copic.  I also added a little bit of glitter to each of the stars.

Whew...busy day today!  If you made it all the way through all of this...you're a real trouper!

Thanks so much for stopping by! Your comments and your visits are always appreciated!! Until next time...

Hugs!
Photobucket


Pin It!

Thursday, March 28, 2013

MUSE....

I haven't played along with the Muse challenge before, but since the muse this week is Ardyth, I thought I'd give it a try.  Ardyth has a style of her own.  I can usually spot an "Ardyth" card!  She loves bright colors and anything CAS (and she's also know to have a bit of a thing for stickles or glitter).  Here's Ardyth's card:

I was inspired by the circles and the design of this card.  Here's my take on the challenge:


I used an old HA stamp that I've had forever.  It was a 12" wide stamp with various circles on it, but since I never use it as a 12" wide stamp, I cut it in half to just use part of it.  I stamped the line of circles twice in HA Orange Soda.  The sentiment is from PTI and is stamped in black on a strip of white card stock that has been embossed with an embossing plate from PTI.  I backed the strip and the white stamped panel with tiny strips of orange.  I added two pieces of bling that were clear, but I colored them with an orange Copic marker.  I also added (in honor of Ardyth) a touch of stickles to parts of the circles.

Thanks so much for stopping by! Your comments and your visits are always appreciated!! Until next time...

Hugs!

Photobucket


Pin It!

OLW 133 - Repeats

It's been quite a while since I played along with the One Layer Wednesday challenge...and after struggling with my card today, I probably should have waited a while longer! Susan at Simplicity is the host this week, and she's challenged us to use a shape repeatedly to create a one layer card.  When I see shape, I immediately think of squares, circles, triangles, diamonds, etc, but I guess it could have been a flower or balloon or something.  Anyway, I went with circles.  Here's my take on this week's challenge:


The circle with the star shape in the center is from PTI.  I stamped the circles in Memento dark blue as well as the sentiment.  The sentiment is also from PTI.  I added the doodled lines around the card...now in hindsight, I probably should have left them off.  I also added a touch of glitter to each of the stars.  

Thanks so much for stopping by! Your comments and your visits are always appreciated!! Until next time...

Hugs!
Photobucket


Pin It!

Wednesday, March 27, 2013

HOPE....

Can you believe it!?  It's only Wednesday, and I have my card ready for the CASology challenge!  Usually, I don't manage to get it posted until early Sunday morning....sliding in just under the wire!  Here's the cue card for this week's challenge:


I really tried to keep my card (okay..so I made two!) really CAS this week. Here's what I made this morning:


I think this first card is my favorite of the two I made for this challenge. I've tried so hard to be good and not order any new dies, but this die from Spellbinders kept calling my name until I finally gave in and purchased it! LOL!  I cut a white panel 5.25 x 4 inches and added strips of silver paper to the edges and adhered that panel to the card base.  The white panel was embossed with a PTI embossing plate.  The decorative piece on top of the embossed panel is pop dotted for dimension.  The top piece is actually two different dies from this Spellbinder set.  There are SO many possibilities for this set!.  I stamped the sentiment in black. Sentiment is from PTI.  I added some tiny little pieces of bling on the center panel.   


This card was just something quick and easy.  I embossed the card base (front of the card only) with a PTI hexagon die.  Then I used the same die to cut a pink hexagon and added it to one of the embossed hexagons with a pop dot.  I stamped the word "Hope" from the same PTI stamp used in the above card, by masking off the words "Faith" and "Love" before inking up my sentiment.  I covered the pink hexagon with some glossy accents and then dropped a couple of pieces of tiny bling on each side of the sentiment.  Just so you know...the explanation for this card took longer to type than it did to make the card! 

Thanks so much for stopping by! Your comments and your visits are always appreciated!! Until next time...

Hugs!
Photobucket


Pin It!

Sunday, March 24, 2013

LIM 112 - Beads, beads and more beads!

I have several more cards for the Less is More challenge this week.  I usually post all of my LIM cards in one post, but yesterday I managed to use two challenges to make one card and I didn't get it posted until today and I almost missed the deadline....hence the second post.

I have lots and lots of beads, but I rarely use them on a card.  Even having a lot of beads doesn't necessarily mean that I know what to do with them!  Anyway....here's what I came up with for this week's "bead" challenge.


I think this is my favorite card this week.  I love this big HA flower.  I stamped it on patterned paper (I took the online class last week).  I stamped it twice and then cut out part of the inner petals and raised them with pop dots.  I added a little darker shades of yellow in the center of the flower with Copics and then added some black beads for the center of the flower.  The highlights blended much better than they look like they do in this photo.  Sentiment is from PTI.


In my stash of beads, I found these letter beads.  I strung the beads on floss and tied a bow at each end.  The cupcake is an old Inkadinkado stamp that I stamped and colored with Copics, then added a touch of glamour dust to the icing.  I cut out the cupcake and pop dotted it on the card.  The "happy" is from a Sweet n Sassy sentiment set.  I rounded the corners with the corner chomper.  Super quick and easy card!


This third card is a total CASE of this card from Susan at Simplicity.  I love how she stamps in colors, and I want to be able to do that with ease.  I struggle when I'm trying to stamp with different colors...but I keep trying.  The difference in my card and Susan's card is that I added a 1/8 in strip of score tape across the center diagonal and then covered the tape with micro beads....can you see them? The sentiment is from Sweet n Sassy. 


I almost didn't post this card, but I figured since I made it for the challenge I should probably go ahead and post it.  I cut the hello with the Cameo, added a couple of scored lines above and below it, then stamped the "hello" sentiment again below it.  Then I added the 5 beads.  I backed the white with a piece of dark blue and pop dotted the white panel over the blue.  This looked much better in my head than it did when I transferred it to paper.

Thanks so much for stopping by! Your comments and your visits are always appreciated!! Until next time...

Hugs!
Photobucket


Pin It!

CASology - Song and LIM 112

I think I might just squeak in with minutes to spare!  I made my card for the challenge at CASology yesterday, but didn't manage to get it posted.  This card also fits the theme for the Less is More challenge. Here's the cue word for CASology:


And here's my card for this week's challenge at CASology (Song...and did you guess my song is Somewhere Over the Rainbow?) and this week's Less is More Challenge which is to use beads:


The rainbow and the pot were cut with the Cameo.  I added the sentiment with the computer.  I colored the rainbow with Copics then coated it with glossy accents.  The "gold" in the pot is a collection of different types of beads.  I masked off the bottom and inked in a little "hill" for the pot to sit on and added a few pen flicks for grass.  The pot is pop dotted for added dimension.  The sentiment inside says "and the dreams that you dare to dream...really do come true.

Thanks so much for stopping by! Your comments and your visits are always appreciated!! Until next time...
Hugs!


Photobucket


Pin It!

Friday, March 22, 2013

CAS(E) this Sketch #20

When I saw this week's challenge at CAS(E) this Sketch, I knew immediately what I wanted to do!  That doesn't happen to me very often, so I jumped right in and go a card made.

Here's the sketch for this week's challenge:


And...here's my take on the sketch:


I found these adorable giraffes online as a coloring image, and brought them into my Cameo program and turned the image into a print and cut.  I colored the giraffes with Copic markers after they were printed and cut out with the Cameo.  I designed the picket fence in my Cameo software and cut it out. (if anyone would like to have a copy of the studio file for this fence, just email me and I'll send it to you)  After I cut the fence out with the Cameo, I added a bit of dimension using a grey Copic marker, and a black fine tip pin.  The sentiment is from PTI and was stamped three times without re-inking.  The little red heart was punched with a MS punch and I coated it with glossy accents after adhering it to the card base.  Finally, I rounded two of the corners with a corner rounder.  (BTW, the blue around the giraffes is not nearly so blue in real life....crazy camera!) 

Thanks so much for stopping by! Your comments and your visits are always appreciated!! Until next time...

Hugs!


Photobucket


Pin It!

Zentangle Challenge #110 - Outside the box

I haven't had time to play along with Laura's Zentangle challenge at I am the Diva in quite a while...well, technically, I've played along some of the time, just never got my tangles posted.  This week's challenge is to:

"find something way out of your comfort box.  If you shy away from colour, now is a good time to try it... if you always do something small, try something big.  If you always do a larger piece, try a few teeny tiny ones.  Maybe you've never tried a zendala. Maybe you've never tangled an object and those bookends have been staring at you saying: "TANGLE ME"..."

So, that's what I did.  I had purchased a few ceramic tiles from Home Depot months ago thinking that I would make some coasters with decoupage, but I never got around to it...then when I saw this challenge, I thought I'd try doing a few tangles on a tile.  I think I probably will have to heat set it in the oven or something...not sure what...to keep the pen from smudging off (even though I used a microperm pen from Sakura)...I'd hate for it to smudge!  Anyway, I digress...here's my tile for this week's "out of the box" challenge.  This first one was taking with the tile lying flat.


This second one I stood the tile on one edge to take the photo.


I couldn't figure out how to do any shading, so I'll have to leave them as is.  So...what do you think....should I heat set them or try spraying some type of fixative on them?

Thanks so much for stopping by! Your comments and your visits are always appreciated!! Until next time...

Hugs!
Photobucket


Pin It!

Saturday, March 16, 2013

LIM111 - Frame It... (& CASology - Extraterrestrial)

I missed getting my cards posted for last week's challenge at Less is More...got them made, just never got them posted.  I'm trying to do better this week.  The challenge this week from Chrissie and Jen at Less is More is to create a card that has a "frame" on it (while keeping it clean and simple).

I've been in a card-making frenzy today and I've completed several cards with frames.  Off we go...


I think this first card is my favorite...don't know when I might need a wedding card, but you never know.  The image is a digital image (I believe it was from "Sylvie"...the signature got cropped off the image when I was making this card.  I brought the digital image into my Cameo program.  I made a heart frame that would fit around the image, then made the heart into a 1/4 inch frame and cut it out 4 times, layered the heart frames together and adhered them on top of the image.  The sentiment is from Flourishes.  I colored the image - lightly - with Copics, then added a touch of sparkle with the clear star pen from Sakura.  I adhered the heart image and frame to an embossed panel (Looks like wedding rings, doesn't it?). I adhered the embossed panel to a white card base.  I also added three tiny pieces of bling under the sentiment.


The image for this card is from Flourishes. Stamped with Memento ink, then colored with colored pencils.  I made the frame by cutting out the center with a Spellbinder rectangle die, and embossing the edges of the opening before removing the die.  Then I cut the rectangle down slightly smaller than the card base and added score lines around the edges.  Then sentiment across the bottom is also from Flourishes.  I adhered the image directly to the card base then pop dotted the frame over it.  I don't know...is it a little too busy...not CAS enough?


This was the first card I made for the challenge, and I wasn't going to post it, because I don't really like how it turned out.  Too white or something.  Used a MB window die, stamped the SU image on white card stock, colored it, then adhered the window over it with dimensional tape.  The sentiment is from Flourishes


It just dawned on me that this card also fits the challenge over at CASology this week...got my little alien stopping by to wish someone a happy birthday.  Also got a frame on it...see that speech bubbly...yep...cut it out with the Cameo (about 3 times), colored the top piece with Copics to match the spots on my alien, then added a computer generated sentiment behind the speech bubble frame.  Popped the little green guy with dimensional tape.  Stamped a little grass to ground him. The little green guy was a coloring image I found online and turned into a digital image and cut file for my Cameo.  I printed it, then cut it out with the cameo, then colored it.  I've learned so much about my Cameo lately...I'm really loving that machine!

Thanks so much for stopping by! Your comments and your visits are always appreciated!! Until next time...

Hugs!

Photobucket


Pin It!

CASology - Extraterrestrial

This week's challenge at CASology was a challenge for me.  The cue word is:  


Now I know I could have made something with the moon and stars...but when I think extraterrestrial, I think aliens, spacemen, and weird creatures.  So I did a little web search and found some coloring pages that I was able to make into digital images and print out with my Cameo.  Took me a while, but I loved the end result.  As usual, I'm an overachiever and have made several cards for the challenge. Here we go...


After I converted all the images to digital files, I figured out how to print and cut them with my Cameo.  Love that machine!  I printed the image, then cut it out with the Cameo, and then colored it with Copics.  I added some glossy accents to the eyeballs.  I cut a 3.75 x 5 inch white panel, embossed it with a PTI embossing plate, then added the sentiment with the computer.  I added a small blue border to the edges of the white panel and pop-dotted my little blue guy with some dimensional tape.  I adhered the background directly to the white card base.

Quick tutorial:  When you want to print in a specific place on a card, print the sentiment (image) on white copy paper.  Then hold the copy paper up to the light and align the card base (or panel) over the image (sentiment).  Adhere the card stock with a temporary adhesive, then run it through your printer again.  You can even make tags and labels this way too.


This second card might not be considered quite CAS enough...but I thought I'd post it anyway.  I created the background (the earth and the sky) with my Cameo.  I used an "earth) cut file and changed it to print only and then made the sky dark blue with little white dots on it.  I used a clear star Sakura pen to trace around the green on the earth, and I created the sentiment with the Cameo and had it print at the same time the rest of the background was printing.  The little space guy was another of the coloring pages I turned into a digital file, cut it out with the Cameo and colored it with Copics. The space guy is adhered with pop dots and the background panel is adhered directly to a white card base.


This third card just makes me giggle!  Isn't this little guy the cutest!?  Once again, this was a coloring page that I converted to a digital file and then cut the image out with my Cameo.  The candle is an image from DRS Designs.  I stamped the candle, colored it with Copics, then coated it with glossy accents and cut it out.  I cut the little green guy's hand so that he could "hold" the birthday candle.  Then sentiment was  computer generated after I embossed the white panel with a PTI wood grain embossing plate.  The font I used for the sentiment is called Problem Secretary.  It's a really cute font and perfect for this card, I think!  I added a small green border to the embossed panel and adhered the panel to a white card base.  My little green guy is pop dotted for extra dimension. Oh...and I coated his eyes with glossy accents too.

Thanks so much for stopping by! Your comments and your visits are always appreciated!! Until next time...

Hugs!

Photobucket


Pin It!

Wednesday, March 6, 2013

OLW 130 & Addicted to Stamps and More

I've done it again!  I'm made a couple of cards that will definitely fit TWO challenges!  This week's OLW challenge is to use a sentiment or saying centered on the card...and make that the star of the show, surrounded by white space. Can do....

The challenge this week at Addicted to Stamps and More is anything goes...as long as it's Clean and Simple.  Can do...

These cards are REALLY CAS!  Here are the cards I made:


The sentiment is from PTI, stamped in Memento black.  I tried (I mean I really tried!) to stamp in a color, but I just couldn't do it!  I added three tiny black pearls under the sentiment.  


The sentiment on this card is also from PTI.  It's the first time this stamp has seen ink too!  I just couldn't leave it with just the sentiment, so I added two small pieces of orange bling.

These were probably two of the quickest cards I've ever made!  UBER-CAS!!!

I'm thinking perhaps I should have added some scored lines to these cards...what do you think?

Thanks so much for stopping by! Your comments and your visits are always appreciated!! Until next time...

Hugs!
Photobucket


Pin It!

Runway Inspired Challenge #31 and ATCAS #7

WooHoo!  I finally made a card that fits two challenges!  Here are the prompts for Challenge #31 at Runway Inspired Challenge and the challenge at Addicted to CAS :


I rarely manage to combine two challenges, but this card should be perfect for both challenges:


I made the black and white striped paper using my Silhouette program and then printed it out on white card stock.  The "monster" is a Hero Arts stamp that I've had forever...and I think it makes the perfect birthday card for my grandson.  Image was stamped in Memento ink and colored with Copics. I added some googly eyes and then I coated the image with glossy accents.  I don't think you can see the glossy accents on here, but it makes my little monster look like he's popped up off the page.  Sentiment is from the same HA stamp collection. I adhered a strip of the black and white stripe to one side of the image panel, then pop dotted the panel on a white card base...simple...and quick!


Thanks so much for stopping by! Your comments and your visits are always appreciated!! Until next time...

Hugs!

Photobucket


Pin It!

Tuesday, March 5, 2013

CASology - Bunny

This week's challenge at CASology is create a card using the cue word "Bunny"...With Easter right around the corner...this should be lots of fun!


I've made a couple of cards today that fit this challenge...so off we go...


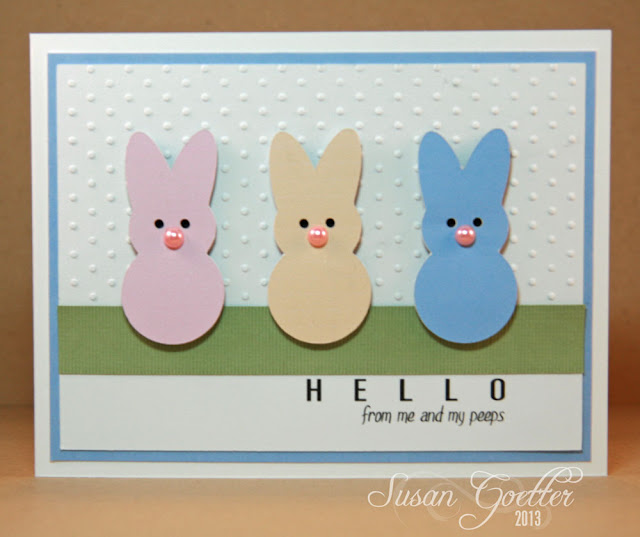
I love this first card...my little "peeps" Not a single stamp was used on this card!  I cut the Peep bunnies with my Cameo.  The green grosgrain "ribbon" is actually card stock that I embossed with a grosgrain embossing plate (which you can find here.) I actually designed the entire card in my Silhouette program, made the bunnies the colors I wanted, then cut them out.  In order to get the blue/lavender border, I simply printed a large square using the same color as my third bunny, then cut it down to size.  I embossed the top portion of the white panel with the dotted Swiss EF.  Sentiment was computer generated at the same time that I printed the bunnies before cutting them out.  Sound like a lot, but it was SUPER quick!


I remembered that I had this cute bunny stamp from Flourishes, so I made another card so I could use this stamp.  I stamped the image on white card stock, then colored it.  I stamped it again on white card stock, colored the front two bunnies, then cut them out and pop dotted them over the stamped image for a little dimension.  I sponged the sky with some distress ink.  I cut out the oval and the scalloped oval with Spellbinder dies.  I added an embossed panel behind the image and tied a ribbon around the panel.  Then layered it all on a white card base.  

Thanks so much for stopping by! Your comments and your visits are always appreciated!! Until next time...

Hugs!

Photobucket


Pin It!

LinkWithin

Related Posts with Thumbnails