Saturday, August 27, 2016

More Water Coloring....

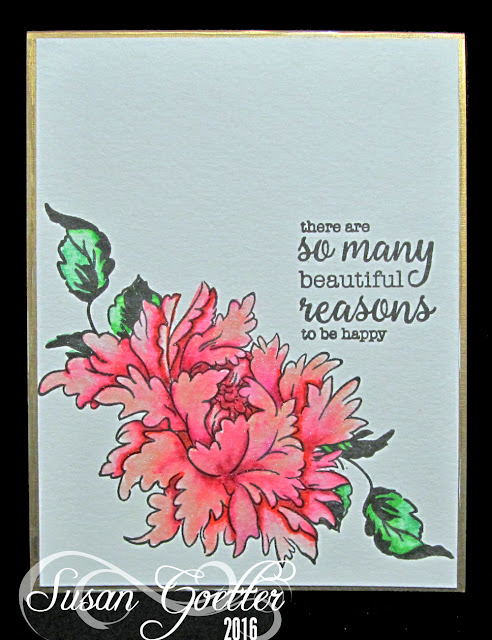
Still playing with my water colors.  I'm also loving the digi Power Poppy Tulip I just got!  It's so easy to color!  So, if you can stand a little more water coloring...here we go..


I printed the image with my laser printer in the center of a landscape piece of water color paper.  I sized the image to about 5 inches square.  I colored the image using my Koi water colors, which I haven't used very much at all, but I wanted to see if they blended as well as the Zig Clean Color brushes.  After coloring, I cut the image in half.  By printing in the middle of a piece of water color paper, I had enough white space on either side for the card.  It's a bit of a waste of water color paper, but definitely worth it!


When I colored this image with the Zig Clean Color brushes, I painted pink and purple-ish tulips, so this time, I decided to go with tulips in shades of yellow/peachy/golden.  I also painted the pitcher kind of like an earthenware color.  I might just master (okay, that's a little strong!) get better at this water coloring if I keep practicing!


This is another image from Power Poppy - Rose and Chamomile Digi.  I printed the sentiment and the image on a piece of water color paper, then printed the image one more time on water color paper.  I colored the image with Koi water colors, then cut it out and popped it over the printed image on the card panel. I added a light wash of light blue to the background, and a few dots of Nuvo.  There are also some "dew drops" on the petals of the flower, but they didn't photograph well.

As always, thanks so much for stopping in.  I appreciate your visit...and I appreciate each and every comment!
Photobucket


Pin It!

LIM 291 - Let's Use Stickers!

The challenge this week at Less is More is encouraging me to reach back into my stash and find those stickers (that I just HAD to have) I've had for years!  And do I have a stash of stickers! I must have thought there was going to be a shortage of stickers in the future! As many of you know, if you normally read my blog, I can rarely just stop at one card....so, this time I've made 4 cards for the LIM challenge!  Let me show you....


Making the card wasn't nearly as difficult as deciding which stickers I wanted to use! LOL!  This card features a single tulip bloom.  I stuck the sticker on a piece of white card stock, then cut it out with a MFT double stitched die.  I backed it with a thin strip of red, then another of white before popping it on another MFT double stitched square.  The sentiment is from SSS Uplifting Thoughts.


This card made me happy when I finished it.  The flowers are one big sticker that I adhered to the corner of a white card panel. I cut the panel with a stitched border die (SSS), then added a tiny red border to the panel (to bring out the red lady bugs).  Sentiment is from SSS Uplifting Thoughts. I absolutely LOVED how that sticker looked once the panel was trimmed!


My photographing skills definitely need some work!  My Ott light that I normally use when photographing my cards, suddenly went out and I don't have a replacement bulb.  So...I had to improvise! All the card stock used for these cards are a bright white...not a dull yellow/beige! The peace sentiment is a sticker on this card.  I cut the oval with a Spellbinder die, then cut another oval slightly larger and popped the sentiment on the second (gold) oval.  I dry embossed the card panel with a snowflake embossing folder that I really like. (I have NO idea who makes this embossing folder!).  I added a small gold border with the same card stock that I used for the larger oval and adhered it to a white card base.


This is actually the first card I made, and I wasn't overly thrilled with it.  I have a MILLION (well, maybe not quite that many!) of these Me and My Big Idea stick children.  I love the cute images, but I don't like that the edges of the sticker show.  Sentiment is from PTI.  I inked a small hill with distress ink so that she didn't look like she was just hanging in the air. I cut the card panel with a stitched rectangle die from SSS and adhered it to a white card base.

As always, thanks so much for stopping in.  I appreciate your visit...and I appreciate each and every comment!
Photobucket


Pin It!

Wednesday, August 24, 2016

A Little More Practice with Water Colors

I watched a tutorial over at Splitcoaststampers called Palette Blending by Dina Kowal.  This is the same image she used.  I learned quite a bit from this video...you might want to check it out.


This is actually one digi image from Power Poppy called Tulips in Hobnail Pitcher.  She really has some beautiful digi images there.  I printed this image on water color paper on my laser printer.  I printed it rather large and printed it in landscape mode so that I would have plenty of white space on either side of it, because I wanted to be able to cut the image in half and make two cards with the one image.  Dina Kowal also cut her image in half and made two cards.  

I used my Zig Clean Color markers to color this image and it actually went fairly quickly.  The sentiments are from PTI - Everyday Blessings.  I felt like this bit of water coloring was a little better than previous efforts.  I'm slowly but surely getting there!

As always, thanks so much for stopping in.  I appreciate your visit...and I appreciate each and every comment!
Photobucket


Pin It!

Addicted to CAS and LIM 290

I spent a little time in my craft room today...and made a card for the challenge at Addicted to CAS and the current challenge at Less is More.

"Less is More"


As it turns out, I made a card with a "silhouette" on my Silhouette Cameo for the challenge at Addicted to CAS!


I cut the beach scene with the Cameo. The design is from the Silhouette store Design #2666.  I cut it from black card stock.  I used distress inks to blend the background, masking off the sun with a circle cut from a post it note.  After I finished inking the background, I removed the mask and added a bit of mustard seed DI to the sun so that it wouldn't be stark white.  The sentiment is from TPC Studio stamps and is heat embossed in white on the black silhouette piece.  The silhouette was popped off the sunset panel with foam tape. 


The second card is for the challenge at Less is More.  The theme this week is Exotic.  That was definitely a brain teaser for me!  Of course, after I made this card, I remembered that I do have some panda stamps! Duh!  Anyway, this image is a coloring book image I downloaded from the Internet.  I printed the image and the sentiment and colored it with Copic markers.  This is a one-layer card. I had to look up the bird to see what color they actually are, so he's probably not perfect, but he's close!

I used Aloha for the sentiment, thinking it meant "hello" or "goodbye" in Hawaiian, but then did a little research and this is what I discovered.  "The real meaning of Aloha in Hawaiian is that of Love, Peace, and Compassion.  It’s the guidelines of how to live – a life of Aloha is one when the heart is so full it is overflowing with the ability to influence others around you with your spirit."

I like Aloha even better now that I know that it's not used to mean hello or goodbye!

As always, thanks so much for stopping in.  I appreciate your visit...and I appreciate each and every comment!
Photobucket


Pin It!

Sunday, August 21, 2016

CASology Week 211 - Dream


It's been a while since I've actually gotten a card posted during a challenge...and I'm barely squeaking into the CASology challenge this week!


I had an idea in my mind, but it didn't work out quite like I had planned, so this card was my second idea.


This little elephant was a freebie from SSS on one of my orders, and I think this is the first time the little guy has seen ink! I stamped the elephant and the balloon with Memento black ink and colored them with Copics. I used a double stitched square die from MFT and cut out the square, leaving the balloon hanging off the top edge of the square.  I don't know what the technique is called, but you have to figure out where you want the die to cut, then mark your stamped image and fussy cut it down to the line you've marked, sliding the (in this case) balloon on TOP of the die and then cutting with your Big Shot/Cuttlebug.  I usually don't have it work out this well...sometimes I have a gap between the fussy cutting and the square...but this time, I guess I was holding my mouth right and it cut just perfect!  The sentiment is from PTI.  I added a little gray shading under the elephant so that he didn't look like he was floating!  I cut a slightly smaller panel with the SSS stitched rectangle die, only I cut it a second time to make it a bit shorter and fit the square stamped piece a little better.  Mounted it all on a white card base...and done!

As always, thanks so much for stopping in.  I appreciate your visit...and I appreciate each and every comment!
Photobucket


Pin It!

Saturday, August 20, 2016

Practicing Watercolor and More

I've been working on trying to improve my water coloring capabilities. I think I might be getting just a "little" better!  


Using Altenew Peony Bouquet stamp set.  I stamped the bloom in a light distress ink, masked that bloom and stamped another bloom right beside it.  I masked off the blooms to added the leaves, which were stamped in light green distress ink.  I think I try to work the water colors (in this case distress ink) too much.  I cut the panel down, added some splatters, and popped it over a card base with on side covered in a green card stock. The sentiment is from SSS Uplifting Thoughts, stamped with versamark and heat embossed with liquid platinum embossing powder. (and would you look at that!  I adhered it crooked!!!  Maybe no one will notice! LOL!)


So...I thought I'd try the same bloom again.  This time I used distress inks again, but I used a lighter hand with the water.  I think it might be just a bit better blended than the first one. I like the leaves on this one better too.  Used the same stamp set.  I used some Nuvo pearl drops and a few spots of Irresistible in silver.  Popped it on a card base with craft foam. 


This was my third attempt at water coloring.  I used the Altenew Beautiful Day stamp set (LOVE this set!)  I stamped the blooms (using masking) with distress ink (Peacock Feathers), then worked on my blending again.  "Maybe" a little better? Didn't do a great job with the leaves...but I think I'm getting there!  Sentiment is from SSS Flower Friends.  Popped on a card base with a teal strip on one side.

Thought I'd add in a couple of cards that I actually made for challenges, but never got around to posting them.  I'm slow like that sometimes! :)


Super quick and easy card...I think I actually made this card for CASology "dizzy" challenge.  You know....when you're dizzy, you sometimes see spots?  Right?  Anyway, I just stamped random dots with several colors of ink from MFT, then added some white dots on the top of that.  Added a few drops of different colors of  Nuvo.  I really love this stuff!  Makes perfect drops....every time!  Simon Says has lots of different colors!  I wanted them all, but I restrained myself...you know, it's that whole fixed income thing!  I'm sure many of you can relate!


I really can't remember which challenge I made this one for...but it was a perfect fit...I do remember that!  I cut a card stock panel to 4.25 x 5.5 inches and cut a stitched circle from the center of the panel.  This particular die from Simon Says cuts stitching on both the inside circle and the outside circle.  The image is from a very old Flourishes stamp.  I colored the image with Copics and then sprayed a light mist of Shimmer Mist over the entire card.  There really is a pretty sparkle on the card...even though I can't seem to get it to photograph!  The sentiment is from the same Flourishes stamp set.  I popped the big panel on craft foam and then pushed the circle down into the opening.

That's it for me today.  Hope you'll leave a comment...If you regularly follow my blog do you think my water coloring is improving?

Thanks so much for stopping in.  I appreciate your visit...and I appreciate each and every comment!
Photobucket


Pin It!

Friday, August 12, 2016

A Little Zen-tangled Inspired Art...

I needed to catch up with some of my "name" tangles...I have two new granddaughters that I wanted to get these made for before they grow up on me!  You KNOW how fast kids grow up now....Right?!?

I've removed their last names for posting...just so you know there's not a huge gap on the drawings. I always mean to take a photo of my art BEFORE I take it to be framed, but for some reason I ALWAYS forget!  The background appears a bit grey, but it's actually a bright white.  I had to take the photos AFTER the framing was completed! :-(


Used a black micron pen and shaded with a graphite pencil.  The hearts were punched from pink glitter paper.


Thanks so much for stopping in.  I appreciate your visit...and I appreciate each and every comment!
Photobucket


Pin It!

Wednesday, August 10, 2016

Happy Cards

My previous post was all sympathy cards. Unfortunately, we all need one from time to time.  THIS post is just for HAPPY CARDS!  


My beautiful great granddaughter just turned one in June and this was the card I made for her birthday. I used MFT peak-a-boo die for the aperture.  I backed it with some polka-dotted paper.  I popped the panel with craft foam.  The cute little kitten is a new stamp that I've never inked from SSS (cuddly critters). I colored this cut little guy with Copics and added a birthday hat from the Tim Holtz crazy bird accessories. The balloon is also from the accessory stamps.  I attached the balloon with some floss and then threaded it behind the kitten's right paw.  The sentiment is also from TH.


This was one of my attempts at water color.  I "might" be getting a little better at it now! The flowers are from Altenew "Dahlia Blossoms".  I stamped them in versafine black and then used my zig water color brushes to color them.  I trimmed around the bottom of the blooms, then added an orange border and popped the panel over a white card base.  The sentiment is from SU.


I fell in LOVE with this new bloom from Altenew (Majestic Bloom)!  I stamped it with versafine black ink and then colored it with my zig water color brushes.  It doesn't show up on the photo, but there is a fine shimmer all over the bloom.  The sentiment is from SSS Uplifting Thoughts. The gold border was made with a broad tip gold marker.

Glad I got some happy cards made....I feel better now....

Thanks so much for stopping in.  I appreciate your visit...and I appreciate each and every comment!
Photobucket


Pin It!

Sad Cards


Sometimes you just need a sympathy card.  Unfortunately, I needed a couple of sympathy cards this week and realized that I didn't have a single one in my stash!  So, I set to work getting the ones I needed made and a few extras. It's never fun to make sympathy cards, but if you make several of them at one time, then it doesn't seem quite so bad.  Praying that I DON'T need them any time soon!

I think all of these cards would be eligible for the HLS August Anything Goes Challenge, so I think I'll link up with Happy Little Stampers!


Warning...this post is photo heavy!


Very simple card. Die cut the butterfly (MB) from grey card stock, and then cut the bottom off of the panel with a SU die. I inserted the butterfly back into the card panel using some foam tape to pop it off the card base and keep it in place. I popped the panel with craft foam onto a white card base.  Sentiment is from HA and is stamped in HA soft granite ink.


This was a very quick and easy card.  Cut a yellow panel slightly smaller than the card base. Used a distressed corner die (MB) and then embossed the panel with a large embossing folder.  Sentiment is from HA and is embossed in silver.  Panel is popped over the card base with craft foam.


This card and the next card were created with the same papers.  I embossed the white card stock with the same embossing folder I used on the yellow card.  I also embossed the black and a grey strip with two different embossing folders.  One the card above, I added a small strip of dull silver paper between the black and grey.  The bloom the leaves are from Altenew and are colored with Copics.  I stamped the sentiment on vellum and heat embossed with silver. The flower is popped on the panel, the panel is adhered directly to the card base.


I made this card with the leftovers from the previous card.  The leaves were cut with the Cameo. Sentiment is from PTI and is heat embossed in silver.


I think these next two are my fall-to designs.  I simply die cut the flower (SSS) from both a white panel and a craft panel.  I backed the panel with double sided tape and inserted the flowers in to the opposing colored panel. The sentiment was stamped and heat embossed in liquid platinum on a strip of vellum.  Panel is adhered directly to card base and corners were rounded with a corner chomper.


This is the second card panel.  I inserted the craft bloom into the white card base, added a small border of craft around the edges and heat embossed the sentiment (HA) with liquid platinum.

This is actually grey card stock.  I cut a panel with a stitched rectangle die (SSS), then cut the square from that panel with a double stitched edge die (MFT). The flowers stamps are from HA.  I stamped the image and scanned it into my Silhouette program and made a cut file for these flowers.  Having a die is always much easier to cut out an image, but when there isn't a die, I'm glad I have my Cameo to make the cut for me!  I colored the blooms with Copics. I popped the rectangle panel with some craft foam, then cut the center out so that I could put the square stitched piece down into the hole.  I put the flower stems under the larger panel and over the inset panel with on bloom  hanging over the edge.  Added a few liquid pearl drops.  Sentiment is from HA and heat embossed with liquid platinum.

Thanks so much for stopping in.  I appreciate your visit...and I appreciate each and every comment!
Photobucket


Pin It!

LinkWithin

Related Posts with Thumbnails