Thursday, August 30, 2012

OLW103 - Score!

This weeks One Layer Wednesday challenge is hosted by Karen Dunbrook.  You can visit her blog "Snippets" and see her great cards and check out all the other entries for this weeks OLW challenge!  This week, Karen has challenged us to create a one layer card that includes scoring.  Here's my take on the challenge.


This is a digital image that I've had for several years.  I printed the image onto Kraft card stock, then colored with Prisma color pencils.  The sentiment was computer generated and printed at the same time I printed the image.  To finish off the card, I simply scored three lines to help "ground" the image.  Super easy-peasy!

Thanks a million for stopping by!  I haven't been visiting blogs this week, due to circumstances beyond my control. (Further explanation here).  I truly appreciate each and every comment...and I hope to get back into my normal routine soon!

Until next time.....

Hugs!
Photobucket


Pin It!

CASology - Cue word - Relax

The challenge this week at CASology has a cue word  -  "Relax".  There are many, many ways to relax, but one of my favorite ways to relax, is to sit on a quiet beach and listen to the waves.  Here's my take on the challenge.


Hope this one is CAS enough.  Super simple...stamped the image on white card stock, then stamped it again on white, yellow and red.  Cut out the images and did some paper piecing on the umbrella, and pop dotted the chair for added dimension.  Sentiment was stamped using Lawn Fawn alphabet letters.  Colored the image (Sweet and Sassy Stamps) with Copics.  I had to "extend" the image a bit with Memento markers to get it to fit like I wanted it to.

Thanks a million for stopping by!  I apologize for not visiting blogs this week, but we were so busy prepping for Hurricane Isaac that I just didn't have the time I need to get everything done.  Thankfully, Isaac was barely a blip around here...but those over in Louisiana weren't so lucky.  I always feel better when we are prepared...you never know where those hurricanes will actually end up!  I do appreciate all your comments, and hopefully, this week will be a little calmer around here!

Until next time...

Hugs!
Photobucket


Pin It!

Saturday, August 25, 2012

LIM82 ...3-2-1

It's recipe week at the Less is More challenge.  Our challenge from Chrissie and Mandi this week is create a card and incorporate 3 of something, 2 of something and 1 of something else. Gotta get my thinking cap on for this one!

Here's what I came up with for this week's challenge:

Thought I might as well start off with my favorite card from all the cards I've made today.  For this card...there are...3 flowers, 2 apertures, and 1 word sentiment.  The flowers are from Flourishes and were colored with Copics and then I did a little fussy cutting (whew!).  I used two sizes of Spellbinder square dies, and cut the apertures in two pieces of card stock, one the same size as the card base front (5.50 x 4.25).  I masked off part of the card base that would be showing behind the second aperture and sponged it with wild honey DI.  The sentiment is stamped in black and is a stamp from Flourishes. Then I adhered the top panel with the largest aperture centered over the smaller aperture before adhering to the card base.  Slipped the flowers between the 2 apertures and popped them up a touch with some dimensional tape.  


This was actually the first card I made.  It just didn't do it for me.  I punched three apertures with a stamp punch in a white panel cut slightly smaller than the card base.  Then I stamped some flowers (PTI) in angel pink Mementos ink on the card base so that they would show through the openings.  The sentiment is also from PTI and is stamped in black.  So...we have...3 apertures, two words in the sentiment (and two inks), and 1 piece of pink bling.


Since I had the 3 "stamps" punched from the first card, I decided to use them for my second card.  I stamped each of the "stamps" with an image from PTI in Memento teal.  Then I used a matching pen and put dots around each edge of the "stamps".  The sentiment is from Flourishes.  So...we have...3 "stamps", 2 score lines (or two words in the sentiment), and 1 piece of bling (or one punched edge).


For this card I was playing around with DI again.  I've used...3 colors of ink - wild honey, worn lipstick, and chipped sapphire DI - to create the background. Then I spritzed the background with a little mister to give it a mottled look.  The "grass" at the bottom is a PTI stamp.  The butterflies are punched with a MS punch and colored with Copics.  I layered the inked piece on a piece of dark blue and adhered it to the card base.  Here's the 3-2-1....3 words in the sentiment (or three ink colors), 2 scored lines (or 2 butterflies), and 1 piece of bling.


And, last of all (and I probably shouldn't have posted this as it is SO simple!).  Recipe...3 strips of washi tape, 2 words in the sentiment, and 1 heart brad.  The white panel was cut slightly smaller than the card base, and then I added red card stock strips around the edges before layering it directly to the card base.  The sentiment is stamped using the Paper Smooches alphabet letters.  I didn't have a red heart brad, but I did have a white one.  I coated the brad with versamark ink, then dipped it into red embossing powder.  After I heat set it, I dipped it another couple of times in the embossing powder to get a good shiny surface on the heart.  Really loved how well this worked out.

That's all for me right now.  Thanks a million for popping in!  I appreciate your thoughtful comments!! Until next time.

Hugs!
Photobucket


Pin It!

Wednesday, August 22, 2012

OLW102 - School and such....

This week's challenge at One Layer Wednesday is hosted by the talented, Ardyth at MASKerade.  Ardyth does a fabulous job with CAS cards...and I love all the bright colors she uses!  Once again, another challenge looking for "school related" cards!  I really have no need for a school related card, but since Ardyth has told us that the theme for our card should not only be school...but include our favorite subject....YAY!  I can make a card for this!


Okay...first of all....can you guess what MY favorite subject was?  LOL!! Why...RECESS of course! That was my favorite time of the day.  I don't think kids have "recess" per se anymore, but when I was a kid (many, many) moons ago, we were allowed to go outside to play for 30 minutes each morning and 30 minutes each afternoon (and sometimes a full hour in the afternoon!).  Of course we were in school from 8:00 am until 3:00 pm...so it was a long day!  Some of the friends I made during my early school years are still my friends today.  Recess was an important part of growing up when I was a kid...you learned about winning and losing, playing fair, letting everyone have a turn, including everyone in whatever game we were playing, but most of all we learned how to play.   Sometimes I think that the children of today have lost the art of "playing" unless it's connected to an electronic game!

But I digress....oh, yeah...my favorite class...RECESS!

The image and sentiment are from Flourishes.  I stamped the image in black archival ink and heat embossed with clear embossing powder.  Then I sponged in a little sky and ground with DI.  I cut this card down a bit...the finished size is 4.25 x 4.25 inches.

Thanks so much for stopping by!  Your comments are greatly appreciated!! Until next time....

Hugs!
Photobucket


Pin It!

CASology - Going Green

The challenge this week from CASology is create a card using GREEN.  I've given it a bit of thought, and this is what I've come up with.


The lattice work was punched with a MS deep edge punch.  The leaves (vine) was cut with a Sizzix die, and the small flowers were punched with an EK Success retro flower punch.  The centers for the flowers was done with Liquid Pearls.  Sentiment is from PTI and stamped in Mementos Cottage Ivy.  The white background was embossed with the PTI texture embossing plate.  The trellis was raised slightly using clear dimension tape.  The white panel was also pop dotted on to a green card base.


I thought I'd share the inside of the card with you too. I rarely do anything to the inside of my cards until I'm ready to use them, but since I had a couple of the leave/branches already cut out I thought I'd decorate the inside of the card too.

Thanks a bunch for stopping by!  I appreciate your visit and if you leave a comment, please know that I truly appreciate it! Until next time....

Hugs!
Photobucket


Pin It!

Monday, August 20, 2012

More Tearing....

Just another quick card I did today for the LIM challenge. I rarely make more than one post for this challenge, but this card turned out so cute, I decided to post it.


I stamped the music background in Memento brown on white card stock, then trimmed it down and tore off one corner.  For the butterfly, I stamped three different distress inks on my craft mat...sprayed them with a little water, then just smooshed my card stock around in the colors.  I dried it with my heat gun, then smooshed it around in the colors some more.  After it was completely dry, I stamped the butterfly (HA) in black ink, and cut it out.  Then I added just a touch of glitter to the butterfly and popped him up on the music.  The sentiment is from PTI and is stamped in Memento brown.

Super quick and simple card! Thanks so much for stopping in! Hope to see you again soon....Until next time...

Hugs!
Photobucket


Pin It!

Saturday, August 18, 2012

LIM81 - Tearing it Up!

This week's challenge at Less is More is a themed challenge...and the theme is tearing ... in this instance, it means ripping paper...not shedding tears (although to be honest, sometimes I make such a big mess of things that it makes me want to shed a tear! LOL!) I love tearing paper...it's very therapeutic!  I've had a good time today getting my card(s) made for this week's challenge.

So...off we go....


This first card is the last card I made today....so what does that tell you?  I keep on trying until I get something done that I really like!  The stamp is an Inkadinkado stamp that I've had for several years.  I inked it with Mementos black and stamped on white card stock.  I highlighted around the image with a Copics B000 and then a touch of Y000 on the "halos".  I also added a touch of glamour dust to the halos. I cut around the image on three sides and then tore the bottom edge.  I added a blue and a gold layer behind the image and tore the bottom edges of each layer.  I stamped the sentiment (PTI) in Versamark and heat embossed it with WOW gold.  I tore around the sentiment and layered it across the stamped image, adding two small pieces of bling to each end.  I might also add that this was the easiest card I made too!


This is the first card I made.  It didn't quite turn out like I'd envisioned.  I really thought my torn edges would show up a bit more.  I cut the word "happy" from white card stock.  I tore pieces of red, yellow, blue, and green paper and adhered the strips to a piece of blue card stock, then popped the word "happy" over the torn strips.  The word "birthday" is a PTI sentiment and was stamped in black.  I also edged the white "happy" layer with small strips of red, and the blue layer with small strips of yellow.  Too many layers??? There is still a lot of white space, right?


For this card, I embossed the white background, layered it on a piece of teal paper, and adhered it to the white card base.  The branch was cut with a MB die, as were the leaves.  The flowers were punched with a small flower punch.  I painted the centers of the flowers with some distress ink and touched the edges of each petal with a red Copics marker.  Tied a little bow around the piece before adhering it to the card base.  No sentiment....that way I can use it for any number of occasions.


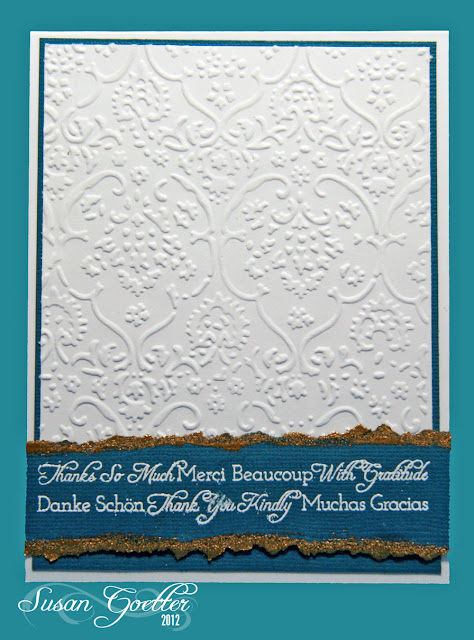
This card was super quick and so simple to make.  I embossed the white background and edged it with a piece of teal card stock.  I stamped the sentiment (Flourishes) with Versamark, and heat embossed with white WOW powders.  Then...I tore the edges of the sentiment and inked them with Versamark and embossed with WOW gold EP.  I see I smudged the white a bit...guess I need a little more practice with the heat embossing.


This last card was an after thought....I had some scraps of paper on my table from a project I finished last night, and I decided to "tear" a few blooms.  I tore the centers also. The stems were cut with a QK die (part of the string for a banners set), the leaves are a MB die.  Stamped the HA sentiment and cut it out with a Spellbinder die....Put the pretty (Ha!) flowers on a dotted embossed background...and it's done!

Finished a layout last week too...


These are photos of me and my grandson, Allen, when he was about 9 months old.  I used Echo Park - Paradise Beach papers for this layout.  The title work was cut with the Cameo (several layers stacked and glued together)  The top layer of the title work was cut by adhering strips of paper to another sheet of paper and then putting it through the Cameo - giving me tri-colored letters. Then I just made that my top layer on the letters. The peachy-orange paper was punched with a EK Success "holey" punch and then I trimmed around the edges to make it kind of scalloped.  The chevron strips were cut with a MFT die. The borders under the title work and under the little boy at the top were punched with a MS Victorian flowers punch. The little boy at the top is a digital image from Mo's Digital Pencil.  I added quite a bit of faux stitching with a Memento pen.  No journaling on this one...it's kind of self explanatory.  I did have to go back and check the date on the pictures to make sure it was Allen...because it looks just like Pierce! 

That's it for me right now.  Thanks a million for stopping by!  If you leave a comment, please know that I really appreciate it!  Until next time...

Hugs!
Photobucket


Pin It!

Thursday, August 16, 2012

OLW101 - Feeling Blue

This week's OLW challenge is hosted by the talented Heather Telford at Bits and Pieces.  Heather is the master of sponging inks and creating gorgeous scenes.  I can only hope that I can be that talented!!  Heather has challenged us to create a one layer card using lots of blue.  Here's my take on the challenge:


I masked off a section of the card with post it notes, then sponged in my blue sky, using a torn piece of paper to put in a few clouds.The butterflies are from HA, and the sentiment is from PTI.  I added a scored line over and under the sponged sky.  The butterflies and the sentiment are stamped in DI - salty ocean.

Very simple...and quick! (and I only messed up one card before this one!! - that's probably some kind of record for me! LOL!)

Hop on over to Heather's blog and play along with us this week.  Thanks for stopping by and if you leave a comment...please know that it's greatly appreciated!! Until next time...

Hugs!
Photobucket


Pin It!

CASology - School

The challenge this week over at CASology is to create a card using the cue word "School".  Since I don't have little ones....or big ones for that matter...in school anymore, I had a bit of difficulty with this one.  But, it is a challenge, so I accepted the challenge and gave it my best shot.


I know...not my best work...but it IS school related!  The books and apple were cut with the Cameo (have I mentioned that I love my Cameo?!)  I cut several of each image and glued them together to get more dimension.  Then I added just a small touch of Copics white paint (love this stuff).  The tag was generated on the computer, added a few dots with a blue pen, then cut the tag with a Spellbinder die.  The panel behind the books was embossed with a SU embossing folder (it made me think of lines on a chalkboard).  

That's all for right now. Hop on over to CASology and check out the other fabulous cards!   Hope to see you again soon!  As always...thanks a million for your comments...they are much appreciated!  Until next time....

Hugs!
Photobucket


Pin It!

In the Pink....

I'm playing with a new challenge today.  It's called "In the Pink"  So...guess what the challenge is....yep! Use lots and lots of pink.  I like pink, so I don't have a problem using pink...it's just that I couldn't think of a thing to do!   After much thought, I decided maybe I should use up some of my pink scraps that are filling my scrap bin.

Here's my cards for this challenge:


 For my first card, I selected several different patterned papers and a few solids (trust me....these are all shades of pink), and cut them into ½ inch strips.  I adhered the strips to a white card cut to 4 x 5.25, and just covered ½ the card with the strips.  I found this scalloped piece in my scrap drawer also, so I just cut it to size and pop dotted it over the strips (that covered up the fact that my strips weren't exactly even!).  As a final touch, I added some Ranger Liquid Pearls along the scalloped edge.  The sentiment is from Flourishes and is stamped in Memento's black.  I then added just a tiny little border of the dark pink to the white, then added the finished piece to a white card base.


For this second card, I embossed a piece of white card stock with a SU embossing folder.  I made the heart by weaving 3/8 inch strips of pink (scraps).  To do this, simply cut a square of paper, put adhesive down one edge of the paper, and start your strips there.  I laid out all the dark pink strips (sides touching) down the side with the adhesive.  Then, I took the striped strips and proceeded to weave them under and over, reversing the order of weaving with each strip added.  Pull the strips up tight against each other.  Then I traced a heart on the backing, and used my sewing machine to stitch around the edges (this will hold the woven shape together).  I backed the embossed panel with some of the dark pink, cut a strip of white to stamp the sentiment on, and backed it with the same dark pink.  The sentiment is from Flourishes.  I added a touch of faux stitching to the banner, and folded it before adhering it to the card front.  The finished panel was adhered to a white card base.

After finally getting them finished, I can't make up my mind which one I like the most...can you? For more pinkalicious inspiration, pop on over to In the Pink and check out the other entries. Who knows...you might even want to play along! 

Thanks a bunch for stopping by!  Your comments are always welcomed and appreciated! Until next time...

Hugs!
Photobucket


Pin It!

Monday, August 13, 2012

You MUST TRY this Recipe!

I don't usually post recipes on my blog, but I tried a new recipe the other night and it was so good that I just had to share it.  I found this recipe on Pinterest (where else?!?!), but it didn't link to a blog for more details.  The directions were typed beneath the photo, so I think that it's just a photo that someone uploaded.  Anyway, here's how I made this YUMMY dish.  Did I happen to mention that this is a meal in one dish?  It doesn't get any easier than this!

4-6 raw chicken breasts, new potatoes, green beans (fresh or canned-really any green veggie would work. Broccoli is good, too).  Arrange in 9x13 dish.  Sprinkle with a packet of Italian dressing mix and then top with a melted stick of butter.  Cover with foil and bake at 350 degrees for 1 hour.  Enjoy!


You will need:

9 x 13 inch baking dish
3-4 chicken breasts (depending on size you might use more)
fresh green beans (or broccoli/asparagus)
4-5 new potatoes
1 package Italian dressing mix (dry)
1 stick butter(margarine)

In a 9 x 13 inch baking dish (I used a glass baking dish), place washed and cleaned chicken breast down the center of the dish.  On one side of the chicken, I put new potatoes and on the other side I used green beans. (I think this would also be good with broccoli or asparagus).  The info under the photo at Pinterest said that you could use canned green beans, but I think the flavor of the fresh beans is much better.

Anyway...after you've put the chicken, beans, and potatoes into the baking dish, sprinkle one package of Italian dressing (dry) mix over everything.  Melt one stick of butter (but you could probably get by with just ½ stick of butter) and pour of the top of the dressing you've just added.  Cover the baking dish tightly with aluminum foil and bake at 350° for 1 hour.  When you take it from the oven, it's ready to serve!  Really...could it be any easier?!  And...it was delicious!

Hope you'll give this dish a try...it's definitely a WINNER!  Until next time....

Hugs!
Photobucket


Pin It!

Sunday, August 12, 2012

CR84FN - Grape, Blue, and Green

I know...back again! I've been on a roll this weekend getting a few challenges done that I've been wanting to try.  This week's challenge at CR84FN (Create for Fun) challenge is a color challenge using the colors green, blue and grape.  Here's my take on the challenge.


I think I tried to take a decent photo of this card about 4 times, and I just can't seem to get the true colors of the card. Phooey!  The colors really are close to the challenge colors....honest!  I cut the branch with my Cameo, then hand cut some small leaves to fit on the branch.  The "grape" colored blooms are a MB flower die, as is the "blue" bird.  I used a Flourishes sentiment and embossed the background with a PTI embossing plate.  Then I added a tiny grape border around the embossed background.  The flowers and the grape border are the same paper...now why didn't they photograph the same?!?  For a final touch, I added some liquid pearls to the centers of the flowers.

Thanks so much for stopping by! Your comments are always appreciated! Until next time.....

Hugs!
Photobucket


Pin It!

Challenge 82 - Using Brayd

I don't always have time to get something posted for the challenges at I am the Diva, but this week, I managed to get a tile done and it's ready to post! This week the challenge was the UMT (use my tangle) challenge, where we are challenged to use a specific tangle.  This week's tangle is Brayd.  I've tried this tangle a time or two, but was never totally satisfied with my results, so I thought I'd give it another try.


So, this is what I ended up with. Very simple and straightforward...just the tangle, Brayd.  There are some really great tangles submitted to the challenge this week...pop on over to I am the Diva and check out all the other entries.

Thanks so much for stopping in!  Come visit anytime!  If you leave a comment, please know that it's much appreciated!  Until next time...

Hugs! 
Photobucket


Pin It!

St. Luke's Charity Card Challenge - Go for the Gold!

The challenge this month at St. Luke's Charity Challenge is to create a card with the theme of "sports" in honor of the Olympics.  The summer Olympics are my favorite sports, but I had a terrible time coming up with an idea for a "sports" related theme.  I finally remember that I had these cute little gymnast stickers from Me and My Big Ideas.  I've had these stickers for years!  


I put the little gymnast on some white card stock and then cut her out.  I made a "floor" by embossing a piece of Kraft card stock with the PTI wood grain embossing plate, then inked it up with some brown chalk ink.  The three stars were also stickers that I put on card stock and cut out.  The little girl and the stars are all popped with dimensional tape.  The sentiment is from PTI.


The second card (I hope it qualifies!) is a digi stamp from Mo's Digital Pencil.  I just love this sweet little swimmer!  I added the sentiment (a quote from Winston Churchill) before printing the image.  The image is colored with Prisma pencils, and the blue shadowing is Copics.  I also added a few "droplets" of glossy accents for the water.

Thanks so much for popping in! Hope to see you again soon!  Thanks a million for leaving a comment!  Until next time...

Hugs!
Photobucket


Pin It!

Saturday, August 11, 2012

LIM80 - Fur or Feathers

WHEW!  I've just finished my third post...in a row!  I think I should get a little more organized and get things posted in a timely manner! LOL!  

It's time again for the Less is More weekly challenge from Chrissie and Mandi. This being the second week of the month, our challenge this week is a one layer card challenge...and it should be a card with either fur or feathers...hmmmm....

After digging through my stamps for a while, I finally realized that I have relatively few stamps that would qualify for this challenge.  So...what to do?  Why digi stamps, of course!


This card was made with a digi image from Mo's Digital Pencil.  I got it last year when I was inspired by a card that someone had done for the LIM challenge and just had to have this image!  Well, I finally got to use it! Colored it with Copics and added a touch of glitter to the bands and ball on the Santa hats...then stamped a sentiment from PTI.


I believe this image is also from Mo's.  I added a sentiment below the image before printing it on my card base.  I colored it with Copics...and that's about it....


This card was actually the first card I made...and it's the only one that I used a "real" stamp on.  The image and sentiment are both from Flourishes, stamped in black Mementos ink and colored with Copics.


This is another digi image I found in my file.  I have no idea where I got this image...but it's kinda cute.  I colored it with Prisma color pencils and added a touch of stickles.  Sentiment is from HA.


This last card is a just for fun card.  Our youngest son finished his last final and has graduated with a bachelor's degree (in some kind of interdisciplinary computer science).  It's taken him a few years, but he will graduate with high honors...and while getting this education, he's been full-time employed, done a little part-time work for someone else, and taken care of 3 children while his wife has been working some crazy hours!  That's dedication...and I'm so proud of him!

I found this image (again, no idea where it came from) and I decided to make a fun card to give to him for achieving this goal. Sentiment was added on the computer and the image was colored with Copics.

What?!...you thought I was finished?  LOL!...just wanted to share another layout I finished last week.  


This photo is my hubby when he was about 8 or 9 years old.  I have no idea where it was taken.  Papers are from Echo Park Sunshine collection.  The truck on the bottom right is a SU image that was colored with Copics, cut out with a Spellbinder die, and matted on green card stock.  The ferns are cut with a MB die.  The title work was cut with the Cameo and 4 layers were put together to form a chipboard like letter.  I made the little tags with descriptive words using an old typewriter font on the computer, then cut out the flags and backed with paper.  The "flagpole" was cut from gold paper and I added a pearl to the top of the pole. The "memories" sentiment was a very old DaisyD rubon that I've had for years. The round tag with his name and the date was made on the computer, then backed with a polka-dotted piece and cut with pinking shears. The "remember" stamp is an old TT stamp.  I added a bit of doodling and faux stitching to finish it off.  The black border is not on the layout...it was added digitally to keep the edges from fading away.

Now....I'm finished!  LOL!...Thanks a million for stopping by.  Your comments are ALWAYS welcomed!  Until next time...

Hugs!
Photobucket


Pin It!

OLW100 - Transportation

This week is week 100 for the One Layer Wednesday challenge!  This week's challenge is hosted by Cheryl at A Paperie Journey. Cheryl has challenged us to make a one layer card with a theme of transportation.  I had a new SU stamp that I really wanted to use, so....here's my card.


I stamped the truck, then masked it off and stamped the trees behind it.  I see that I need to do a little something with the grass under the truck...maybe a different shade of green?  I was really loving this card until I stamped the sentiment crooked! UGH!  

I finished another card with a transportation theme, but it also works for the CASology challenge this week.  You can peek at the card here.  It's a little boat sailing away into the sunset....all on ONE layer!

Thanks so much for popping in!  I appreciate each and every comment!  Until next time....

Hugs!
Photobucket


Pin It!

CASology - Pond

I wanted to play in this week's challenge at CASology, but I'm barely squeaking in before the deadline!  The cue card for this week is "pond".  I've made a couple of different cards for the challenge.


This first card was stamped with a Sweet and Sassy image and colored with Copics.  It's difficult to see on here, but I stamped the swan a second time and cut it out, then popped it over the water that I'd previously cut with an oval Spellbinder die.  Then I used another Spellbinder die for the blue label backing the oval.  The sentiment is from PTI.  I curved it on my acrylic block and stamped it under the oval shape of the blue .  I also added a mat of white with a tiny blue border that had been embossed with a texture plate from PTI.  Sounds like a lot, but it's still pretty simple.

I really love how this second card turned out.  I embossed two circles on a one layer card, then masked off all but the center circle.  I applied several different colored DI for the sunset, and a couple for the water.  The boat is an image from GinaK Stamps.  I use a touch of glitter on the waves for sparkle.  The sentiment was curved on an acrylic block to "fit" beneath the circle frame.

This card also fits with the OLW100 challenge to make a one layer card with any type of transportation.

Thanks so much for stopping in. If you leave a comment, please know that it's greatly appreciated!  Until next time....

Hugs! 
Photobucket


Pin It!

LinkWithin

Related Posts with Thumbnails