Thursday, October 8, 2015

CASology 167 - Silly

I really had to think long and hard about what to make for this week's challenge at CASologyThe cue card word for the week is "silly".


I've always loved these stamps from Art Impressions, but until I found these images recently, I had no idea they came as acrylic stamps....I thought they were all wood mounted!  I was delighted to find them as acrylic stamps!  So...without further ado...here's my card for this week's challenge.


I colored the image with Copics and then added a few touches of glittery pen here and there.  The sentiment is also in the stamp collection.  I added a dark purple border on the panel and adhered it to a white card base.  The necklace and bracelets I added using some dimensional glaze from "irResistible".

Thanks so much for taking the time to stop by for a visit!  Hope you'll come back soon!  Your comments are greatly appreciated! Until next time...
Photobucket


Pin It!

LIM 244 - Jewel Tones

I'm really running behind this week! I've had my cards made since Sunday, and just got around to taking pics today! Whew!

This week the challenge at Less is More is to create a card using jewel tones.  Here's my take on the challenge.


I think this first card is my favorite of the three cards I made.  I love these edge dies from Spellbinder.  I cut the front white panel with the Spellbinder dies twice.  The curved edge with the tiny holes is one die, and the lacy cut is another die...they work together beautifully.  I popped up the lacy cuts over some rich blue/teal card stock and added the blue panel to a white card base.  The sentiment is from SSS.


This second card is actually the first card I made. I cut the lacy star using a Spellbinder die that I've had forever and never used! Guess that makes it a NBUS die!  The "best" is a die from SSS that I've used several times lately and the "wishes" is part of a stamp set from SSS also.  I cut the lacy star from the white panel and then again from the teal card stock.  Because of the open work in the die, I adhered a piece of acetate behind the die so that I could inset it into the white panel.  The "wishes" part of the sentiment was stamped with Versamark and heat embossed with white and popped over the bottom of the "best" die cut.  I edged the white panel with some of the same teal card stock, then popped it all over a white card base.


This last card was super quick and easy!  I cut strips from several different jewel tone card stock, then adhered the strips along the top and bottom of a white panel (4 x 5.25).  I cut the "sending" from the white panel and then cut it again from some of the deep purple card stock and inset the purple die cut back into the white panel.  The sentiment is from SSS.  I also punched a decorative edge to add to the top strips with a punch from EK Success. I finished off the card by added several pieces of deep purple bling and popping the panel on a white card base.

Thanks so much for taking the time to stop by for a visit!  Hope you'll come back soon!  Your comments are greatly appreciated! Until next time...
Photobucket


Pin It!

Tuesday, September 29, 2015

LIM 243 - Shiny Stuff!

The challenge this week at Less is More is a recipe challenge.  We're to make a card to include something "shiny". (can I just say that I keep typing shinny! LOL!)

I made three cards...I think perhaps this first on is my favorite.  I am really a CAS kind of card maker!


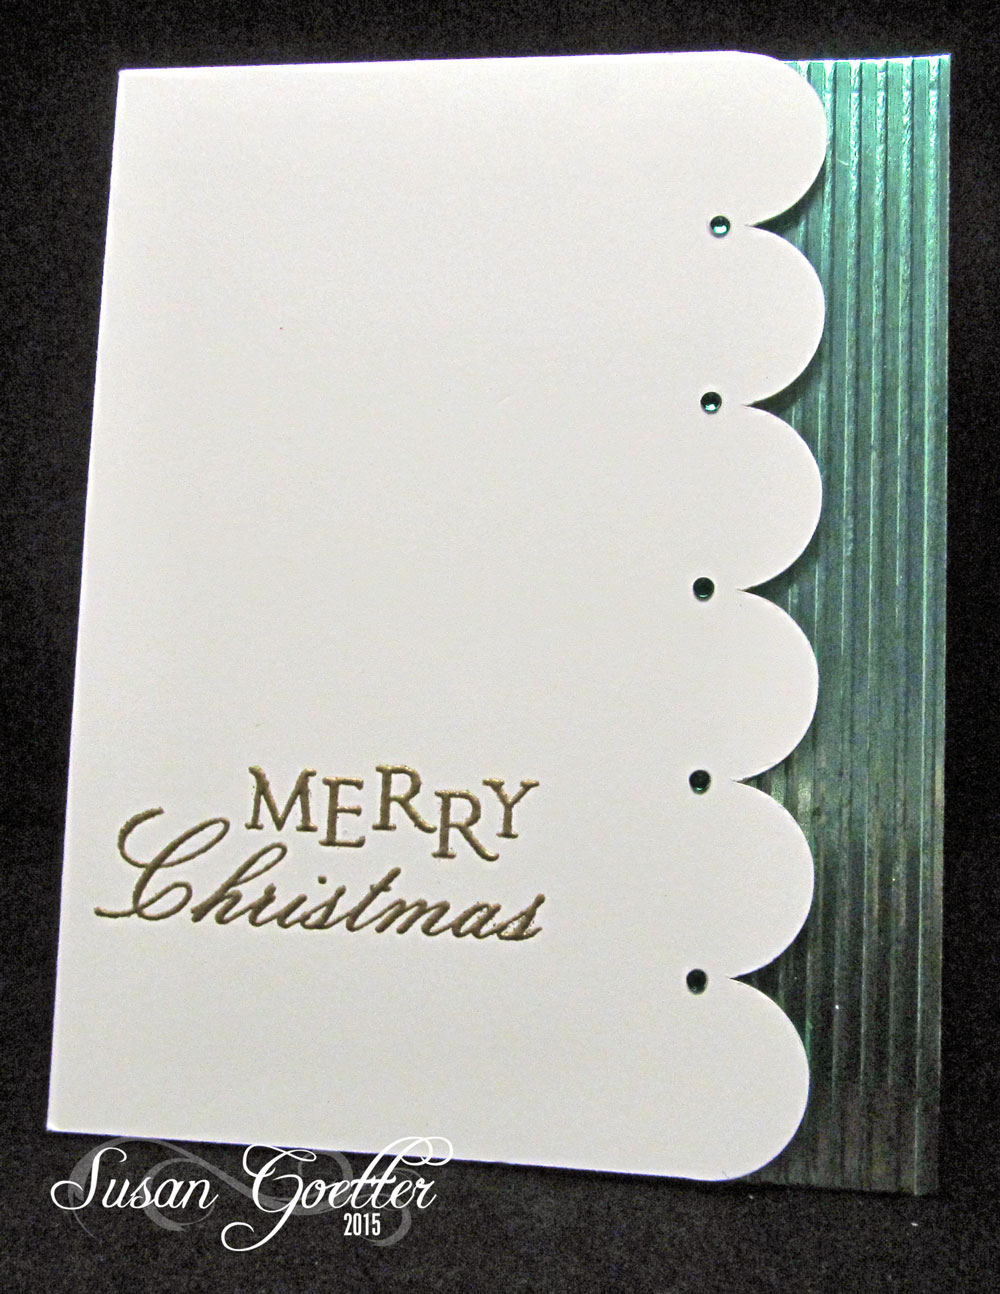
I cut the scalloped edge with the Cameo.  I scored some shiny green card stock at 1/8 inch intervals and adhered it directly to the card base.  I stamped the sentiment from SU and heat embossed it in gold.  I added small green bling pieces at the point of each scallop and then popped the scalloped panel over the shiny green scored piece with fun foam. Super quick and easy!


On this second card, I cut the tree (Impression Obsession) from shiny green card stock, adhered it to a white card base, then added a few small sequins for ornaments. The star is also a die from Impression Obsession and is cut in shiny silver card stock. The sentiment is heat embossed in silver and is a stamp from Paper Smooches. I rounded the bottom corners of the card.


I'm not sure what look I was going for in this card, but it didn't quite turn out like I had envisioned it. I cut the diamond shapes from silver shiny card stock and adhered the diamonds to some copper foil card stock.  Then I cut out a Spellbinder ornament shape. The sentiment is dies from Tim Holtz and was cut in the white panel and also from the copper card stock. I then pieced the copper letters back into the white card panel.  I added some copper lines around the edges of the panel and popped it up on the card base with fun foam.

I still think I like the first one best....which is your favorite? (and can I just say...photographing this shiny card stock is very difficult!!)


Thanks so much for taking the time to stop by for a visit!  Hope you'll come back soon!  Your comments are greatly appreciated! Until next time...
Photobucket


Pin It!

Friday, September 25, 2015

Online Card Class - Watercolor Exploring Mediums

I've thoroughly enjoyed the Online Card Class - Watercolor Exploring Mediums.  I've made a couple of cards from techniques shown in this class...and without further ado...here we go!

I have to say I LOVE how this card came out.  Jennifer Rzasa showed us how simple it was to "draw" our own image and watercolor it....and I'm amazed!


This card came out SO much better than I thought it would!  I will admit that I painted it twice.  The original is on the back of this finished panel.  I didn't like the feet and legs of the first bird.  Don't know if I could ever duplicate this card again...but I sure was happy with the end results.  The sentiment is from Winnie & Walter.  The flamingo was painted with Inktense watercolor pencils as was the "ground" at his feet.  I also used the pencils to flick splatters on the background.  I cut the painted panel down a bit and added a matching pink mat behind it then adhered it to a white card base.


I struggled with this one a little bit.  I stamped my flowers in Versamark and heat embossed them in white.  The flowers are the poppies from SU.  I ended up with half flowers on the left hand side and it didn't really look right, so I trimmed that side off a bit, cutting around some of the blooms and letting them hang off the edge.  The sentiment could have been stamped a little better...but I decided to leave it as it since I went to so much trouble to paint the flowers!  I needed something to make the front panel wide enough since I trimmed so much of it off, so I stamped some white card stock with a linen background stamp, trimmed it to fit the length of the panel and then added a small strip of black between the water colored piece and the linen background.  I think it's kind of growing on me now and I like it much better.

This was a great class, as are all of the Online Card Classes.  If you haven't taken any of these classes, you really should give them a try. I learn something new in every class!

Thanks so much for taking the time to stop by for a visit!  Hope you'll come back soon!  Your comments are greatly appreciated! Until next time...
Photobucket


Pin It!

CASology #165 - Circles & Simon Says Wednesday Challenge

The cue word at CASology this week is circles.   The challenge at the Simon Says Wednesday Challenge is to make a card with NO designer paper...so I believe this fits the bill for that challenge too!

Simon Wednesday Challenge Blog

I think I was putting this card together in my dreams...and it turned out just like I dreamed it did! 


I used the SSS stitched circles dies to cut concentric circles and then put them back together like a puzzle into the white card panel.  The "best" is a some of my NBUS that just happened to be the same size as the center blue piece.  I cut the "best" out 4 times and layered it for dimension then adhered it over the blue circle.  The rest of the sentiment is from SSS collection called Best Hugs (also NBUS!) which I stamped in Versamark on black then heat embossed in white. The embossed sentiment sections were popped up with some foam tape. I added some fun foam behind the panel and adhered it to a white card base.  The corners were rounded with a 1/4 inch corner chomper.

Thanks so much for taking the time to stop by for a visit!  Hope you'll come back soon!  Your comments are greatly appreciated! Until next time...
Photobucket


Pin It!

Saturday, September 19, 2015

LIM 241 - Technology

The challenge this week at Less is More is really a doozy! I really had to put my thinking cap on for this one! The challenge is to create a card relating to technology!  I know we use technology every day, but how to put that on a card!?

Here's my take...and since it was so difficult for me...I only finished 2 cards!


The image for this first one was cut with the Cameo.  I used part of a cut file from Silhouette called computer buttons.  I cut out the portion for just the pause button, placed it where I wanted it to be on the card, then created the computer generated sentiment and made it curved to fit around the button. Then I printed the sentiment on one side of the card stock and cut the button and tag from the other side of the card stock.  I colored the cut pieces with several shades of green Copics.  I also colored a small piece of card stock with a silver pen to put behind the button and then raised the button off the page with foam tape.  I added a sentiment to the top tab portion of the button with a white Signo pen.
It looked a little plain, so I added a fine line of silver around all four edges of the card base.


For my second card, I thought about how often my grandchildren share their photos with my via Instagram, so I found an Instagram logo pic and created a duplicate to match it in the Silhouette program. I popped the "camera" on fun foam and painted the bottom portion of the camera with clear Wink of Stella.  The sentiment is also from the Silhouette store.  I cut it out 4 times, layered it, then painted the top layer with white Wink of Stella.  I added a few dashed lines around the outer edges of the card base and rounded the corners on the bottom.

Thanks so much for taking the time to stop by for a visit!  Hope you'll come back soon!  Your comments are greatly appreciated! Until next time...
Photobucket


Pin It!

Wednesday, September 16, 2015

CASology 164

This week's challenge at CASology the cue word is umbrella.  I had to think about that one for a bit, then I remembered that I had a Memory Box umbrella die that I'd never even taken out of the package!  I seem to have quite a few unused items in my craft room!  So I dug out my umbrella die and made a couple of cards for the CASology challenge and I think perhaps I'll also put these cards in Darnell's NBUS challenge.


I cut the umbrella in black card stock, then cut it again in red, blue, and yellow.  I cut the sections of the colored umbrellas apart and put them back together on the black umbrella. I colored the handle and the little knob on top with a gold pen, leaving the handle black.  I cut the umbrella out again in a 4 x 5.25 white card stock panel, then put my colored umbrella in the cut out on the white panel.  The sentiment is from PTI.  I clipped the corners with a deco corner chomper.  I backed the white panel with a blue to match the blue on the umbrella and adhered it all to a white card base (and clipping the corner of the card base too).  I also added a few beads of glossy accents to the umbrella.


Since I already had all the pieces of the umbrella cut out I decided to used those leftover pieces to make another umbrella card.  I had to cut another umbrella out of a piece of white card stock, then I inserted the pieced umbrella back into the opening.  The sentiment is from Flourishes.  I cut this panel down quite a bit, backed it in the blue and centered it on a white card base.  I rounded the bottom corners of the card base and added a thin gold line around the edges with a gold metallic pen.

I couldn't decide which card I liked better, so I'm decided to post both of them.  Which is your favorite?

Thanks so much for taking the time to stop by for a visit!  Hope you'll come back soon!  Your comments are greatly appreciated! Until next time...
Photobucket


Pin It!

Merry Monday #171

The challenge this week at Merry Monday is to make the sentiment the focus of your card.

I had fun creating this card.  I used my Cameo to design a word "tree".


I cut the word tree from white card stock, removed it from the cutting mat and colored the tree green with two shades of Copics and the trunk was colored with browns.  I then carefully removed the white card stock from the cutting mat and put some score tape across the opening on the back side before reinserting the word tree back into the white.  Of course, you know there were lots of little pieces from between the letters that had to be put back in the puzzle too.  I just left them on the cutting mat until I was ready to put them back together with the rest of the tree.  That made it much easier to figure out where all those little pieces went and it also meant that I wouldn't lose one!  I used the font Bebas Neue for the letters in the tree.  When everything was put back together, I added a few pieces of red bling to the tree.  I put some score tape on the top edges of my card base, coated it with green glitter and burnished it in well so that I could have a glittery edge to the card.  I popped the tree panel over the green glittered card base using fun foam.

Thanks so much for taking the time to stop by for a visit!  Hope you'll come back soon!  Your comments are greatly appreciated! Until next time...
Photobucket


Pin It!

Tuesday, September 15, 2015

One Layer Simplicity Challenge & LIM 241

Got another twofer for you today...This card works for both the LIM 241 (wishing) challenge and the One-Layer Simplicity Challenge.

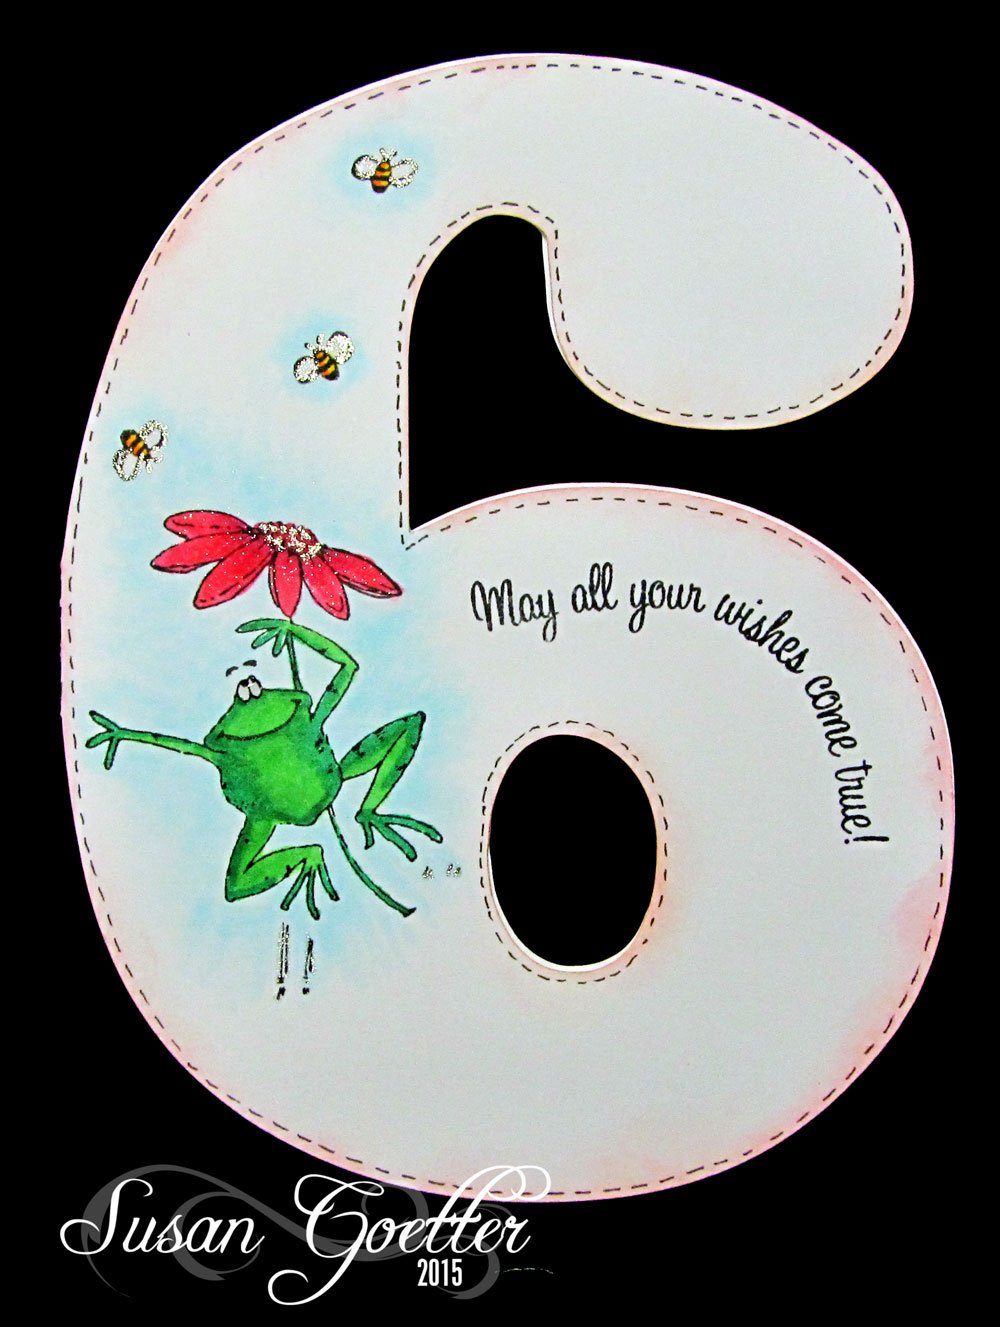
I have a granddaughter who will soon be turning 6, so I made this card just for her.


I made the card shape with my Silhouette and welded the number 6 back to back so that it would have a fold on the left hand side.  I stamped the frog (Penny Black - Toadily) in black memento ink and colored it with Copics.  The sentiment is from a very old Technique Tuesday birthday stamp set. I used my MISTI to get the sentiment to curve around the edge of the six.  I inked up the edges of the six with some pink DI.  The little bees are also from the Penny Black set and I used a clear star glitter pen to highlight the wings of each of the bees.

I've been really busy for the past few days creating a baby shower invitation for the daughter of one of my friends. The design for the invitation is from the Silhouette store. 


I printed the inside of the card (shown below) on my laser printer, then cut the white card base with the cut file from the Silhouette store.  Then I added some black lines on the overall sides and printed out those lines on blue card stock before cutting with the Cameo.  The pocket I designed in the Silhouette program as the original file shows two pockets on the overalls.  I was trying to simplify the piecing.  I added a strip of the dark blue card stock to the top of the pocket, then inserted a red heart into the pocket.  I also cut the dark blue tabs and all the buttons with the Cameo.  It was several hours worth of cutting on the Cameo, but it saved me HOURS (if I had had to cut it all by hand!).


The above left photo is the inside top of the card and the right photo is the shower information. (I blanked out the personal info).

I think they turned out really cute.  I had to make 75 of them so I had to get a great assembly line going with the piecing!  Fun stuff...but glad to be finished with them!

Thanks so much for taking the time to stop by for a visit!  Hope you'll come back soon!  Your comments are greatly appreciated! Until next time...
Photobucket


Pin It!

Thursday, September 10, 2015

CASology - Moon & ATSAM #161

Second post of the day!  I'm on a roll!

The CASology challenge this week is "moon" and Addicted to Stamps and More challenge is one of my favorites...Anything Goes!
                          Addicted to Stamps and More!

First I have my card for the CASology challenge:


I have to admit I was stumped for a bit...but then I found this sentiment from PTI and realized it was perfect...now...what to go with it?  I had a light bulb moment and realized all I needed was a moon! So, I masked off a moon, then inked around it with DI (stormy skies).  I removed the mask and inked up the edges of the moon slightly, then added a few stars with a clear star glitter pen.  I cut the panel with the large rectangle stitched die from SSS and mounted it on the card base using fun foam.  Super quick and easy!

And...this is my card for the ATSAM challenge.


I adore the TH crazy birds stamps and the dies that go with them!  I love how this card turned out!  The bird's wing, eyes, and beak are all cut from a second image and popped up on the original colored image.  I used spray mists for the blue background (okay, okay!..I meant to get this finished so that I could enter it in the LIM challenge LAST week, but totally missed it!).  I used a gold Prisma pen to added a thin gold edge to the blue background and colored the bird with Zig clean color brush pens and water.  The sentiment is from PTI and is embossed in liquid platinum. The blue panel is popped up with fun foam and the bird is adhered directly to the blue background.

Thanks so much for taking the time to stop by for a visit!  Hope you'll come back soon!  Your comments are greatly appreciated! Until next time...
Photobucket


Pin It!

LinkWithin

Related Posts with Thumbnails