Wednesday, April 29, 2009

TUTORIAL - HOW TO JOURNAL IN A CIRCLE

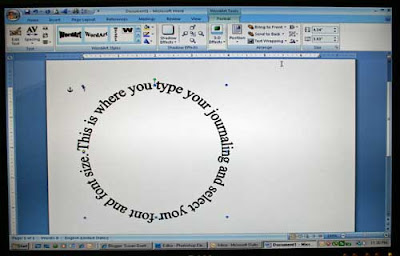
I've had several people ask how to print journaling in a circle, so I thought I’d try to give you a short and hopefully, simple tutorial. I am working in Microsoft Word 2007, but I believe the same features are available in previous versions of Word. 1. In word, open a new document. 2. Click on insert – Word Art – then choose any of the examples shown. For my example I’ve chosen the last on the right – top row. 3. Once you have selected the “style” a new screen will pop up. This is where you will type your journaling and select your font and font size. I’ve used the default font and font size.
4. Click OK and the journaling will be placed in your document and looks like this:
5. In the WordArt Styles section there is an “A” with a drop down box on the right. Click on the down arrow and you will get a selection of styles to chose from. Click on the circle and then grab a corner of the box and drag out your circle. (You may have to play with this part in order to get a true circle) It helps if you have your rulers turned on so that you can see the size of the circle as you stretch out the circle.
6. This is what it will look like when you've selected the circle: Then grab the lower right corner box of the journaling frame and drag it out into a circle.
7. This is your completed “circle journaling” :
8. On this same Word Art format screen, click on: text wrapping - behind text. You’ll notice the little “anchor” on the upper left.
9. Once you have selected the “behind text” and have the little anchor in the upper left corner, those of you who are a little more industrious can add a second circle of journaling inside or outside this one. Here’s all you do. 10. Go back to step 2 and begin again. You will follow all of the same steps. Once you select behind text again, you can move the new circle inside/or outside the first circle.
11. To change the font color, you must select one circle at a time. There are two drop down selections in the WordArt Styles box. One has a pencil on it and the other a paint bucket. Set both to the same color and your journaling will be all one color. The pencil is the “outline” of the letter, and the bucket is the color of the letter.
So, I hope these are easy to follow. My apologies for the quality of my screen photos. I know they aren't the best, but I couldn't get a screen print of each step in my blog entry for some reason, so I resorted to taking a photo of each screen.
After you do it a time or two, it's really not that many steps. I was just trying to take photos of each thing that I did so that it would be (hopefully) a little easier to follow. If you have question, please let me know and I'll help any way I can. I've also saved this as a word document if you would like me to email it to you. Just let me know.
Be sure to let me know if you try it. I'd love to see your layout!
Hugs!
Susan


Pin It!

Tuesday, April 28, 2009

.....Priceless

This is a quick layout that I did a few weeks ago. I wanted to make sure we remembered this fun adventure. Doesn't the swing set look great? It was my idea to put a swing set up in the backyard for the grandchildren. You see, when they all came over to play, there was nothing to do at Grandma's house (except run circles around the pool!). None of the kids are allowed to go in the backyard without an adult, because of the pool. So, that's why I decided we needed a swing set. My husband and I have "discussed" this idea for a couple of years now. Guess who won?!? LOL!! One beautiful Saturday morning in March, I asked my son to go with me to Lowe's to look at swing sets. I thought they would probably cost somewhere in the neighborhood of $400. As you can see my this layout....I was WAY off!!! The checkout clerk at Lowe's graciously accepted my $985 and we headed home with the five BOXES of parts Once we got home with it, and opened a few boxes, I asked my son, " how long do you think it will take us to put this together?" He said, "I think we'll probably finish by 7:oo tonight." bwahahaha!!!! TEN THOUSAND pieces and 3 weeks later...we FINALLY got this (wonderful) swing set together! (I would also like to point out that the directions for this set comes in 4 or 5 different languages - including English - but in general, it was like reading GREEK to me! Plus, if you buy one of these, make SURE to throw away all languages by yours!!!!) I can't tell you how many times I tried to "read" the Spanish version! I was so anxious to see the kids playing on it...now WHY didn't we think to get THREE swings??? I must admit, they really seem to enjoy climbing up to the "fort" on the rock wall, and sliding down the slide. They've even been trying to learn to swing themselves. Just last week, Allen and Jacob were headed out to the swing set, and I asked if they were going to the fort for a "powwow". Allen asked, "what is a powwow?". I explained it to him and he headed off to catch up with Jacob, yelling..."come on, Jacob! We're going to the fort and have a bow wow!" Cracked me up!!! Yep! It's a very entertaining toy...the kids love it...almost as much as they love running around the pool! Thanks for stopping by.... Hugs! Susan


Pin It!

Sunday, March 29, 2009

Trying Some New Things

Here's my first layout from the beach photo shoot with Kimberly's family. I wanted to keep it kind of simple, but I also wanted to try a couple of new things.
I recently purchased the Quickutz Silhouette. I haven't had a lot of time to play with it until this weekend. I found out that I could actually draw my design and then cut it out with the Silhouette! LOVIN' this new toy! I really wanted palm trees for this layout, so I FINALLY got them sketched in the "robo-master" program and saved it as a .gsd file. Let me tell you....I've really learned a LOT this weekend! I made a few mistakes, some things that I'll know not to do the next time.
The sea grass is just very thin strips of paper cut at an angle and adhered to the back of the "sand" base. The sea oats I also cut and then doodled the "oats" on the tips. The sand...now that was a lot of fun. I cut my cardstock in the shape that I wanted, then inked the sand drifts. Then, covered the entire piece with VERY sticky double sided tape. After removing the top of the double sided tape, I coated it with micro beads. Give it an awesome "sand" look! I cut slots for the palm trees to slide into the sand.
The title letters are a font from my computer that I cut at 1/2 inch. I added the journaling strip "between our toes" and finally glued down a few shells.
The clouds were another fun thing I wanted to try. I rounded the end of a makeup sponge, coated it with white ink and just "dabbed" the blue background cardstock for my clouds. The birds are another Silhouette item that I designed. Very simple, but I like the way they turned out.
I really enjoyed putting this together and actually learned a lot in the process. If you have any questions, I'd be happy to answer them.
Thanks so much for stopping by! Come back again soon!
Hugs!!
Susan


Pin It!

Friday, March 27, 2009

Check it out!

Last weekend, my daughter and her family came down for the weekend. She had arranged with out friend(and family photographer), Tim Ludvigsen, to have family photos taken out at Pensacola Beach. Of course, I trailed along with my trusty Rebel XTi in hand, hoping to gain a little more practice and lots more advice from Tim! It should come a no surprise to anyone, but Tim's pics are so incredibly awesome...while mine are...ummmm...okay. Take a minute and check out Tim's awesome blog (and he posted some of his pics of my gorgeous grandchildren!) Tim Ludvigsen's Photography http://timl.bigfolioblog.com/month/mar09 And...for your viewing pleasure, here's a few of the photos I snagged.

Katie is just so photogenic! I love that I caught her in midair! Ah....the sweet innocence of this handsome young man! The surf was absolutely gorgeous on Saturday....and the kids REALLY wanted to get in the water! 100% pure handsome, adorable boy! I think my flash wasn't set properly for this shot....I'm working on it!

Thanks so much for stopping by! Love to hear your comments...at least stop and say hello! LOL!

Hugs!!

Susan


Pin It!

Thursday, March 19, 2009

I Wish.....

When I was a child, every time I said "....I wish", one of my parents would always say..."don't wish your life away". I guess I didn't understand it then, but now when I think about those words, I believe they were trying to tell me to live in this moment and enjoy myself in the here and now. That's a tough concept for a child, and it's still a tough concept for me now. Sometimes during the week (especially a stressful week) I find myself wishing for the weekend. Then when the weekend gets here, I find myself wishing it would last longer. For all the times I said "I wish I was older"....I take it back! Being older just means more responsibility not necessarily more fun! And why is it that you have to get "older" before you understand that concept? With that said...if you had the knowledge you have now when you were a teenager...what (if anything)would you have done differently? And...is it to late to do it? I'd love to hear your thoughts...so SHARE! Hugs! Susan


Pin It!

Friday, February 13, 2009

Practice, Practice, Practice.....

I've had my Canon Rebel XTi for over a year now, and I'm STILL trying to learn how to use it. I know, I know...I've been told all my life that "practice makes perfect"....well, just for the record, that is not technically true. There are quite a few things that I've practiced ad nauseam and STILL have not mastered - anywhere NEAR PERFECT! But I digress...
I have been practicing with my camera...every chance I get. Here are some of my more recent efforts. Two of my children and their children met me down at Bertram Park in Pensacola for a late afternoon photo shoot. Luckily for me, our friend, Tim Ludvigsen (who is a professional photographer) joined us. He gave me several quick lessons on my camera...and I think these are come of the best pics I've taken for a while. Acutally, Tim was the REAL photographer there, I just came along to get in a little practice with my camera AND all the help I could get from Tim. THANKS Tim!!
Thanks so much for stopping by! Hope to see you again soon! Hugs!
Susan


Pin It!

Monday, February 9, 2009

A Recipe for a Great 2009!

Someone sent me this....and I think it could make a difference in my life. What about you? 1. Take a 10-30 minute walk every day. And while you walk, smile. It is the ultimate anti-depressant. 2. Sit in silence for at least 10 minutes each day. Talk to God about what is going on in your life. Buy a lock if you have to. 3. When you wake up in the morning complete the following statement, My purpose is to__________ today. I am thankful for______________. 4. Eat more foods that grow on trees and plants and eat less food that is manufactured in plants. 5. Drink green tea and plenty of water. Eat blueberries, wild Alaskan salmon, broccoli , almonds & walnuts. 6. Try to make at least three people smile each day. 7. Don't waste your precious energy on gossip, energy vampires, issues of the past, negative thoughts or things you cannot control. Instead invest your energy in the positive present moment. 8. Eat breakfast like a king, lunch like a prince and dinner like a college kid with a maxed out charge card. 9. Life isn't fair, but it's still good. 10. Life is too short to waste time hating anyone. 11. Don't take yourself so seriously. No one else does. 12. You are not so important that you have to win every argument. Agree to disagree. 13. Make peace with your past so it won't spoil the present. 14. Don't compare your life to others. You have no idea what their journey is all about. 15. No one is in charge of your happiness except you. 16. Frame every so-called disaster with these words: In five years,will this matter? 17. Forgive everyone for everything. 18. What other people think of you is none of your business. 19. GOD heals everything - but you have to ask Him. 20. However good or bad a situation is, it will change. 21. Your job won't take care of you when you are sick. Your friendswill. Stay in touch!!! 22. Envy is a waste of time. You already have all you need. 23. Each night before you go to bed complete the following statements: I am thankful for__________. Today I accomplished_________. 24. Remember that you are too blessed to be stressed. 25. When you are feeling down, start listing your many blessings. You'll be smiling before you know it.


Pin It!

Sunday, February 1, 2009

How Do You Spend Your Time?

Since I spend my working hours in banks, this really hit home for me. I've seen this little article several times. The older I get the faster time flies....so I leave this for you to ponder. Oh, and Enjoy your day! There is a bank that credits your account each morning with $86,400. It carries over no balance from day to day. Every evening deletes whatever part of the balance you failed to use during the day. What would you do? Draw out ALL OF IT, of course! Each of us has such a bank. Its name is TIME. Every morning, it credits you with 86,400 seconds. Every night it writes off, as lost, whatever of this you have failed to invest to good purpose. It carries over no balance. It allows no overdraft. Each day it opens a new account for you. Each night it burns the remains of the day. If you fail to use the day's deposits, the loss is yours. There is no going back. There is no drawing against the "tomorrow." You must live in the present on today's deposits. Invest it so as to get from it the utmost in health, happiness, and success! The clock is running. Make the most of today. To realize the value of ONE YEAR, ask a student who failed a grade. To realize the value of ONE MONTH, ask a mother who gave birth to a premature baby. To realize the value of ONE WEEK, ask the editor of a weekly newspaper. To realize the value of ONE HOUR, ask the lovers who are waiting to meet. To realize the value of ONE MINUTE, ask a person who missed the train. To realize the value of ONE SECOND, ask a person who just avoided an accident. To realize the value of ONE-TENTH OF A SECOND, ask the person who won a silver medal in the Olympics. Treasure every moment that you have! And treasure it more because you shared it with someone special. And remember that time waits for no one. Yesterday is history. Tomorrow is a mystery. Today is a GIFT. That's why it's called the present!


Pin It!

Monday, January 26, 2009

I've Been Tagged!

I don't get tagged often, but this week I've been tagged and received a "blog award" from a couple of my friends. So here goes..... The tag from Vel... Here are the rules: 1. Go to the section of your computer where you store all of your photos. 2. Select the 6th folder. 3. Select the 6th photo from that folder. 4. Post and explain about that picture. 5. Tag 6 other peopleHere are the rules: The date on the sixth folder in my pictures was September 14, 2006. This is a photo of our great grandson Nolan when he was about 2 weeks old. Perhaps I should scrap it! LOL! I will tag Sharon, Julie, Jane, Nicole, Amy, and Patti +++++++++++++++++++++++++++++++++++++++++++++++++

I also received a Fabulous Blog award from Julie and Jane

For some reason, in order to accept this Fabulous Award, I need to list five of my addictions. In no particular order, my addictions:

1. Diet Coke

2. Scrapbooking

3. Reading

4. Chocolate

5. Chocolate....sorry but it really IS an addiction!! LOL!

And in order to pass it forward, I'm nominating the following individuals for the Fabulous Award:

1. Pam

2. Sharon

3. Nicole

4. Amy

5. Patti


Pin It!

Tuesday, January 6, 2009

January Kit Work

Thanks for stopping by my blog. As usual, I'm a hit and miss kind of blogger. I really do intend to keep it up, but somehow I just keep shifting my blog to the back of the burner. So...hopefully, I can begin 2009 with a better record of blogging that in the past! Here's my layouts using the main kit from My Creative Scrapbook
This is my beautiful granddaughter Katie. She had just lost her front teeth and we tried everything to get her to give us a BIG smile....but she was wise to us! LOL! My daughter and her son with such happy smiles! I used a lot of sparklies on this layout. I roughed up the edges of the papers a bit too.
I really had fun with this card. I used my quickutz for the branch. The flowers are a paper shapers punch and the butterfly is stamped. I cut the butterfly out and added LOTS of glitter!
Well, now I'm off to do some "real" work...gotta keep that paycheck coming in so I can afford all my scrappy goodies!
Thanks a bunch for stopping by!
XOXO
Susan


Pin It!

LinkWithin

Related Posts with Thumbnails